35 posts tagged with "features"

View All Tags

Connectors now route automatically, attach neatly and label easily

· 7 min read

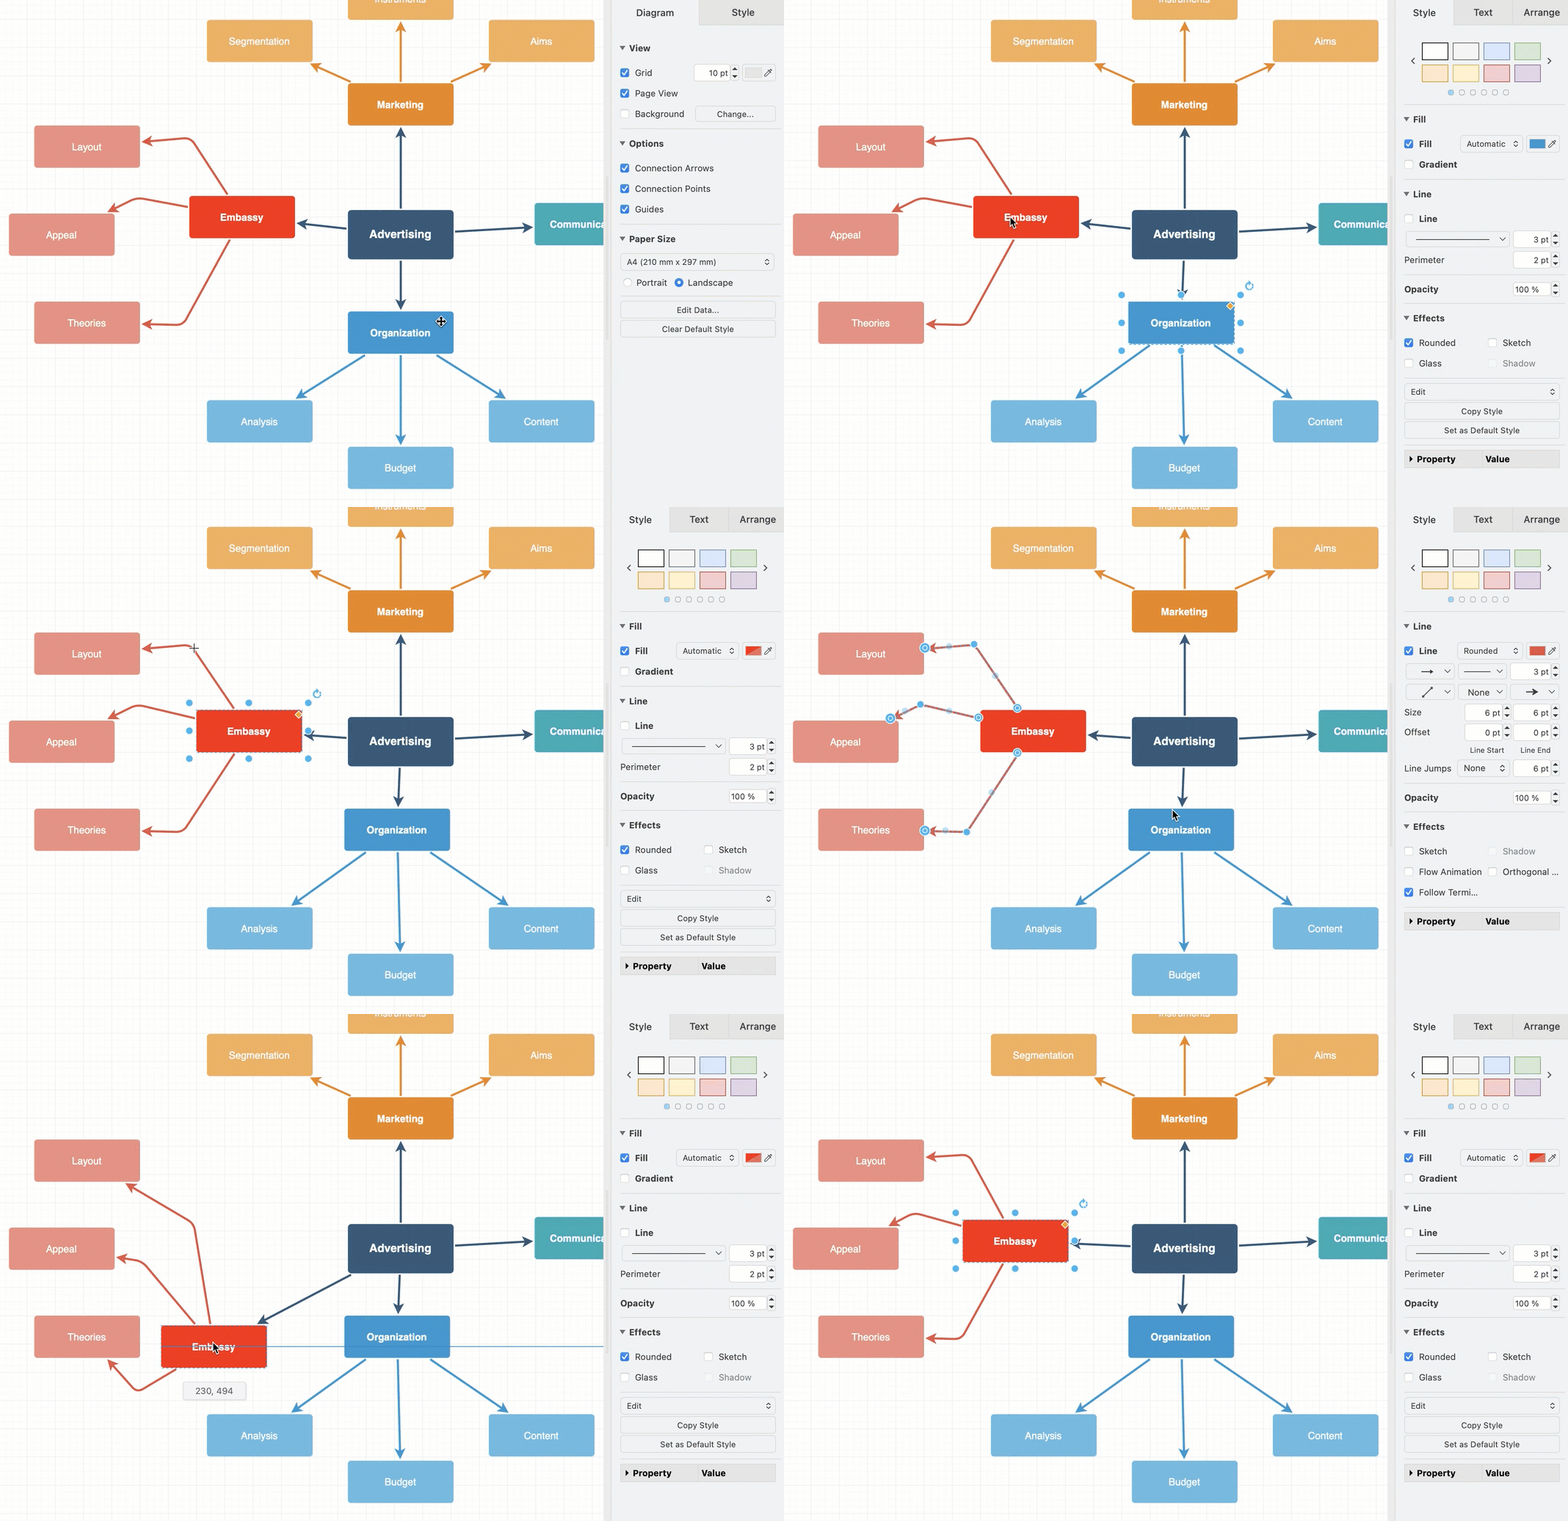
Connectors in draw.io can now automatically route around shapes and will update their paths whenever you move, rotate or resize any elements in your diagram. When you now attach connectors to shapes with rounded corners, they will attach neatly to the line and not to the squared perimeter.

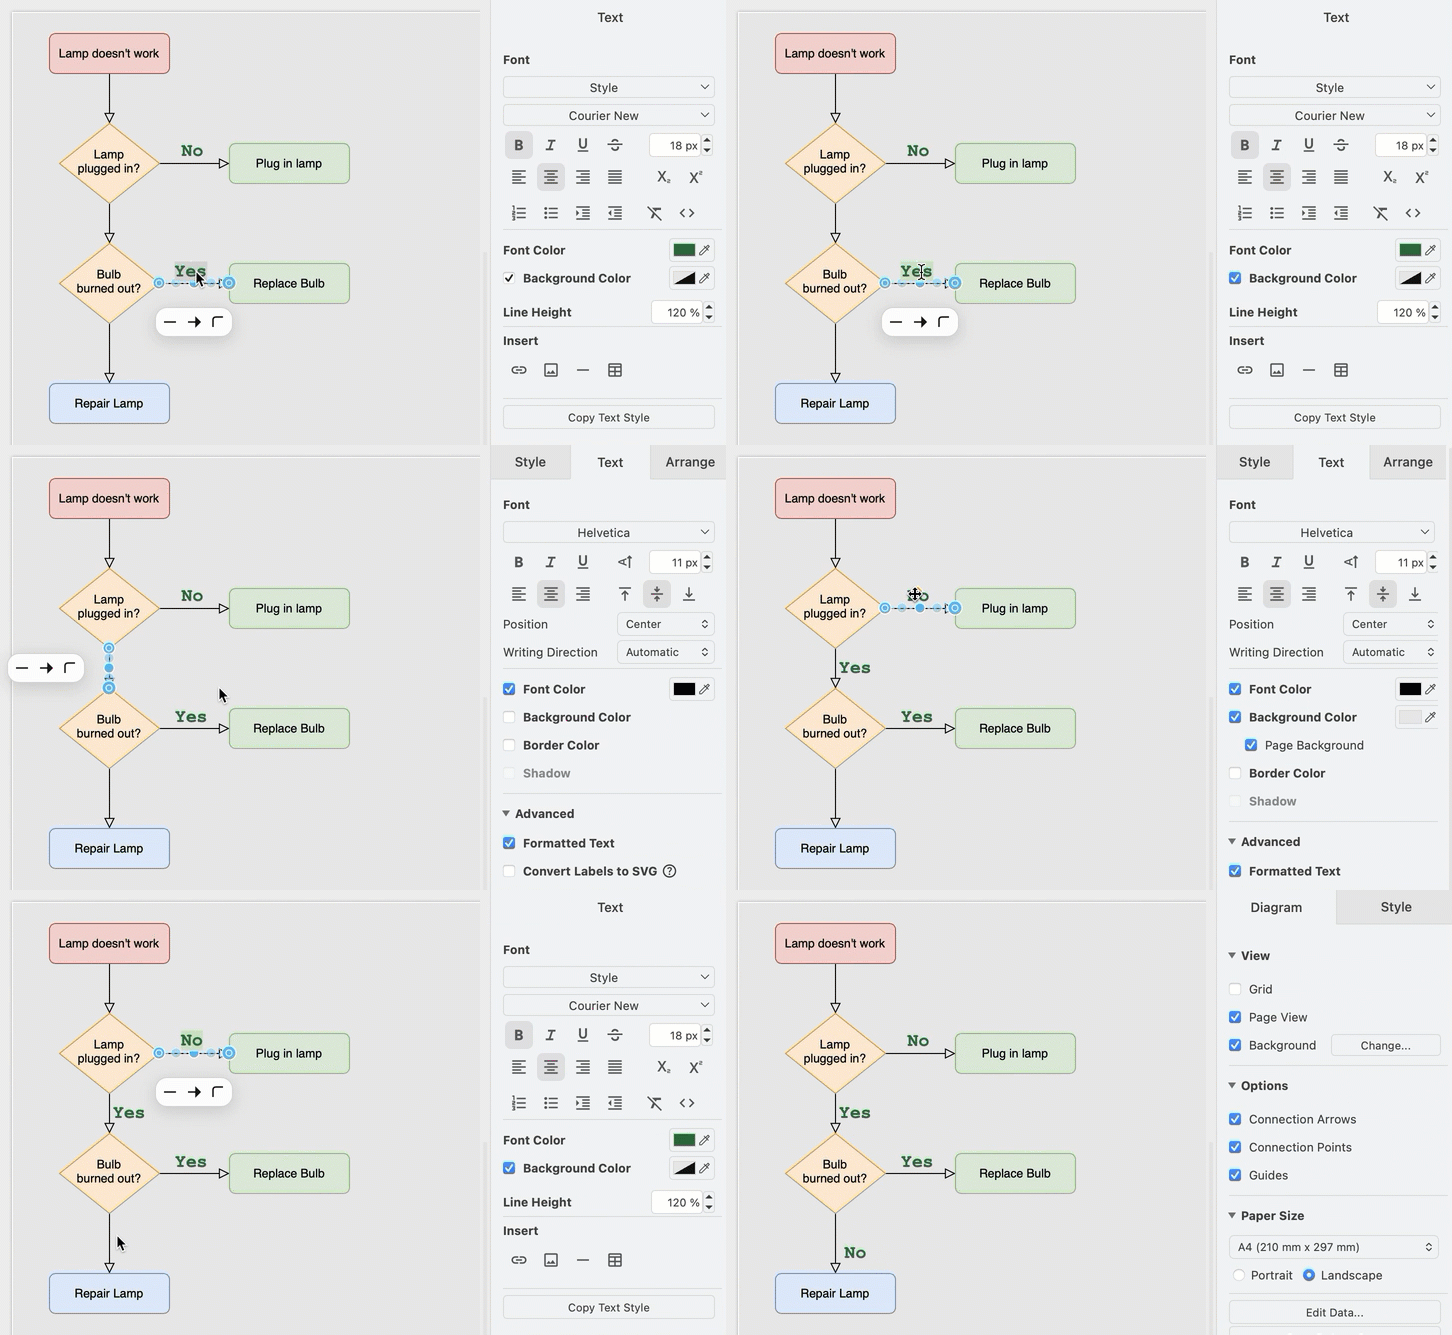
Labels have also been improved - drag and drop a text element from the shape library onto a connector to add a label, copy and paste connector labels, and set label backgrounds to use the coloured page background (if set).

Connector paths update automatically​

Manually repositioning connectors to make your diagram more readable is one of the more time-consuming tasks. Use auto-routing to ensure connectors neatly avoid shapes on the canvas, and Follow Terminals to move connector waypoints with their connected shapes.

Route connectors around shapes​

Auto-routed connectors follow a path using right-angled bends that never overlap another shape.

  1. Select one or more connectors.
  2. Click Waypoints in the Style tab of the format panel.
  3. Select Auto-route around shapes.

The connector will automatically draw a new path whenever you move, resize, align, distribute or rotate a connected shape, move a shape onto or off its path, or apply a layout. While you drag a shape, a preview will show the new path of each auto-routed connector.
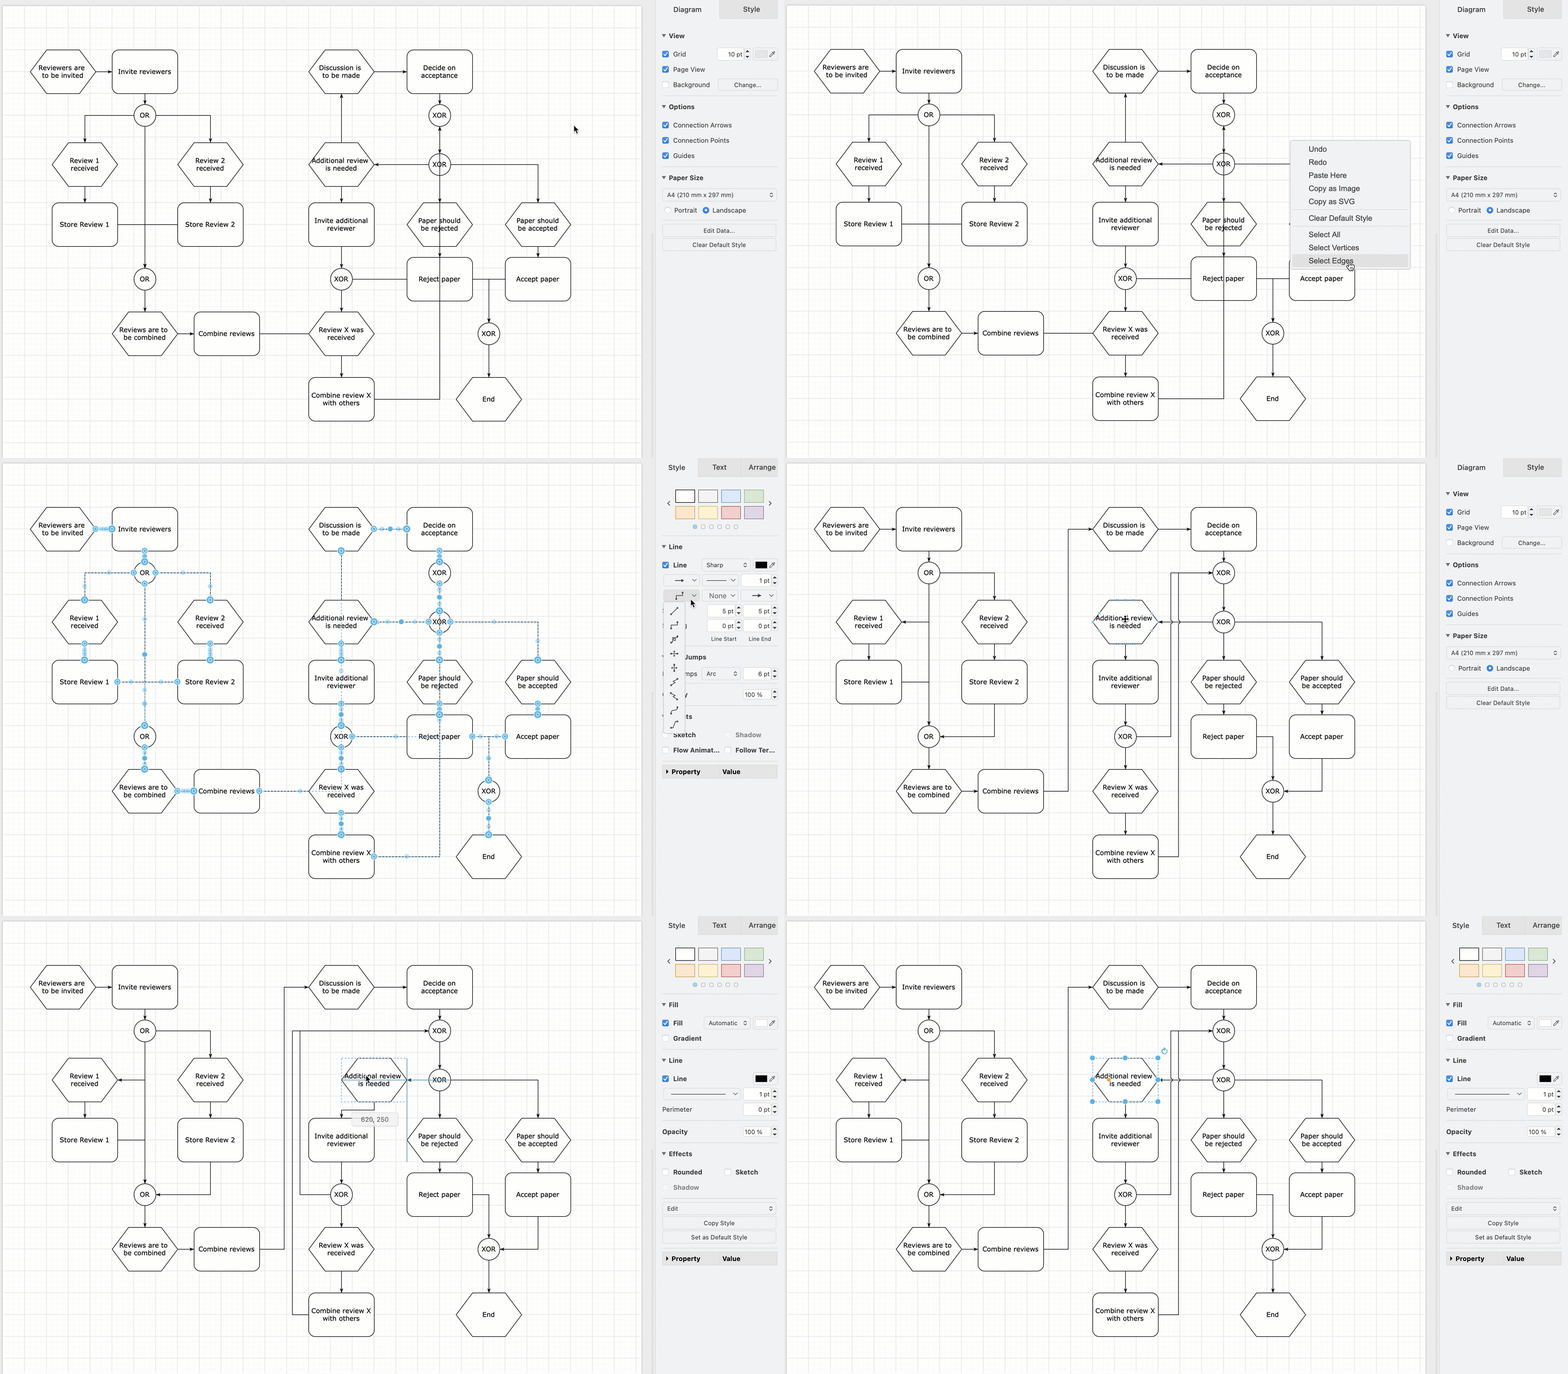
Auto-route selected connectors around shapes by selecting the waypoint style in the Style tab

Drag the connector to set its path by hand and disable auto-routing for that connector. Learn more about auto-routing connectors.

Note: Diagrams generated by AI using the draw.io MCP server can also use auto-routed connectors.

Move waypoints with the connected shapes​

Waypoints normally stay in place when you move a connected shape, which can result in long and convoluted connector paths. Turn on Follow Terminals to move the connector waypoints with the shapes instead.

  1. Select the connector.
  2. Open the Effects section in the Style tab of the format panel.
  3. Select the Follow Terminals checkbox.
    Enable the Follow Terminals checkbox to move the waypoints of a connector when you move a connected shape

The connector's path will now move with its connected shapes as you move, resize or arrange them. Orthogonal connectors retain their right-angled bends and waypoints in other connector styles will keep their bends. This works well in mind maps and other diagrams where a connector's path is logically determined by its shapes.

Note: Straight connectors have no waypoints, so will not appear to behave differently when Follow Terminals is enabled.

Place waypoints precisely​

Use exact coordinates to line up the bends of several connectors.

  1. Select a connector that has waypoints.
  2. Open the Waypoints section in the Arrange tab of the format panel.
  3. Enter the Left and Top position of each waypoint.
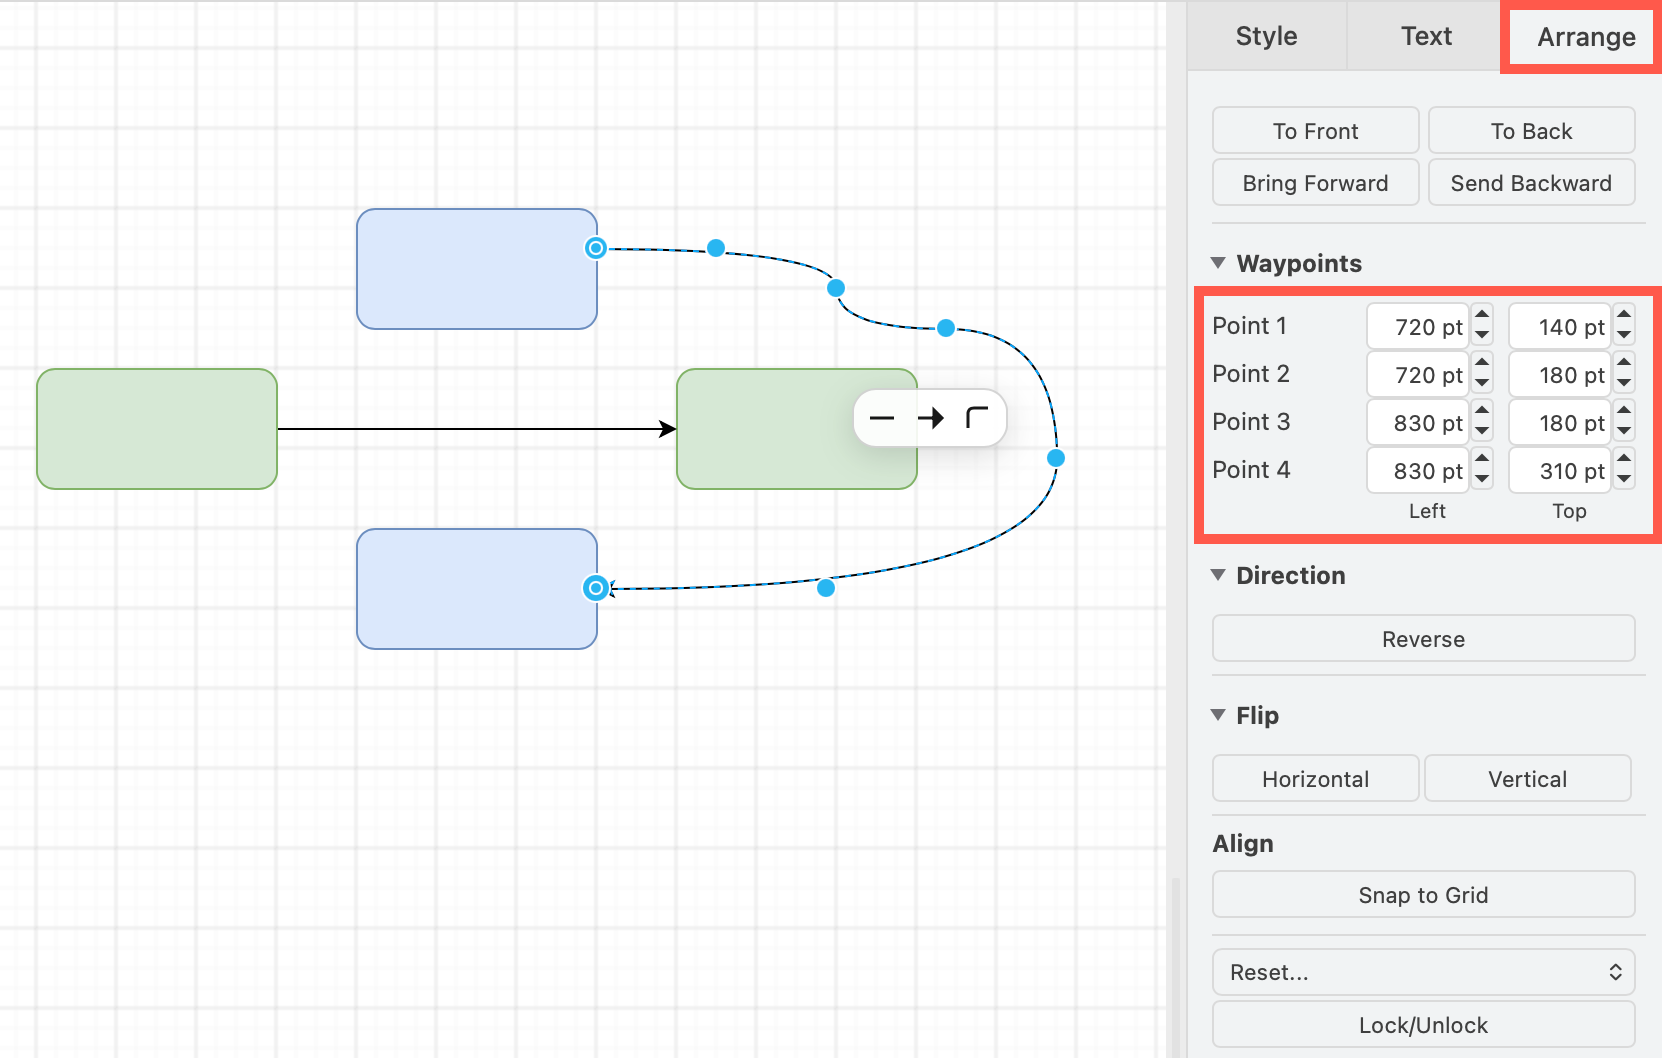
    Set exact positions for each waypoint in the Arrange tab of the format panel

Connectors attach more neatly​

Connector attachment points with arrows or symbols could appear a little messy on shapes with rounded corners. Now, connectors will neatly attach to the curved outline and labels on those connectors will follow these curves. Additionally, the new Orthogonal Ends style, and the 45 degree guide will help you draw neater connectors.

Attach connectors to rounded shapes​

Connectors on the rounded shapes in the General shape library now sit on the curved outline, not offset from the shape outline on its invisible squared corners.

  1. Select or add a shape - any of the simple shapes in the General shape library or that can be added via the double-click shape selection tool.
  2. Select the Rounded checkbox in the Style tab of the format panel.

Rounded Perimeter will be turned on automatically in the shape properties. The connection points and connector ends will then automatically attach to the rounded corners for fixed and floating connectors.
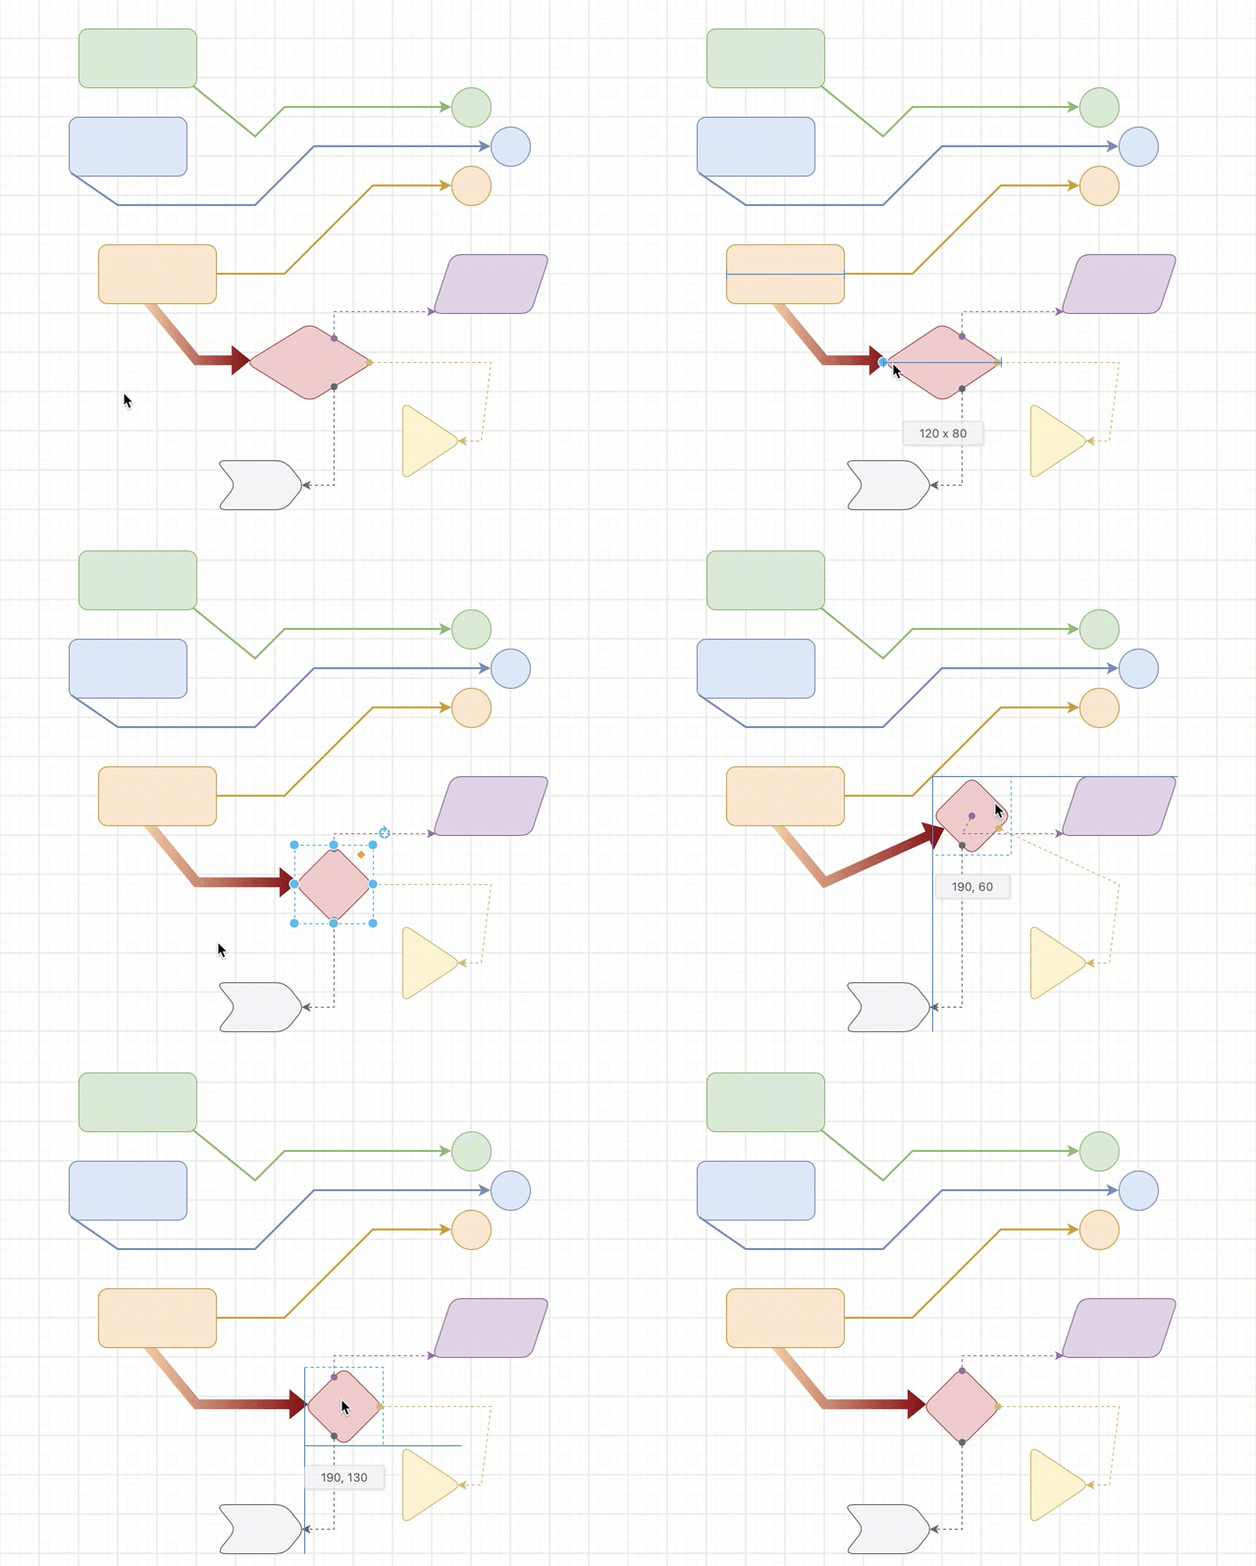
Connectors now will sit on the shape outline when Rounded is enabled in the Style tab, rather than the shape's squared perimeter

Meet shapes at right angles​

Force the ends of a straight or curved floating connector to attach to a source or target shape at a right angle for neater connector arrows.

  1. Select one or more floating connectors.
  2. Select the Orthogonal Ends checkbox in the Effects section in the Style tab of the format panel.
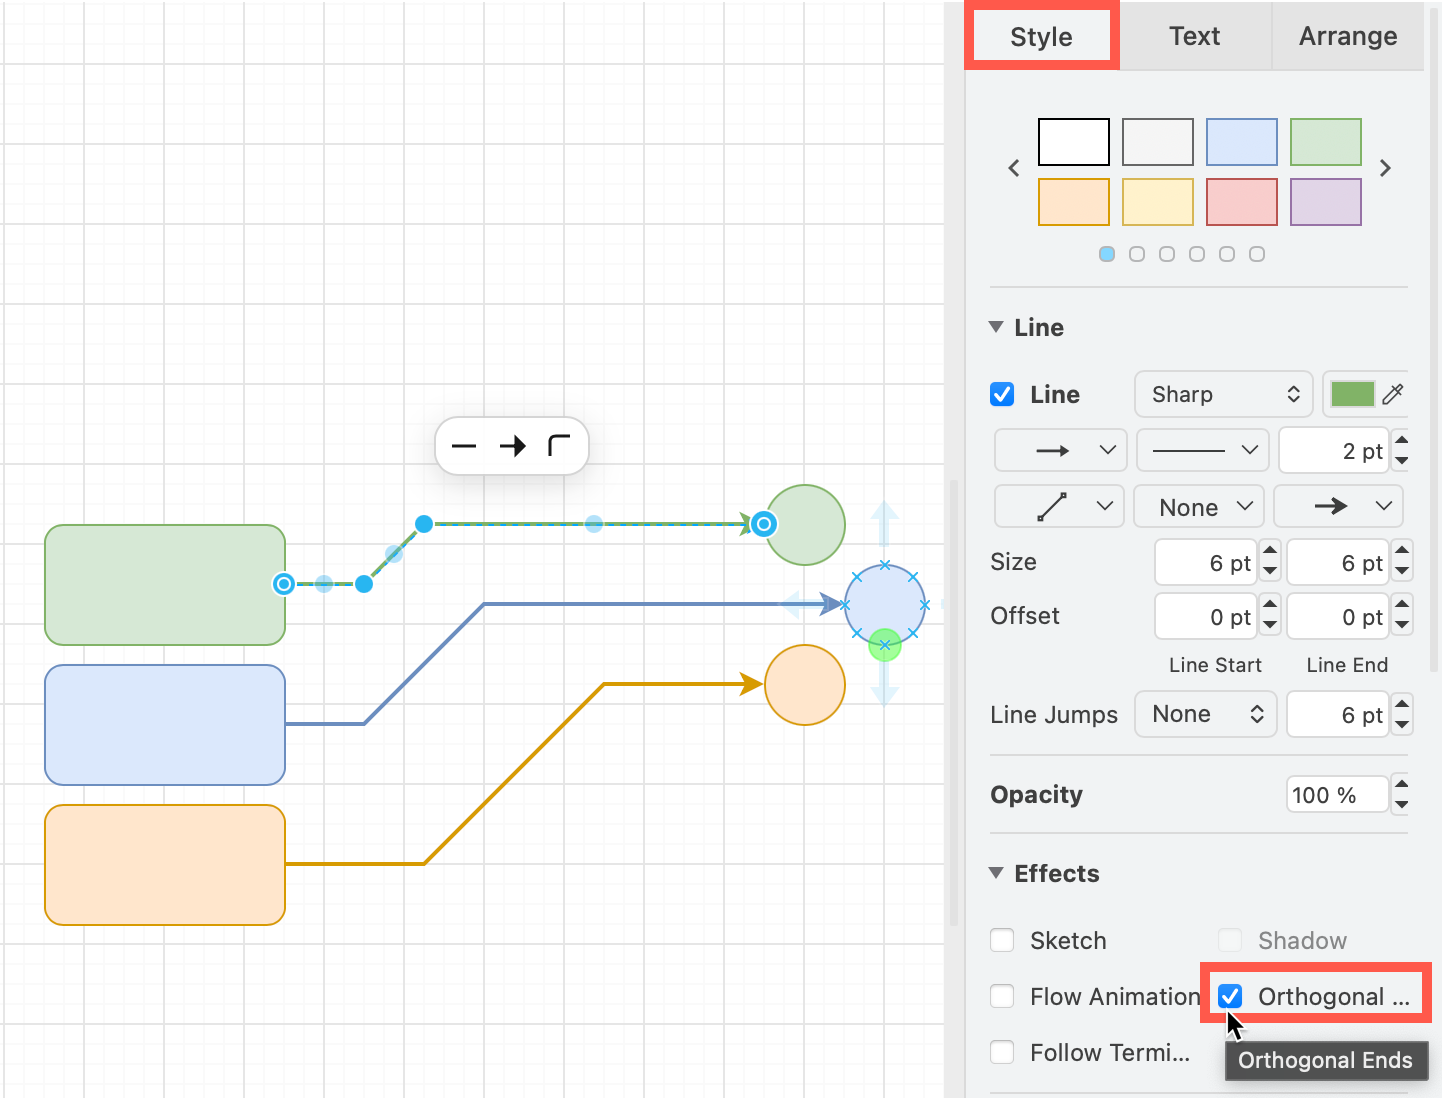
    Style your connector using the options in the Style tab in the format panel on the right in draw.io

Note: This checkbox is only shown when the connector's waypoint style isn't orthogonal or isometric, and both ends are not attached to fixed connection points. Orthogonal connectors always meet shapes at right angles, and isometric connectors always attach at a 30 degree angle through the centre of the shape.

Draw parallel angled connectors​

A 45 degree guide now appears when you drag the waypoints of a connector with the Straight waypoint style. Snap each segment to the guide for neat, parallel and consistent angled connectors throughout your diagram.
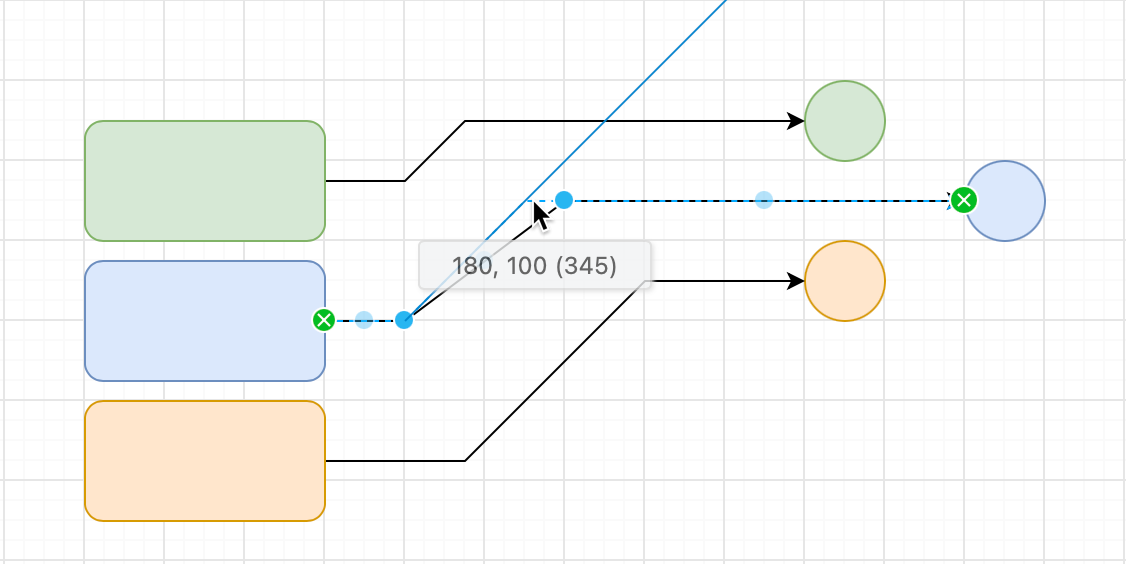
The blue 45 degree guide will be shown (if Guides are enabled) when a connector is close to a 45 degree angle

Improved labels on connectors​

Drop text onto a connector​

Drag a Text shape from the shape library and drop it onto a connector. The text will be added as a label at that point on the connector.
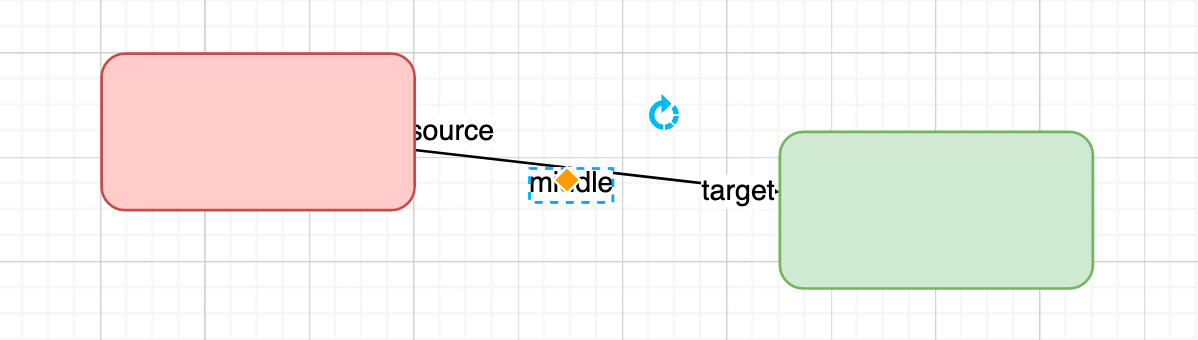
Connectors can have multiple labels - drop a Text shape onto a connector, or double click on it, to add a label at that position

Learn how to label connectors.

Match label backgrounds to the page​

Connector labels typically hide the line behind them with a solid background. On a coloured page, this used to show as a white or black box. Now the label background can use the page background colour instead.

  1. Select the connector.
  2. Open the Text tab in the format panel.
  3. Select Page Background under Background Color.
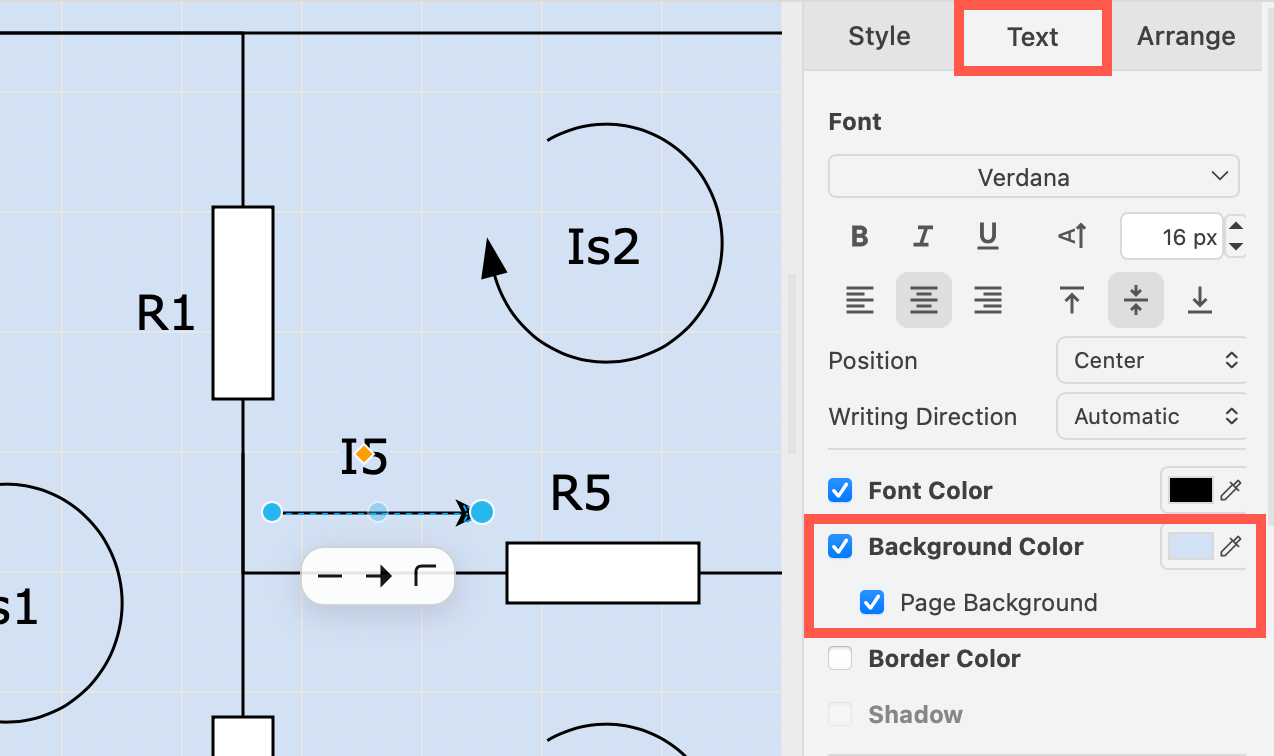
    Set connector labels to use the page background when it is a solid colour - enable the checkbox in the Text tab

Labels with this enabled will also use the page background in dark mode.

Note: On gradient page backgrounds, this will use the first colour of the gradient.

Copy and paste connector labels​

Copy the text of a label, along with its style, size and label background settings with keyboard shortcuts, then paste it on the same or another connector. The label will be pasted under the mouse cursor.

  1. Select a label on a connector.
  2. Copy it with Ctrl+C on Windows, Cmd+C on macOS.
  3. Move the mouse cursor over the connector where you want the new label.
  4. Paste it with Ctrl+V on Windows, Cmd+V on macOS.
    Copy and paste connector labels by selecting the text, then using the keyboard shortcuts Ctrl+C to copy and Ctrl+V to paste

Learn more about working with connectors and connector styles.
draw.io for Confluence Data Center 11

· 6 min read

Atlassian has just released Confluence Data Center 11.0, supported immediately by draw.io 17.0. Your diagrams, boards, embedded diagrams, custom editor configuration, custom templates and libraries will seamlessly carry over when you upgrade.
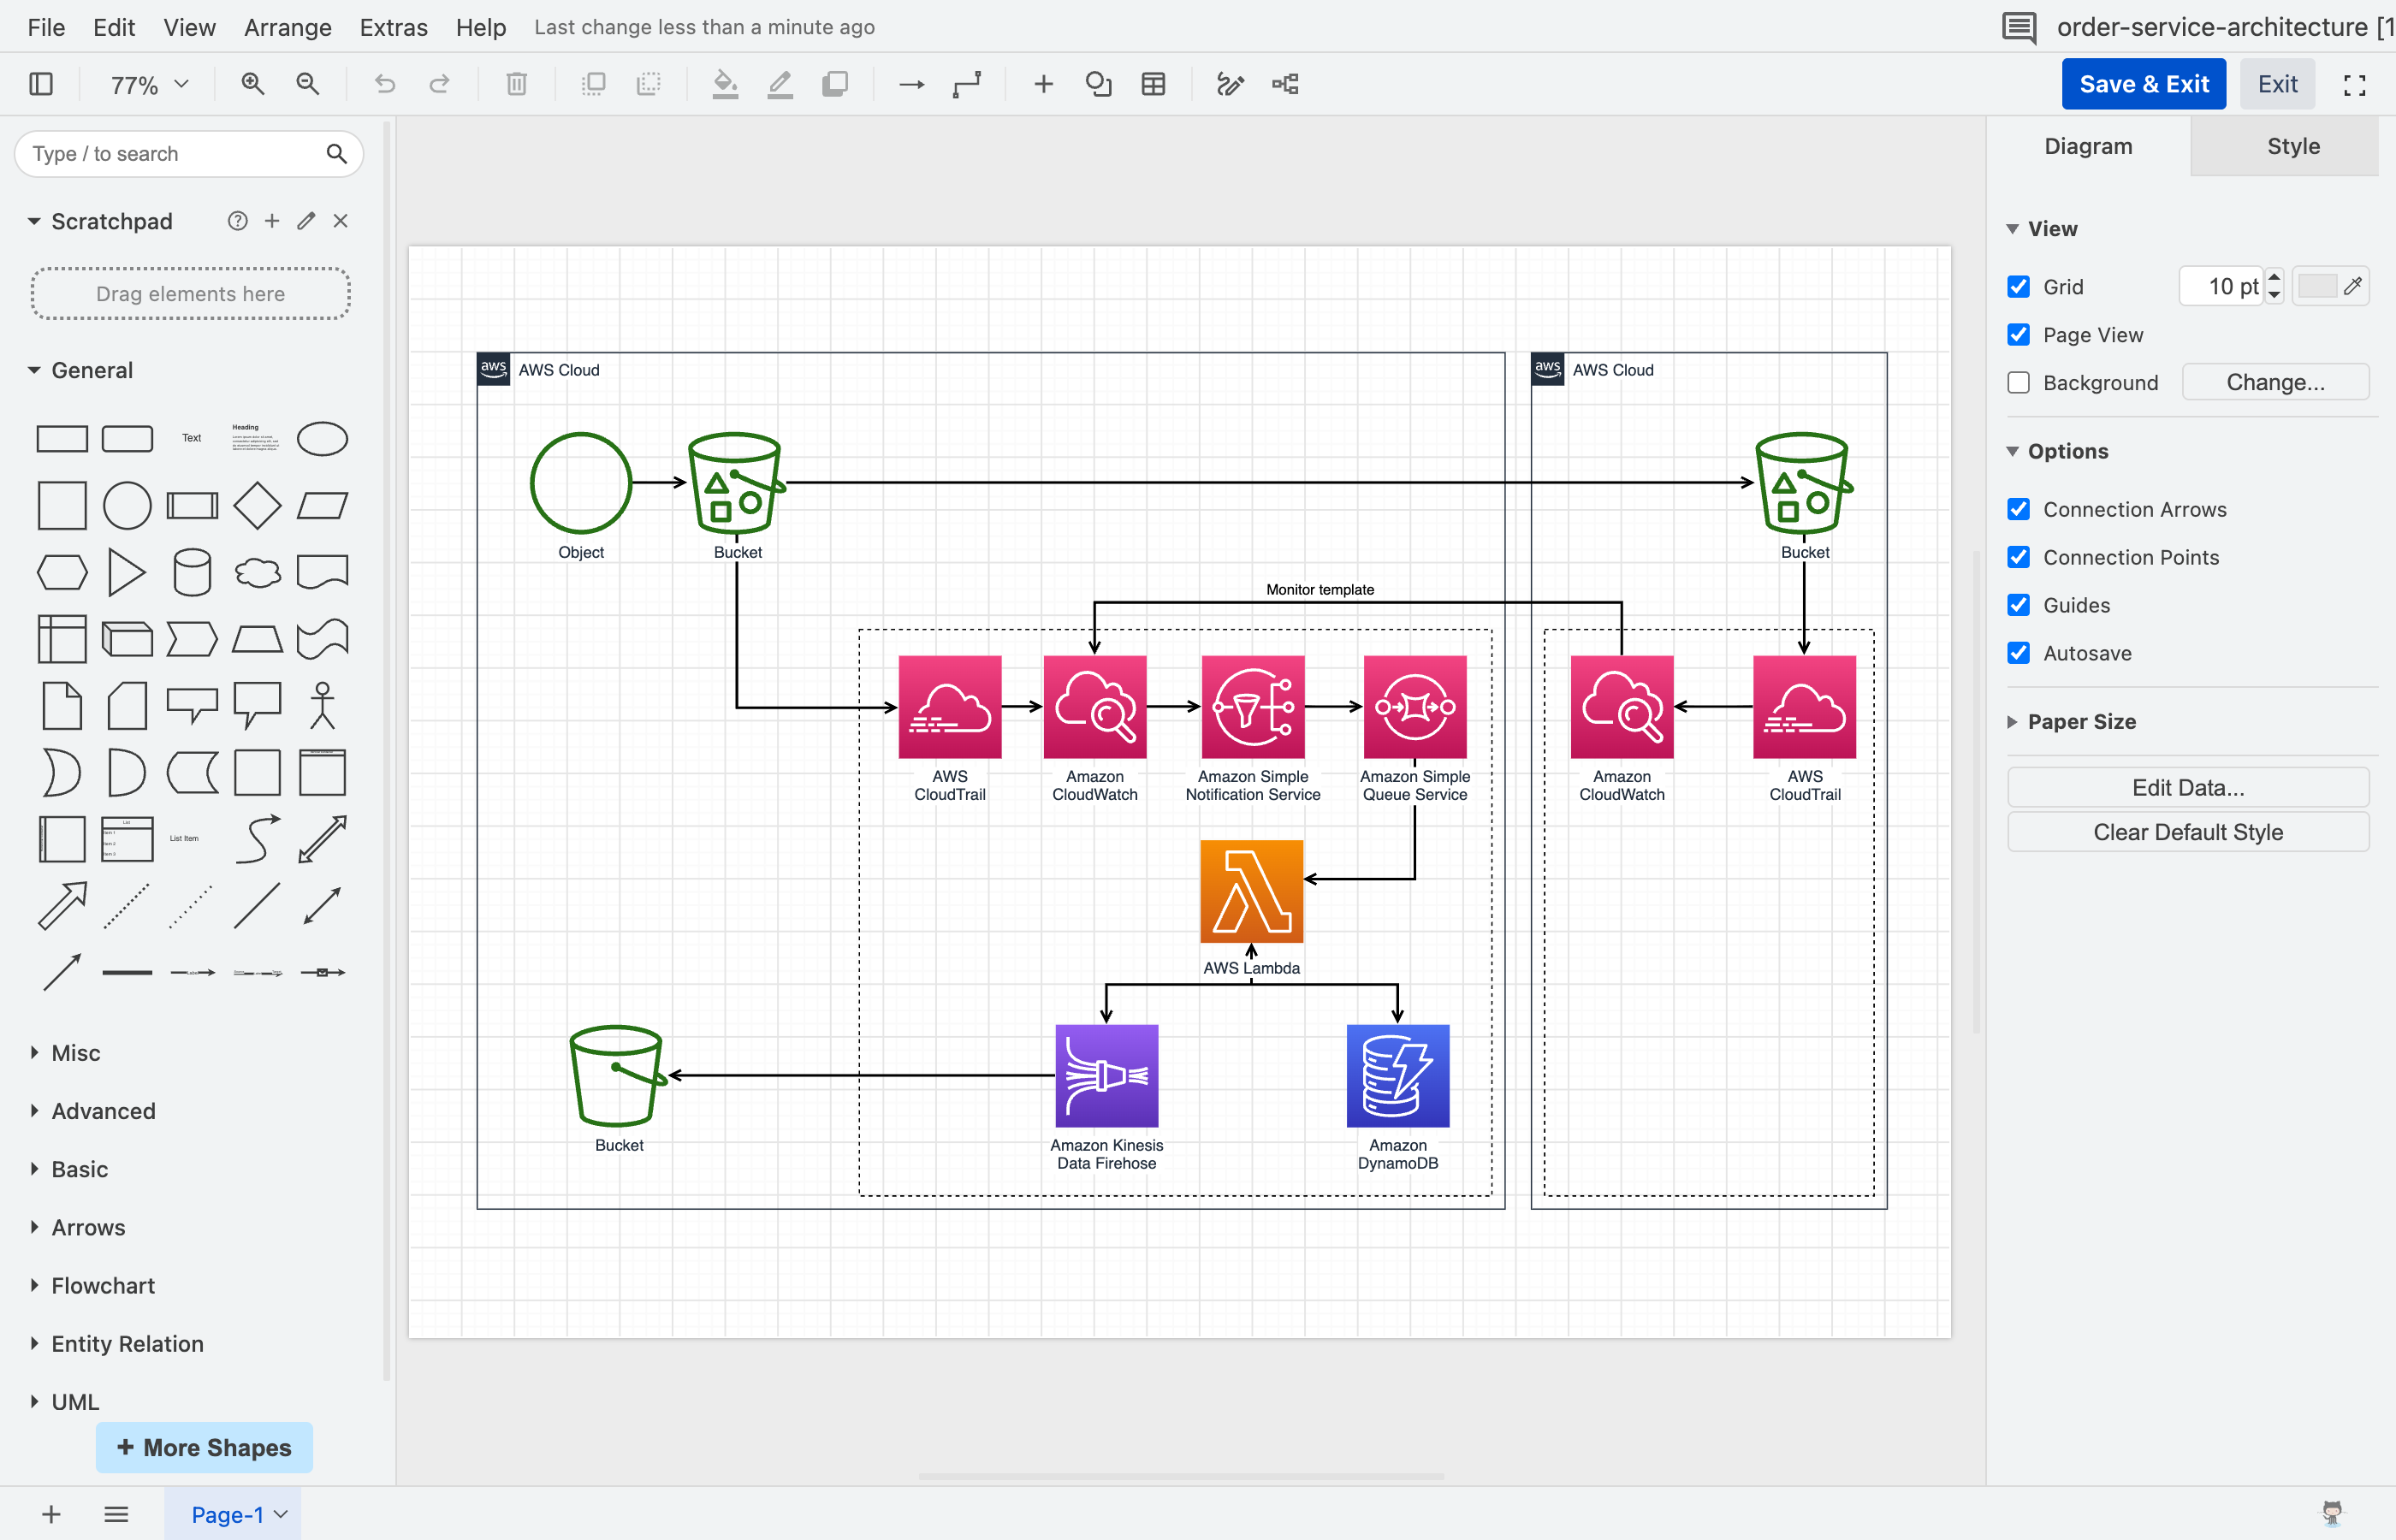
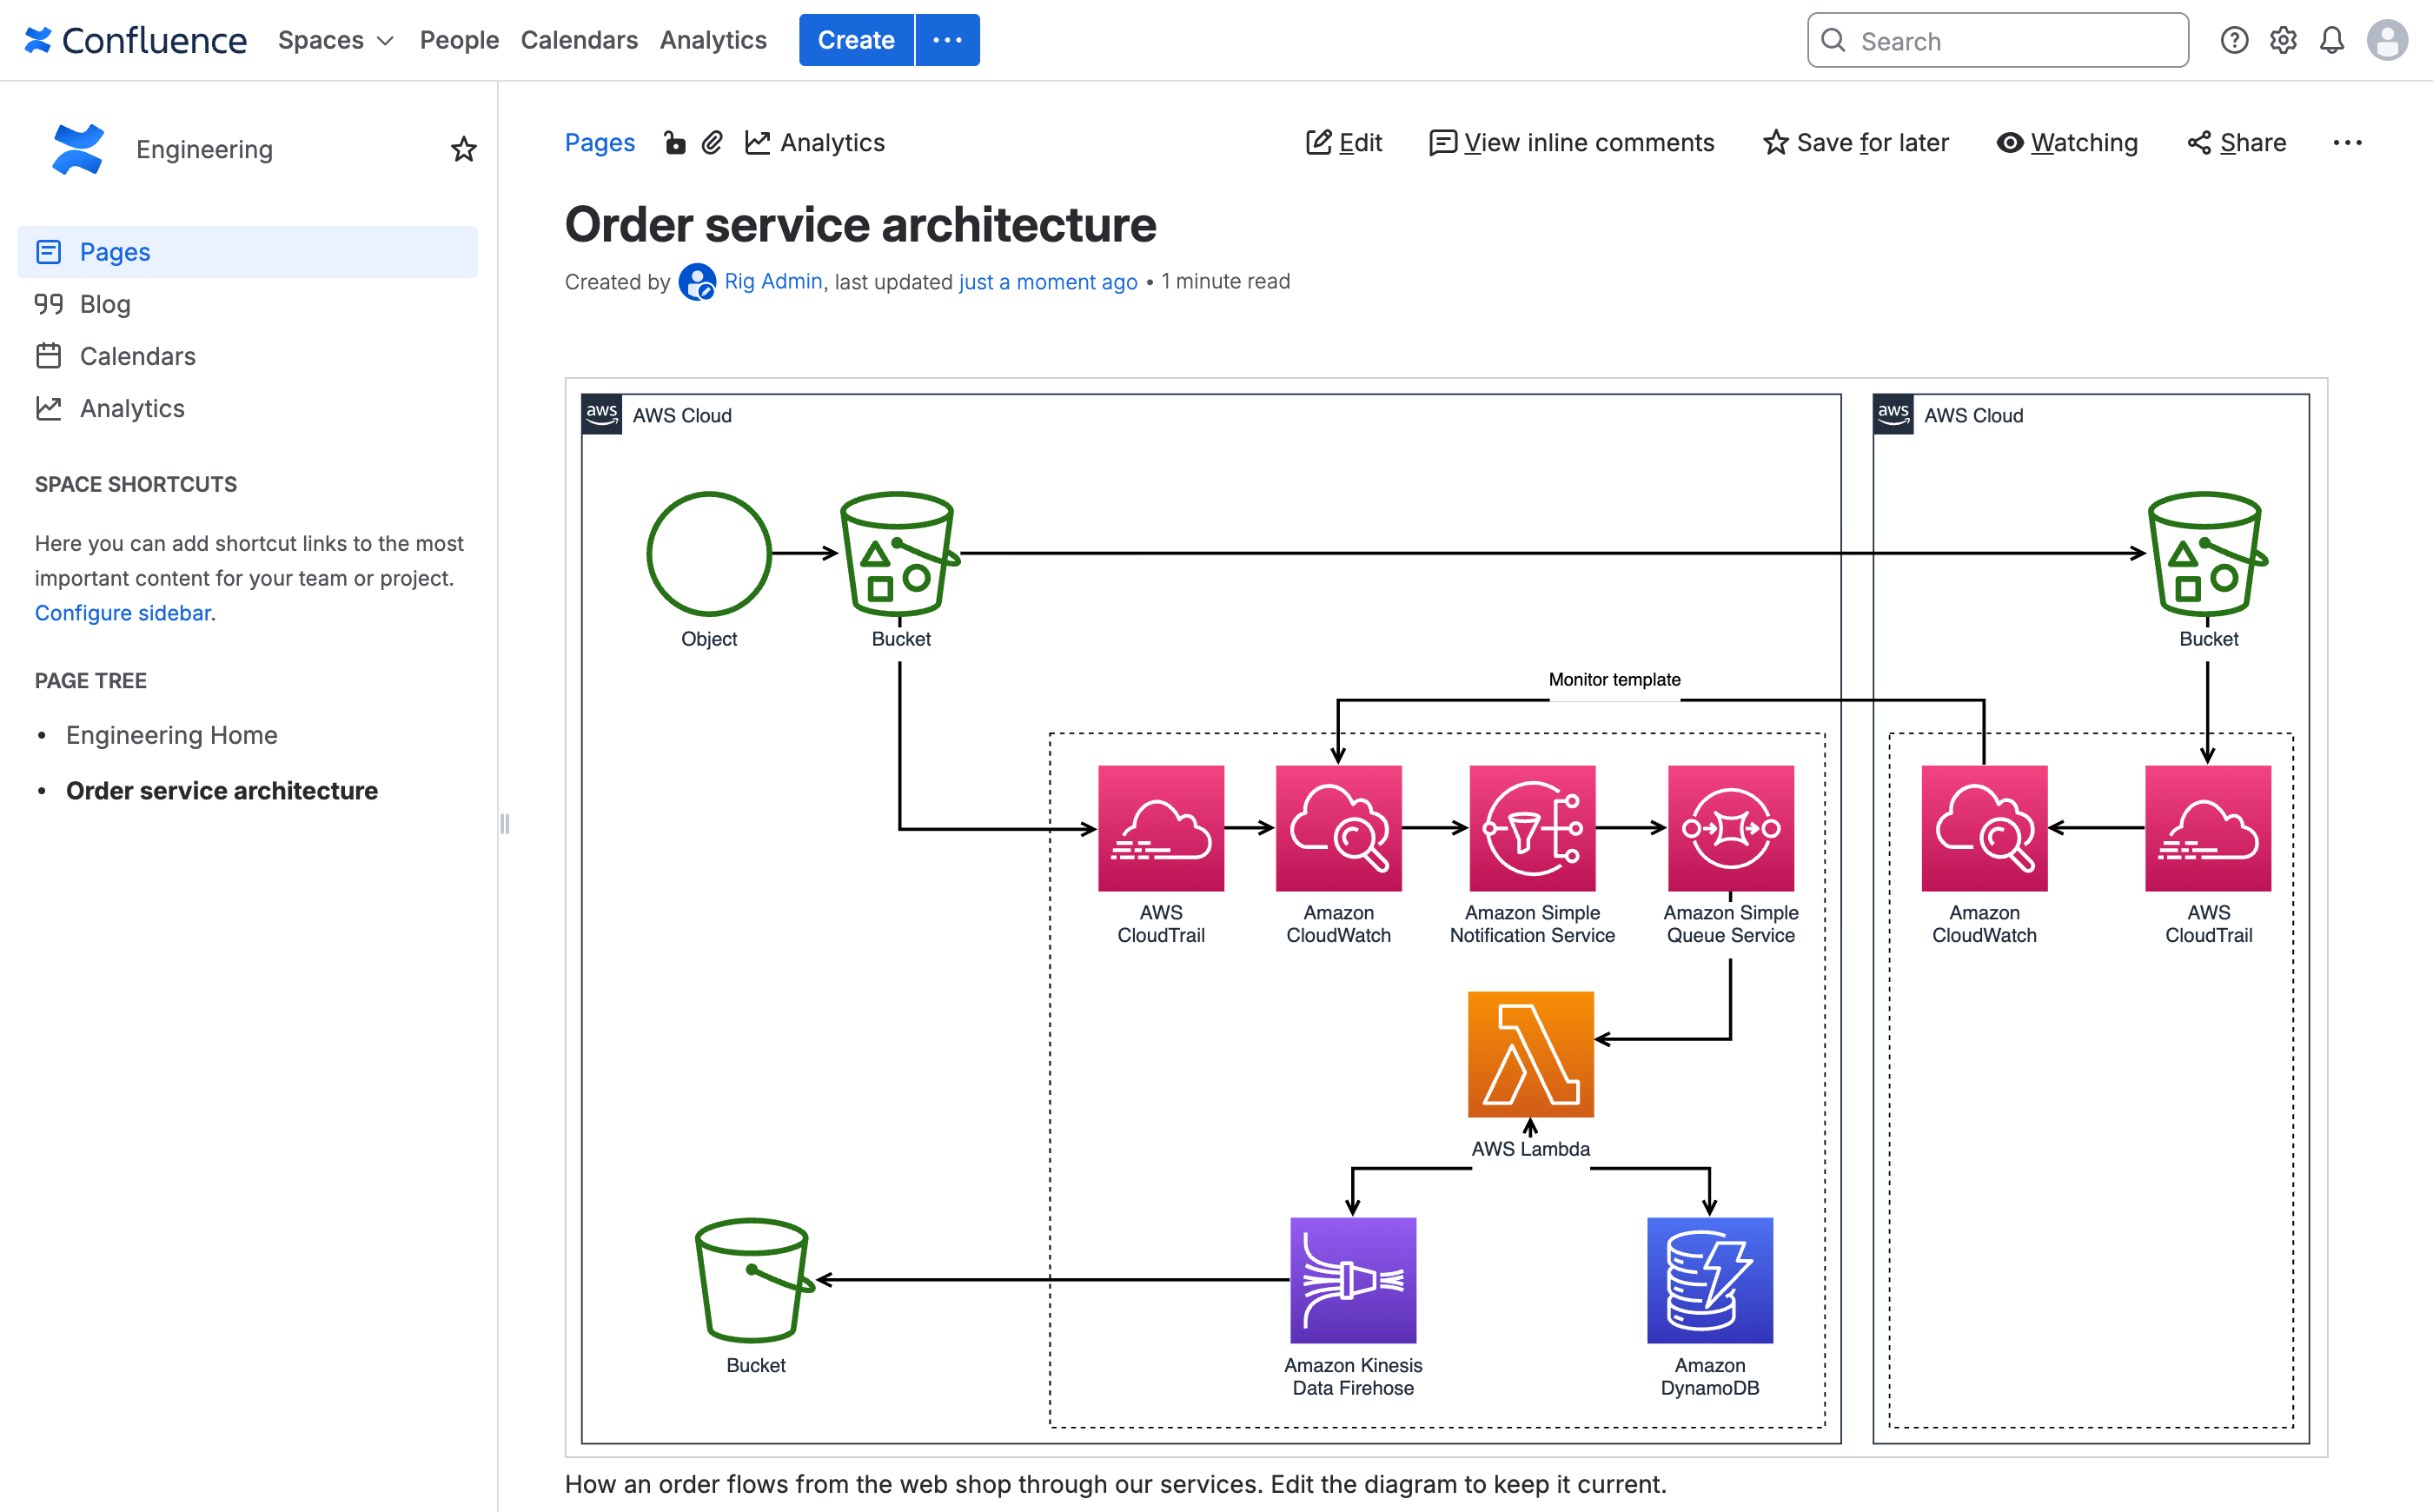
A draw.io architecture diagram displayed on a Confluence Data Center 11 page

Note: If you are still using Confluence 10, you will continue to use draw.io versions 16.x.

Create and edit diagrams in Confluence 11​

Confluence 11 has received a new interface (AUI 11), and draw.io has been updated to use the new interface style. Inserting draw.io Diagram and Board macros work the same way as in previous versions.

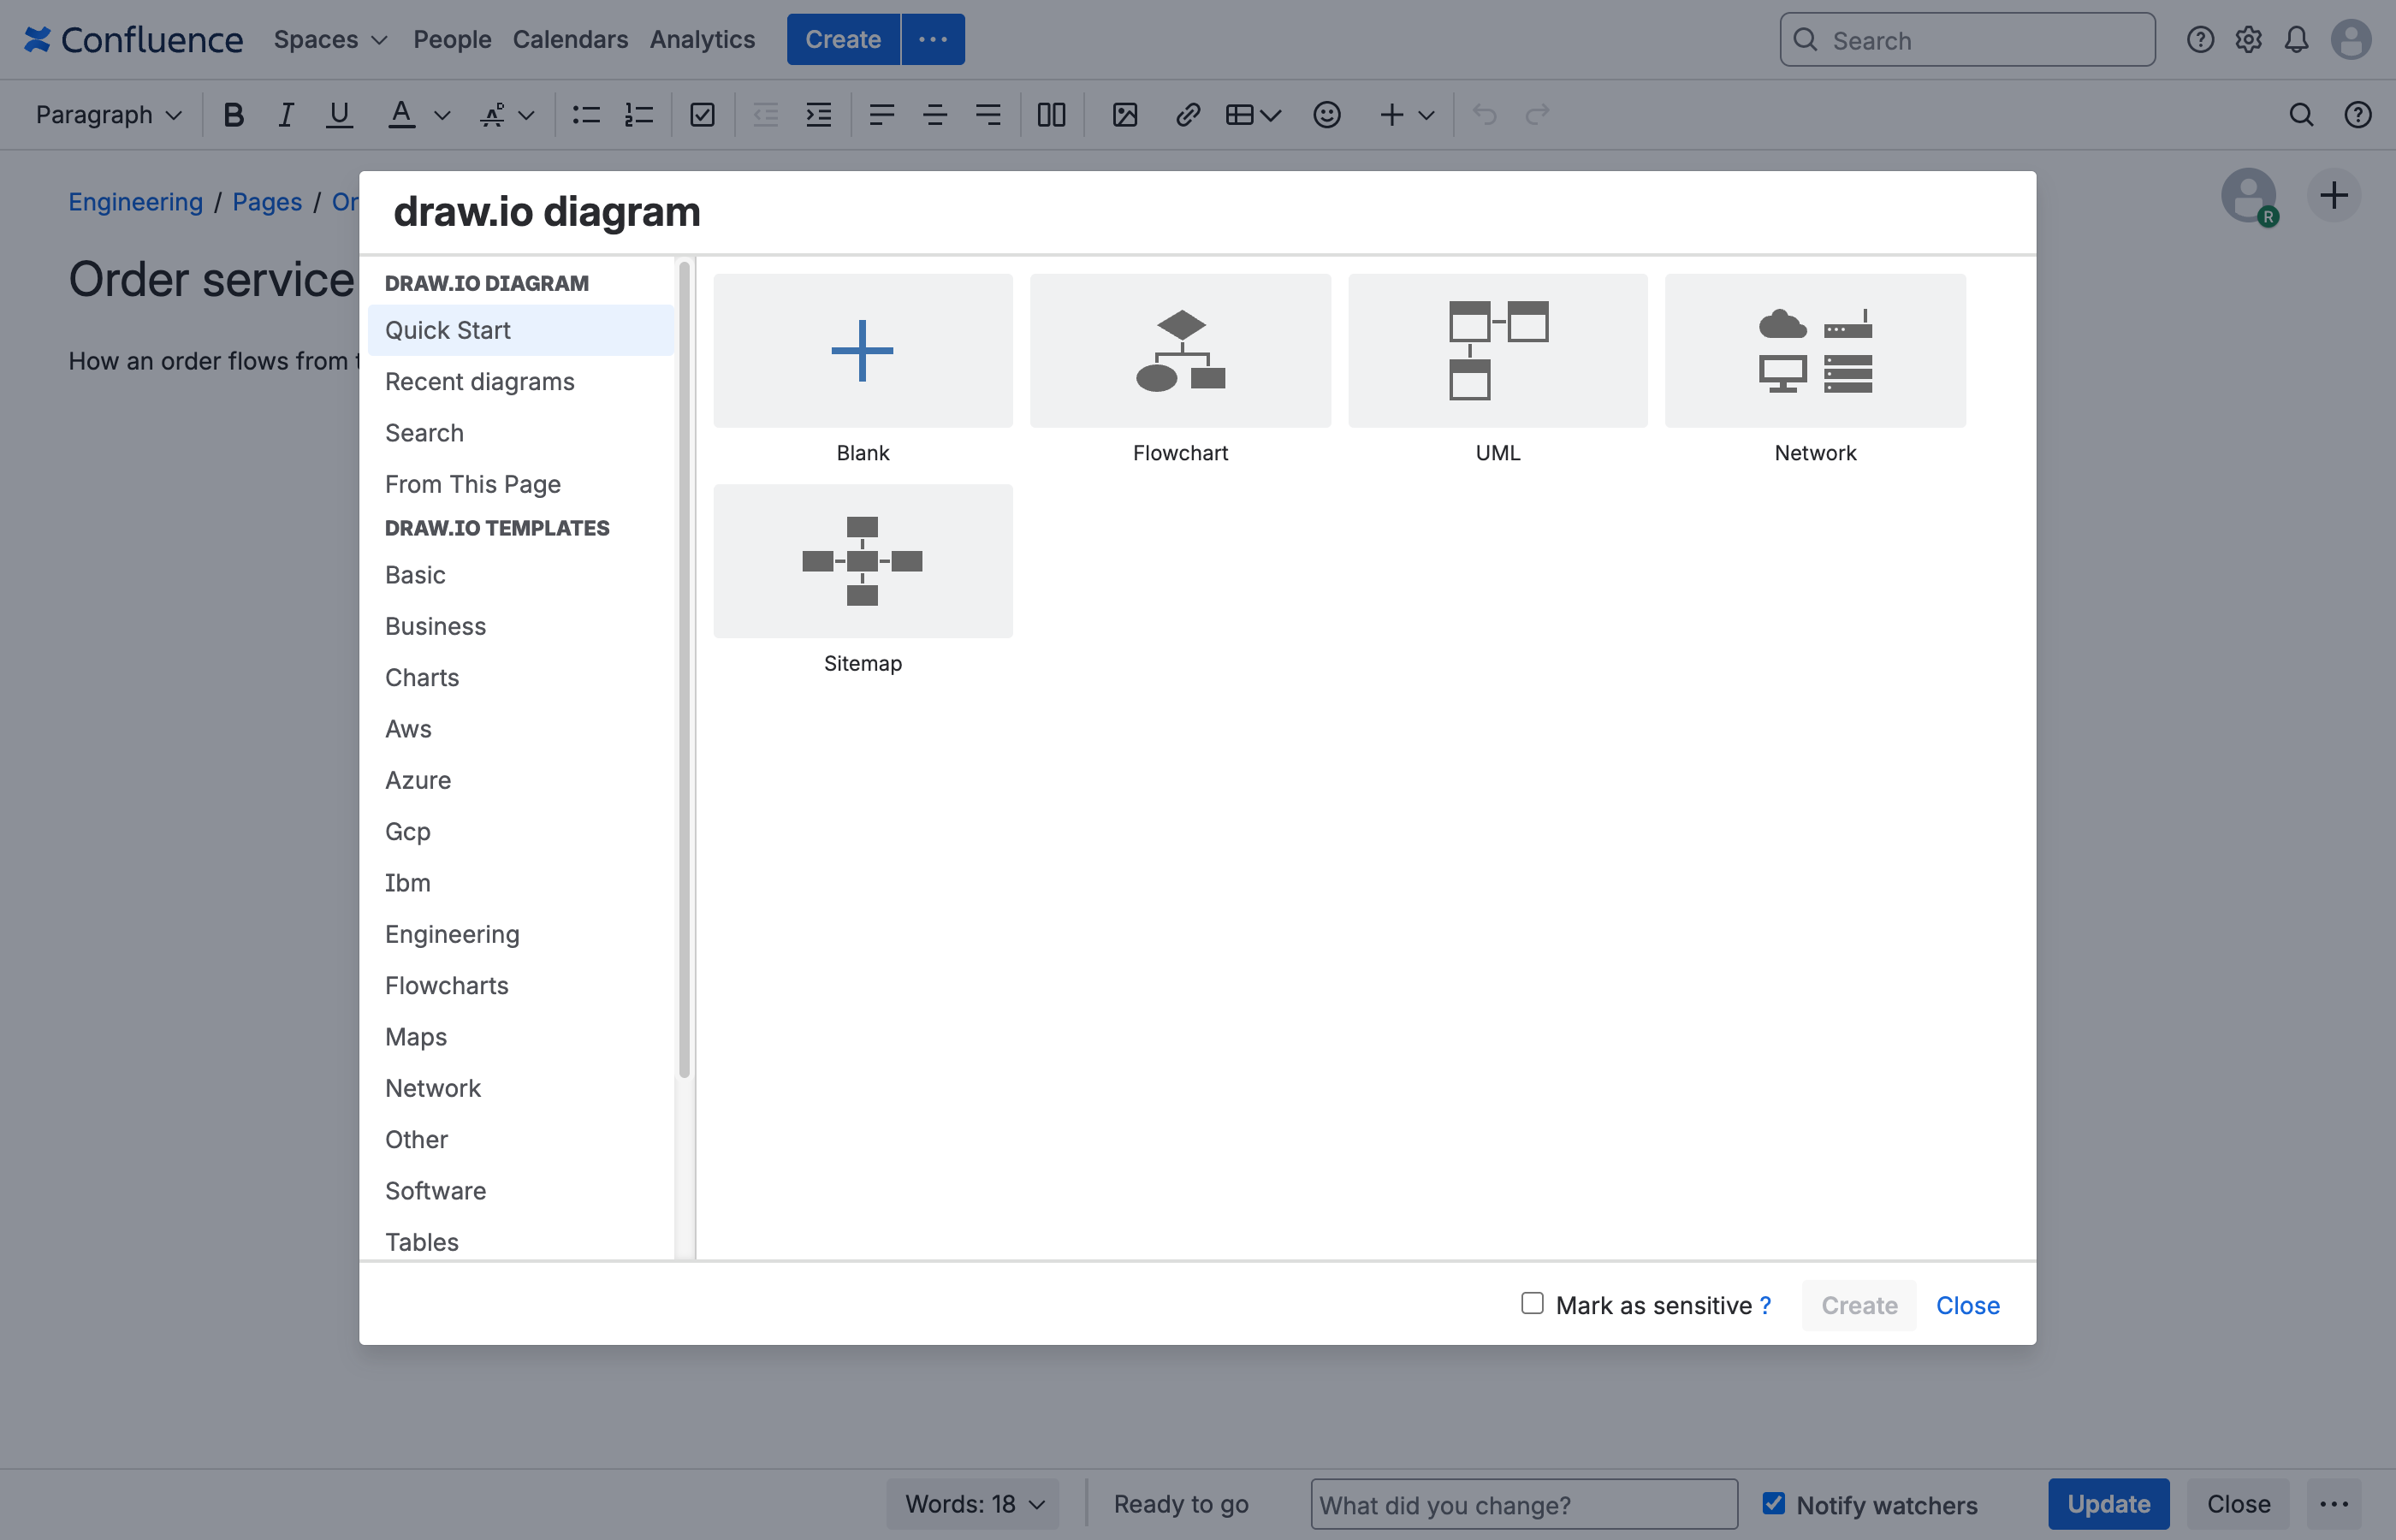
Insert a new draw.io Diagram macro and choose a template from the library and click Create to open it in the editor. Choose the Blank template to draw your own diagram from scratch.
Start a new draw.io diagram from a template in Confluence Data Center 11

Once the diagram has opened in the editor, you can rearrange it, add and delete shapes, restyle and add more diagram pages as needed. Click Save and Exit in the top right to save the diagram and return to the Confluence page editor.
The draw.io editor in Confluence Data Center 11 with the shape library and format panel

Tip: Click on any diagram when viewing a Confluence apge to open it in the lightbox viewer - you don't have to open a diagram in the editor to step through diagram pages or interact with layers and tags.

Works with Confluence 11's stricter security​

Content Security Policy​

Confluence 11 has a strict Content Security Policy by default (http.header.security.content.security.policy.strictness.enabled) that blocks inline scrips unless the page marks them as trusted.

draw.io runs entirely within this security policy, meaning that draw.io diagrams will be protected from injected scripts - there are no exceptions to configure so administrators do not have to switch the policy off. Of course, this includes the draw.io editor, lightbox viewer, administration and configuration pages, and the Google Drive and OneDrive file pickers.

No AI provider keys stored in the configuration​

AI diagram generation is not available in draw.io for Confluence Data Center.

Previously, you could copy a custom draw.io editor configuration from our online editor, and the draw.io configuration in DC would save all of the configuration data, including the properties that weren't used or accessible in the draw.io for Confluence DC app. Now, AI provider keys are stripped from the draw.io configuration, including from earlier versions of the draw.io configuration file.

Important: Backups of your instance that were taken before the upgrade to Confluence DC 11 and draw.io 17.0 will contain those keys. Make sure you revoke those keys with their providers.

Restrict custom shape libraries to groups​

Administrators can set custom shape libraries to be visible only to selected Confluence groups. This is useful when teams need to use specific sets of shapes in their diagrams, that aren't required by other teams.

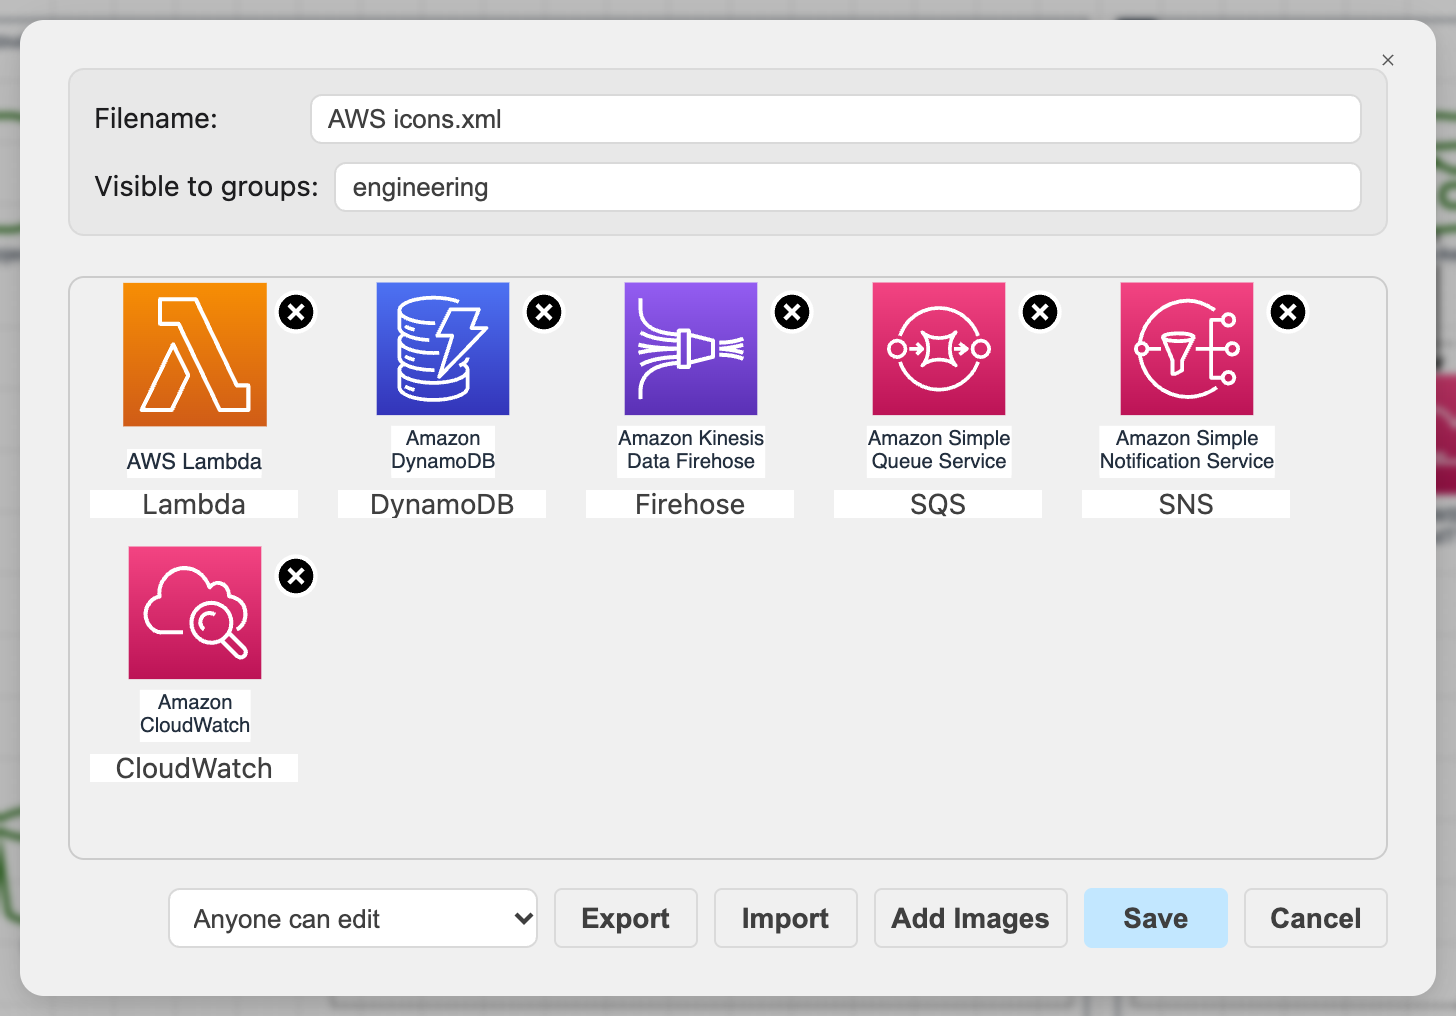
In the Libraries dialog, enter the name of the Confluence groups you want to be able to see the custom library (Visible to groups). When empty, all groups can see this library. When one or more groups have been defined, only those groups can see it - users all other groups will not be able to see or edit the custom library.

Choose Anyone can edit at the bottom of the dialog to allow anyone in the specified groups to edit the contents of the custom library, or limit them to only using the custom library shapes.
Make a custom shape library visible only to the engineering group in draw.io for Confluence Data Center

The instance administrator and the custom library's owner will always be able to see and edit the custom shape library.

Tip: Set a group when you are developing a new custom library to keep draft libraries from cluttering up your users' draw.io shape libraries dialog.

Group restrictions for custom shape libraries will also be available in draw.io for Confluence Cloud.

Faster pages and diagrams​

draw.io macros and the editor have been heavily optimised to allow Confluence pages load faster.

  • Faster pages: pages with diagrams appear sooner and diagrams render faster, even on pages with many of them.
  • Lower server demand: Confluence does less work each time someone views a page with a diagram, which leaves more capacity for everything else on your instance.
  • Smaller downloads: your browser loads only the parts of draw.io a diagram actually needs.
  • Better caching: browsers now keep draw.io's files for far longer, so readers and editors download them once per release rather than again throughout the day, and pages with diagrams open without waiting on downloads.
Many more performance improvements to the draw.io editor on both the client and the server side have been implemented in the incremental 16.x releases. All of these improvements are included in draw.io 17.0 for Confluence DC 11.

How to upgrade​

  1. Upgrade Confluence first: Atlassian supports 11.0 only from the latest Confluence 10.2 release.
  2. Then update draw.io to 17.0 from Manage apps section in the instance administration (or the Marketplace). Note: draw.io 16.x is for Confluence 10.

All existing draw.io Diagrams, Boards and embedded diagrams and their revision history, as well as custom templates and libraries, draw.io configuration, and Google Drive and OneDrive settings will be carried over when you update.

See all the changes in Confluence Data Center 11.0.

Updated custom links now with an action animation editor

· 7 min read

Custom links are now more flexible with a new action editor and many more animation actions to choose from. Animation actions wait for the previous action step to complete by default with a configurable delay duration, but can be set to play immediately with the previous action.

Using the same animation action editor, each diagram page in a multi-page diagram can have its own set of page animation actions that will display when you open that diagram in the lightbox or presentation mode.

  • Add page animations to animate diagram 'slides' for slick diagram presentations in meetings.
  • Click directly on custom links in shapes in the diagram to jump to a related page - ideal for navigating through multi-page technical UML diagrams or infrastructure diagrams with many different levels of detail.
  • Add interactivity via custom links on shapes to mockups and wireframe layouts to better test the usability of new interfaces before implementation.
  • Add animations and effects to custom links to make educational diagrams and infographics interactive and more interesting and memorable for students.
  • Animate flows, timelines, charts and complex processes to aid understanding and retention when training new staff.
  • Add interactive highlights to dependency graphs and PERT charts to clearly show blocking and non-blocking dependencies.
  • Hide or show varius layers of building infrastructure (networking, electrical controls, water supplies, emergency systems) or emergency routes on floor plans via custom links.

Open the action editor dialog​

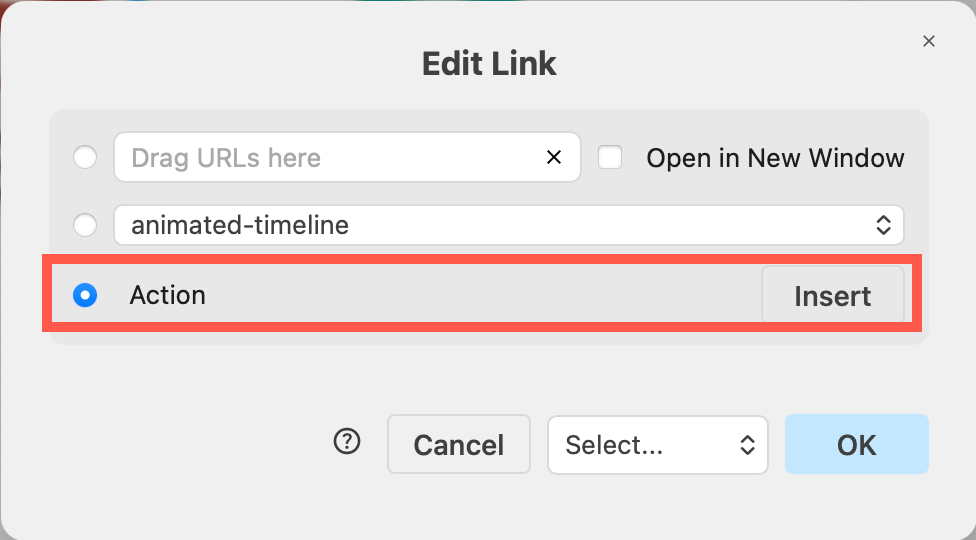
Custom link action: Right-click on a shape or connector and select Edit Link from the context menu or press Alt+Shift+L, select the Action radio button and click Insert.
Edit the custom link

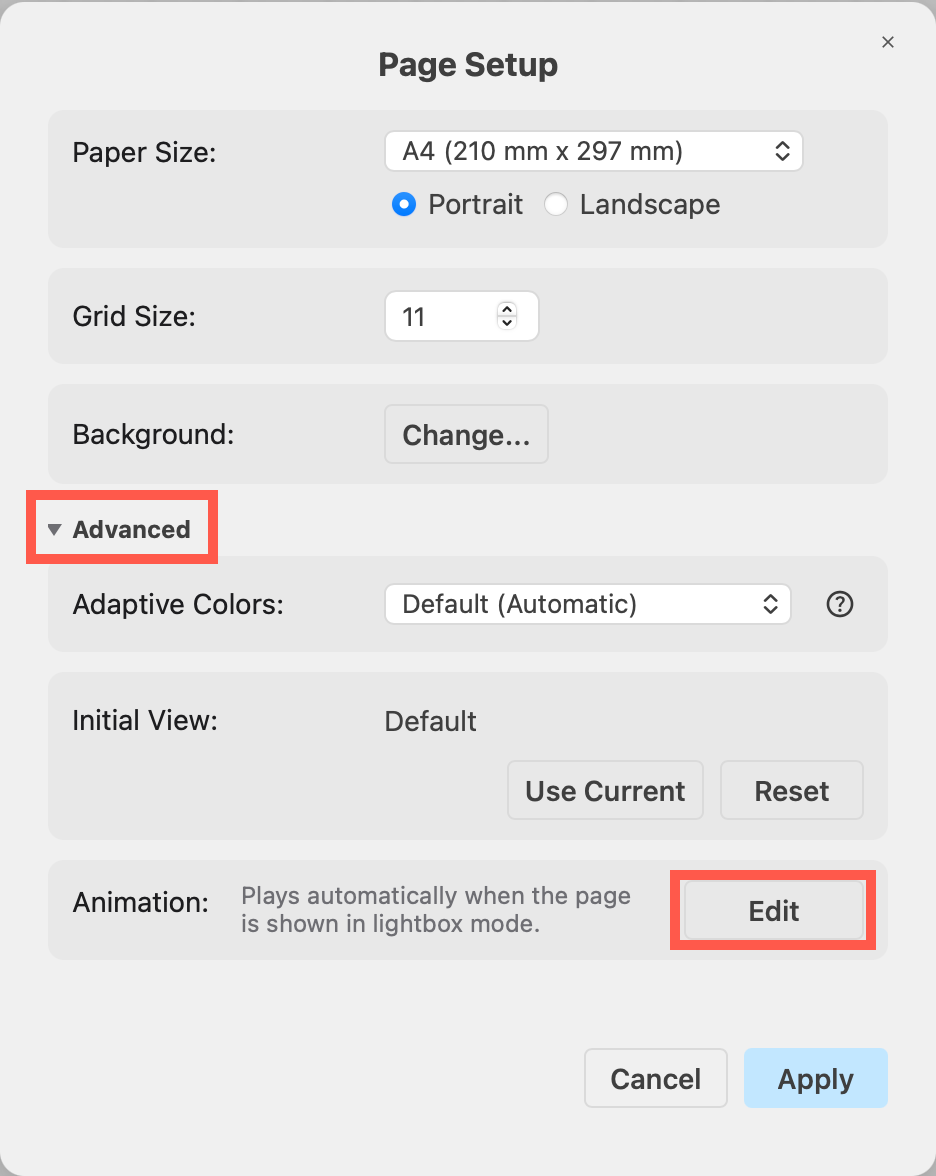
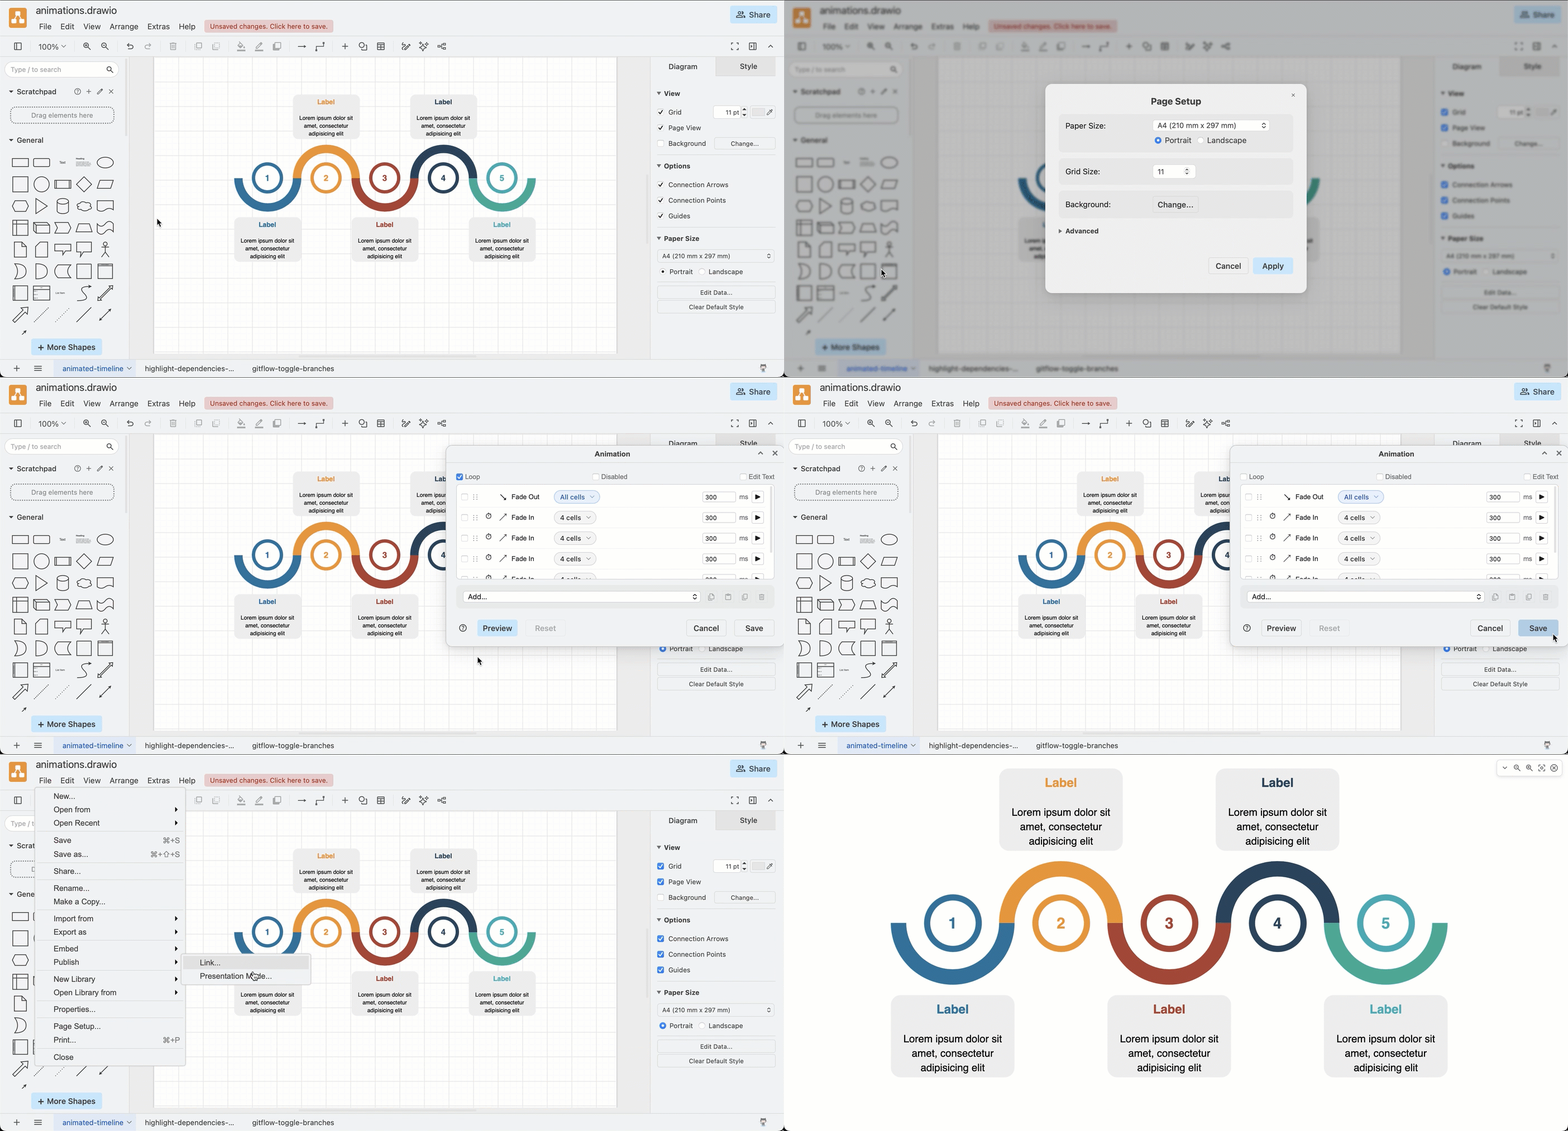
Page animations: Select File > Page Setup from the draw.io menu, expand the Advanced section and click the Edit button in the Animation section.
Add animations to the diagram page for when it is in the lightbox viewer via the Page Setup in the File menu in draw.io

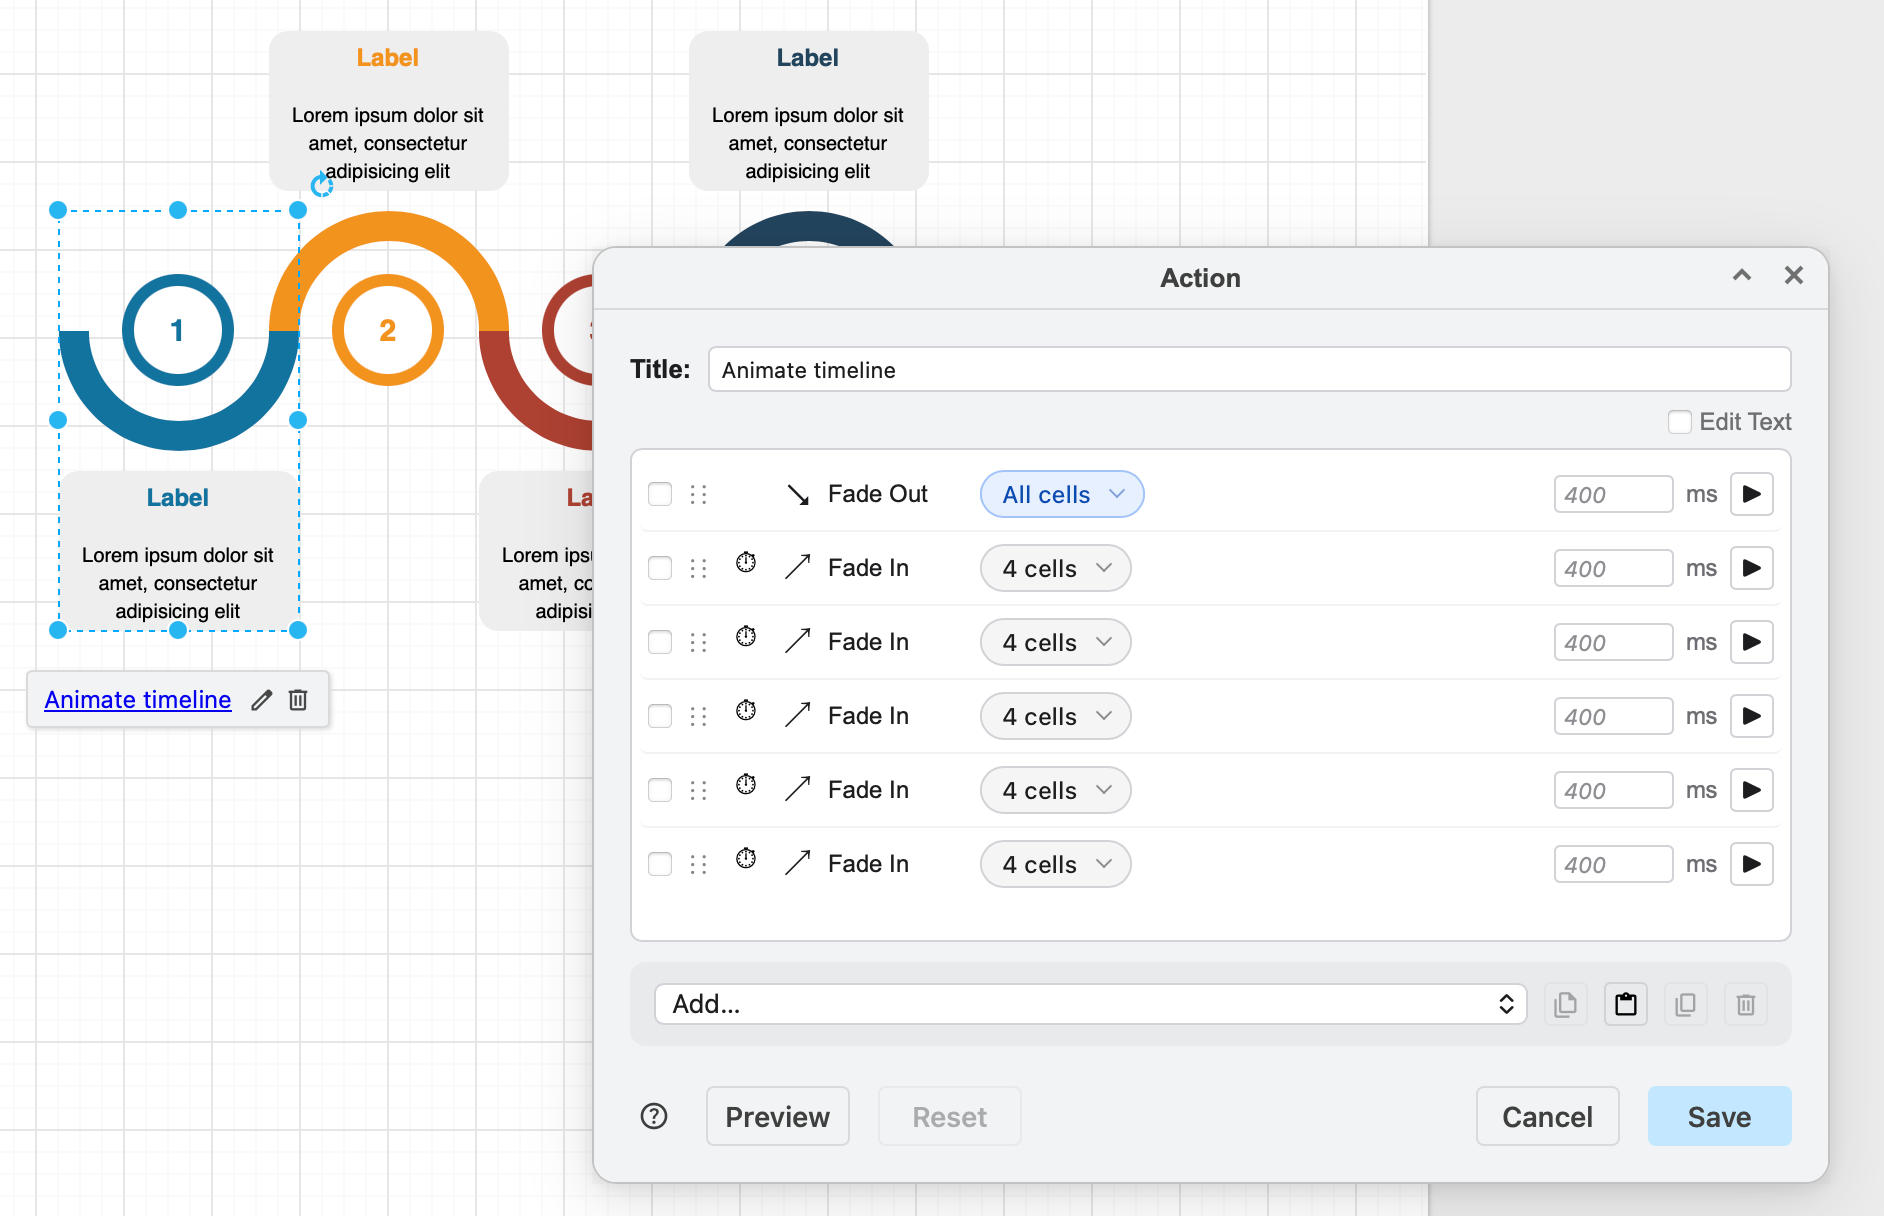
The action editor dialog is a draggable, resizeable dialog that lets you select cells on the drawing canvas and edit animation actions.
Add actions via the editor to the custom link

Work with action sequences​

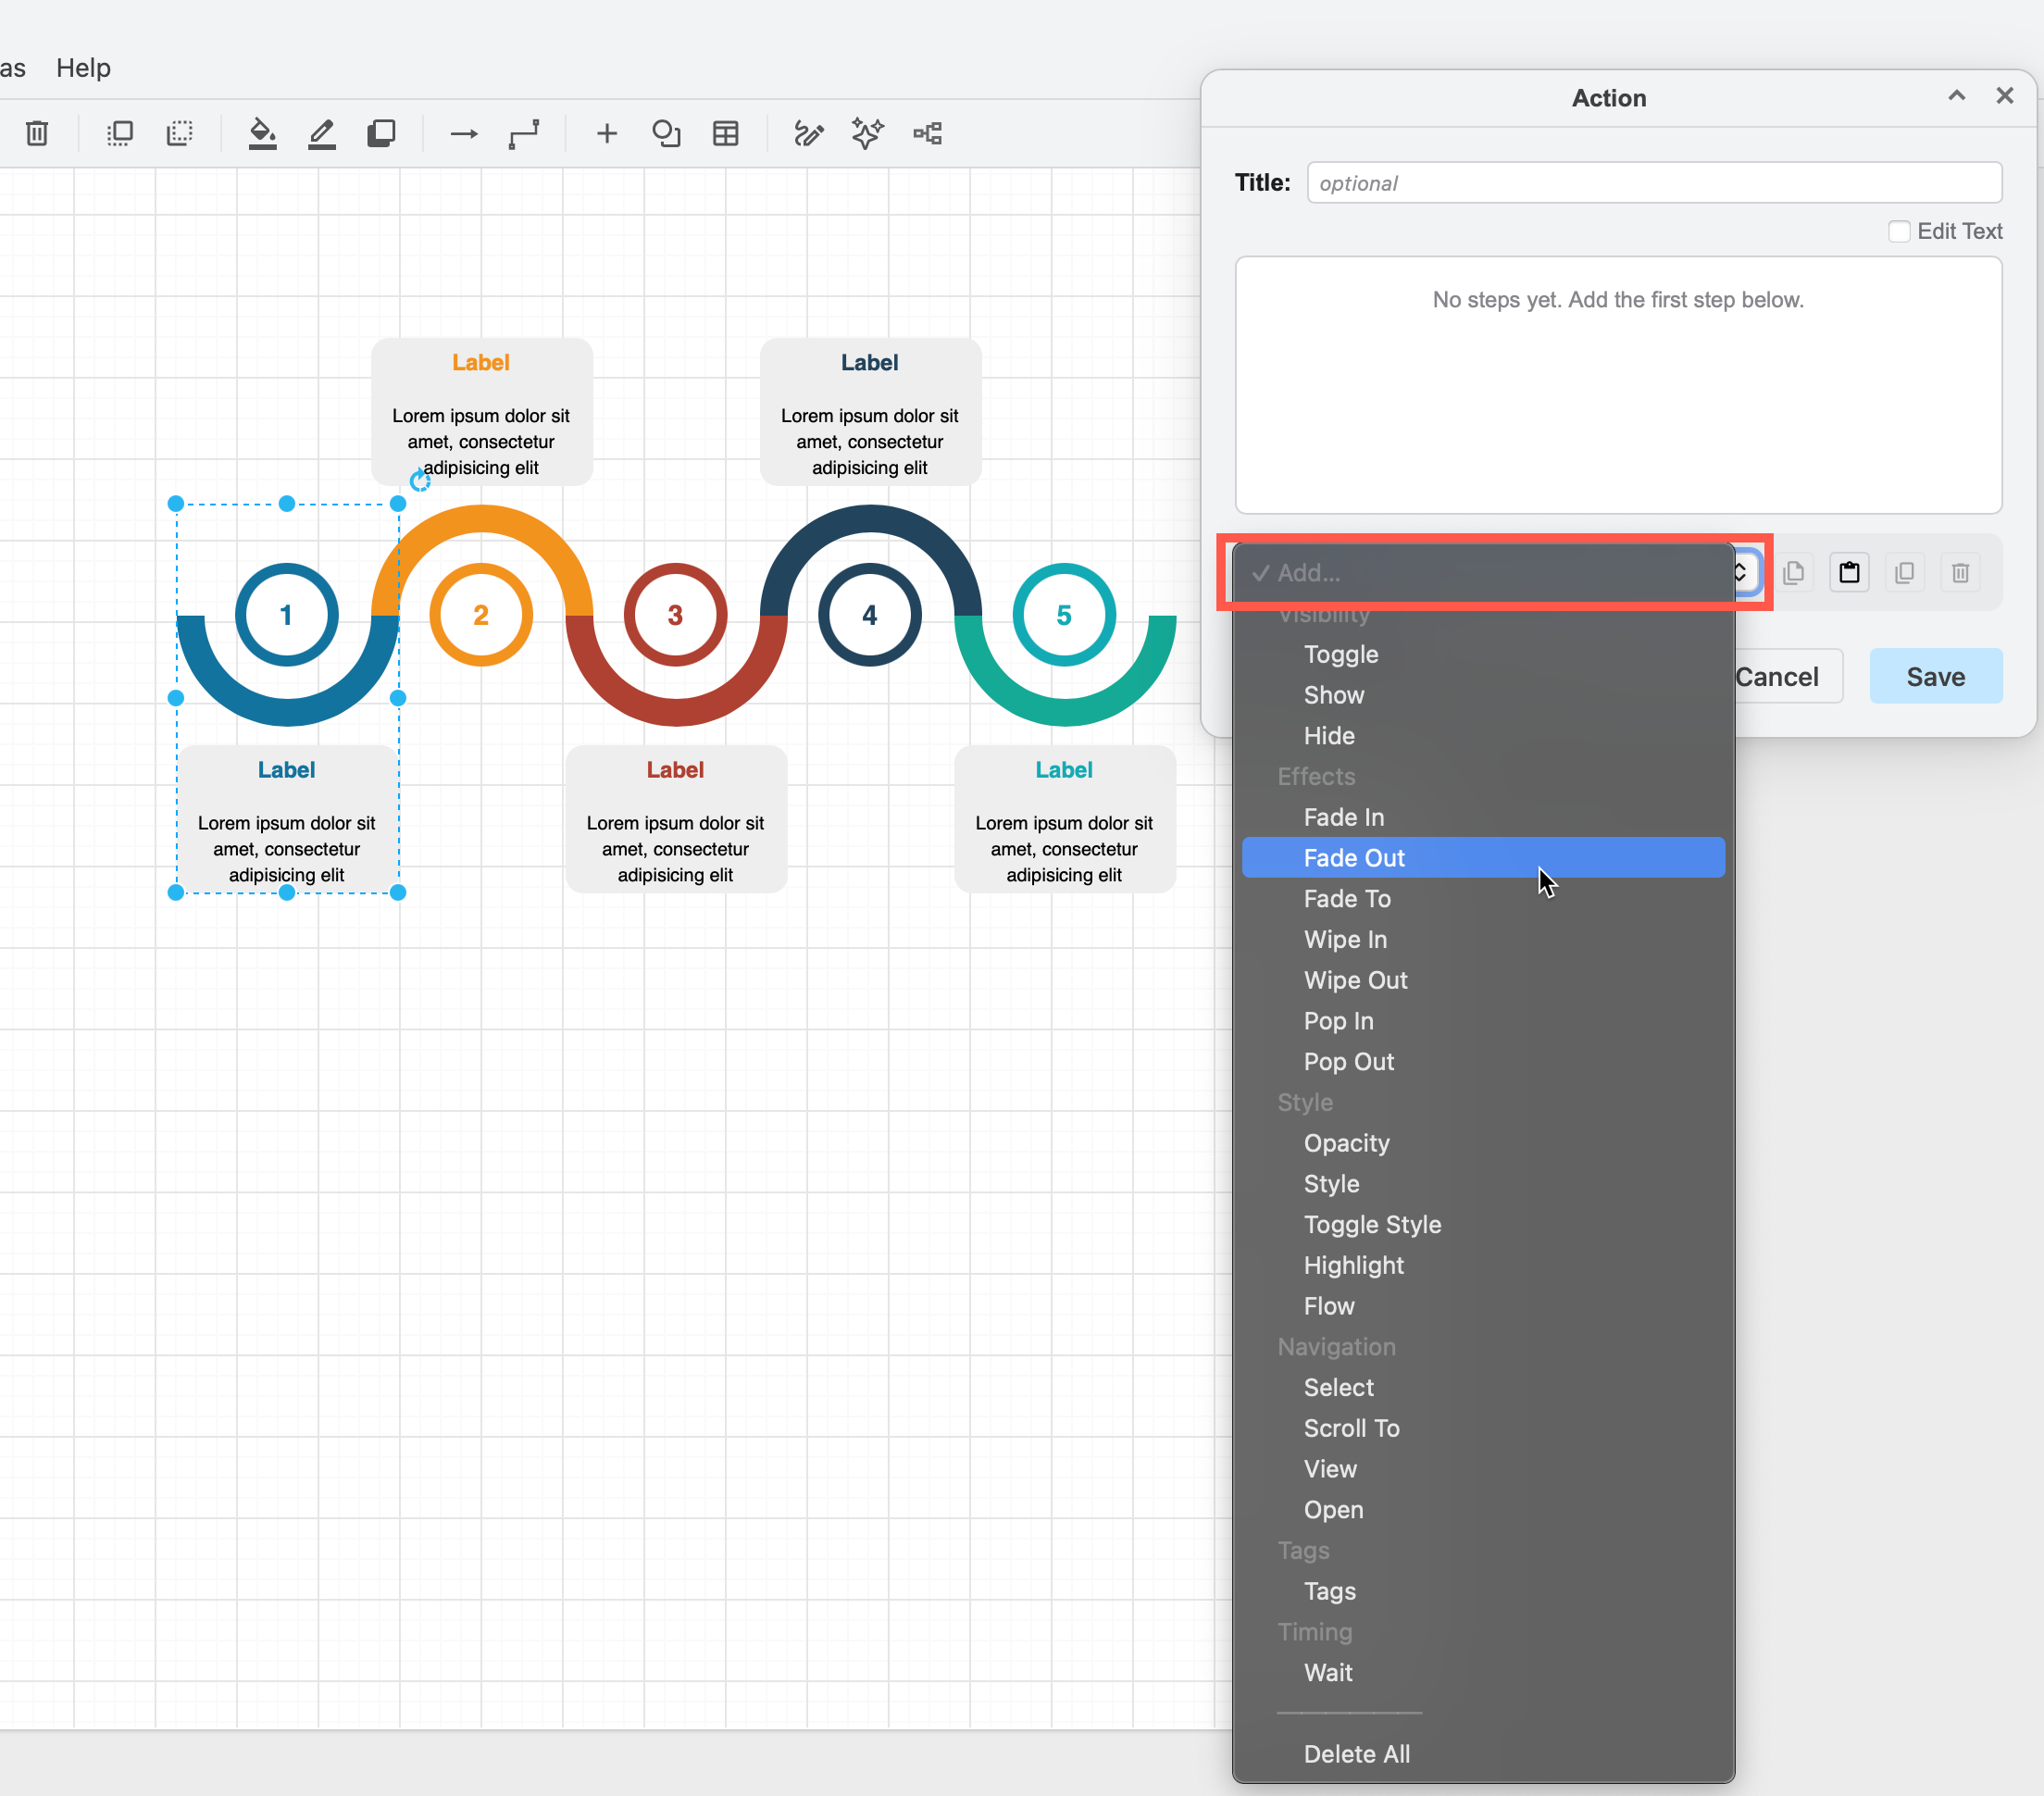
  1. Select an animation action from the Add list at the bottom of the dialog. It will automatically apply to the cell (shape or connector) you had selected.
    Click add and select an animations to add to the diagram in the Animation custom action dialog
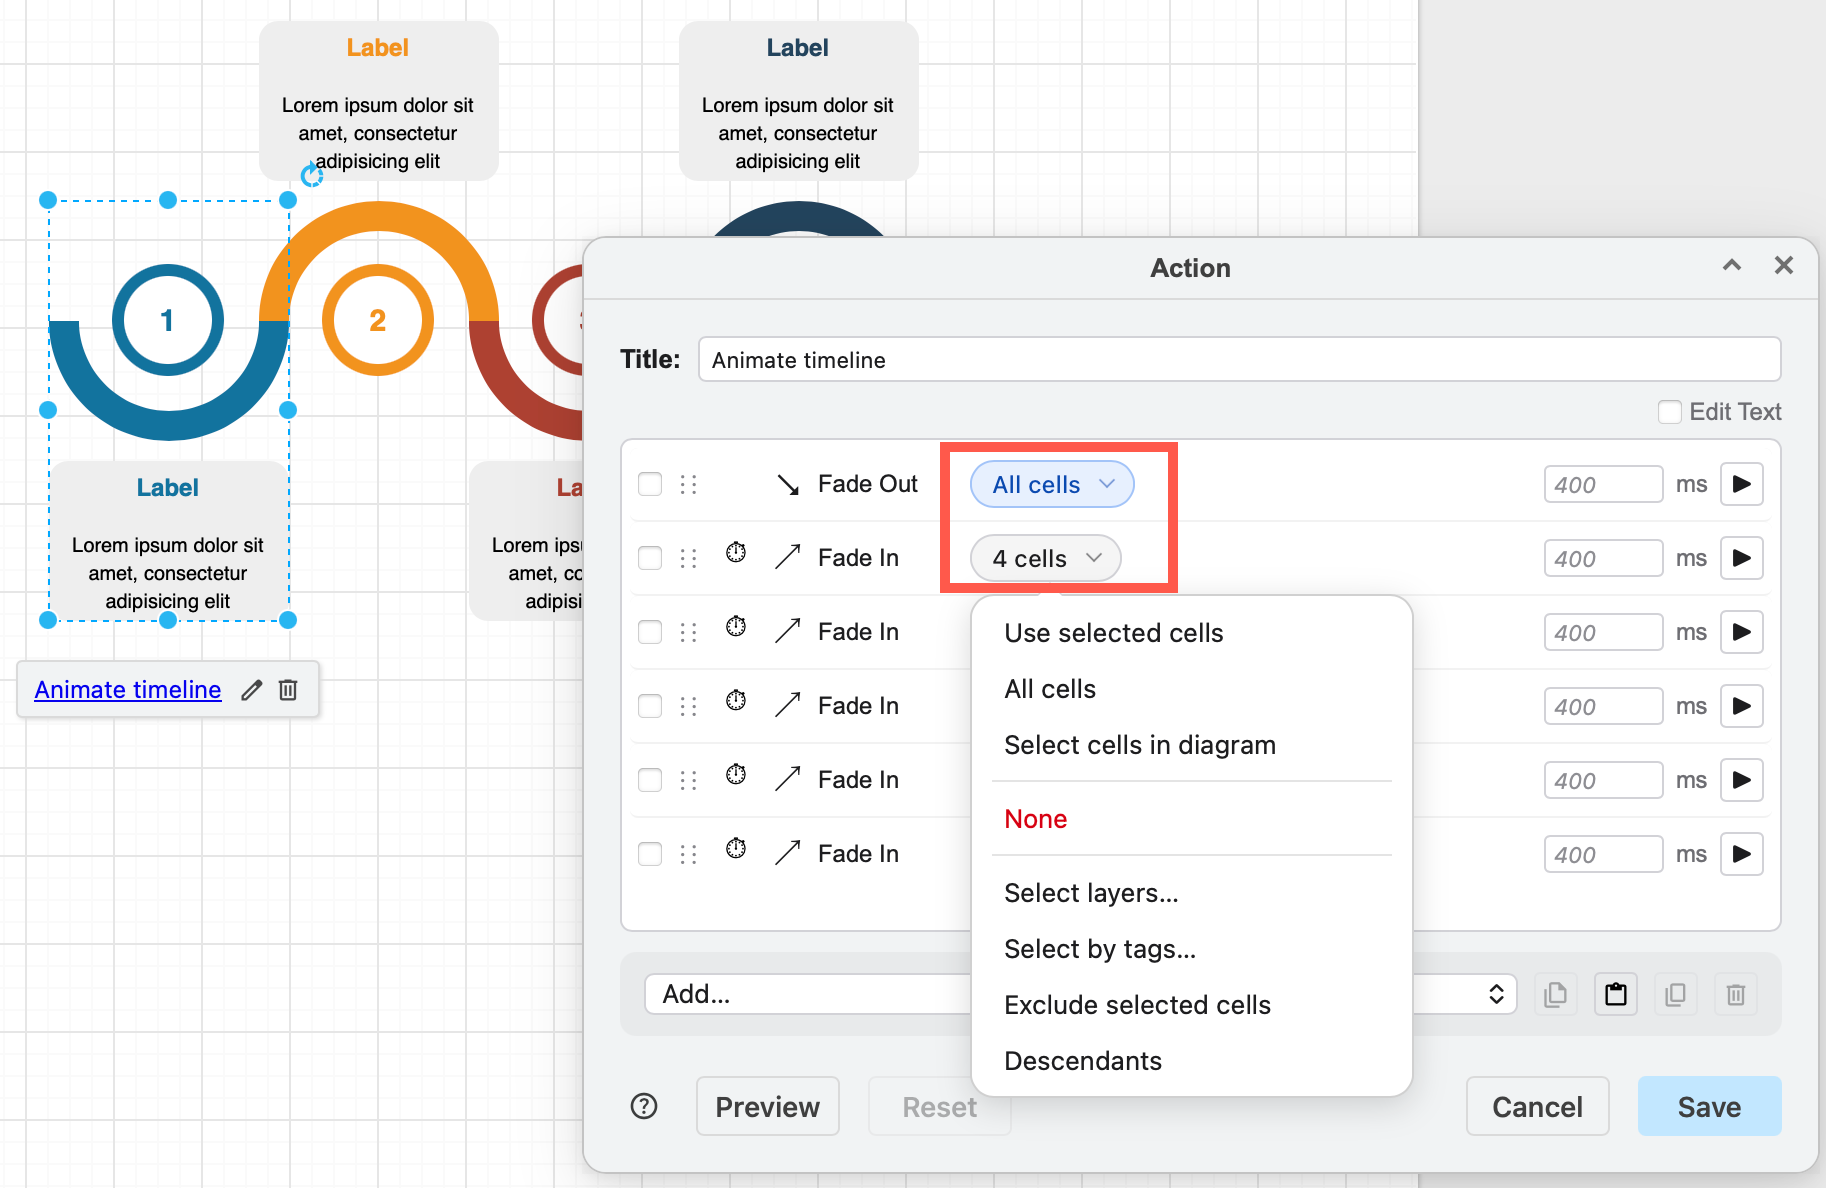
  2. Select different cells, then click on the Cells list of that action and choose Use selected cells. Alternatively, choose Select layers or Select tags to apply that action to shapes with specific tags or on the selected layers.
    Change which cells an animation action acts upon
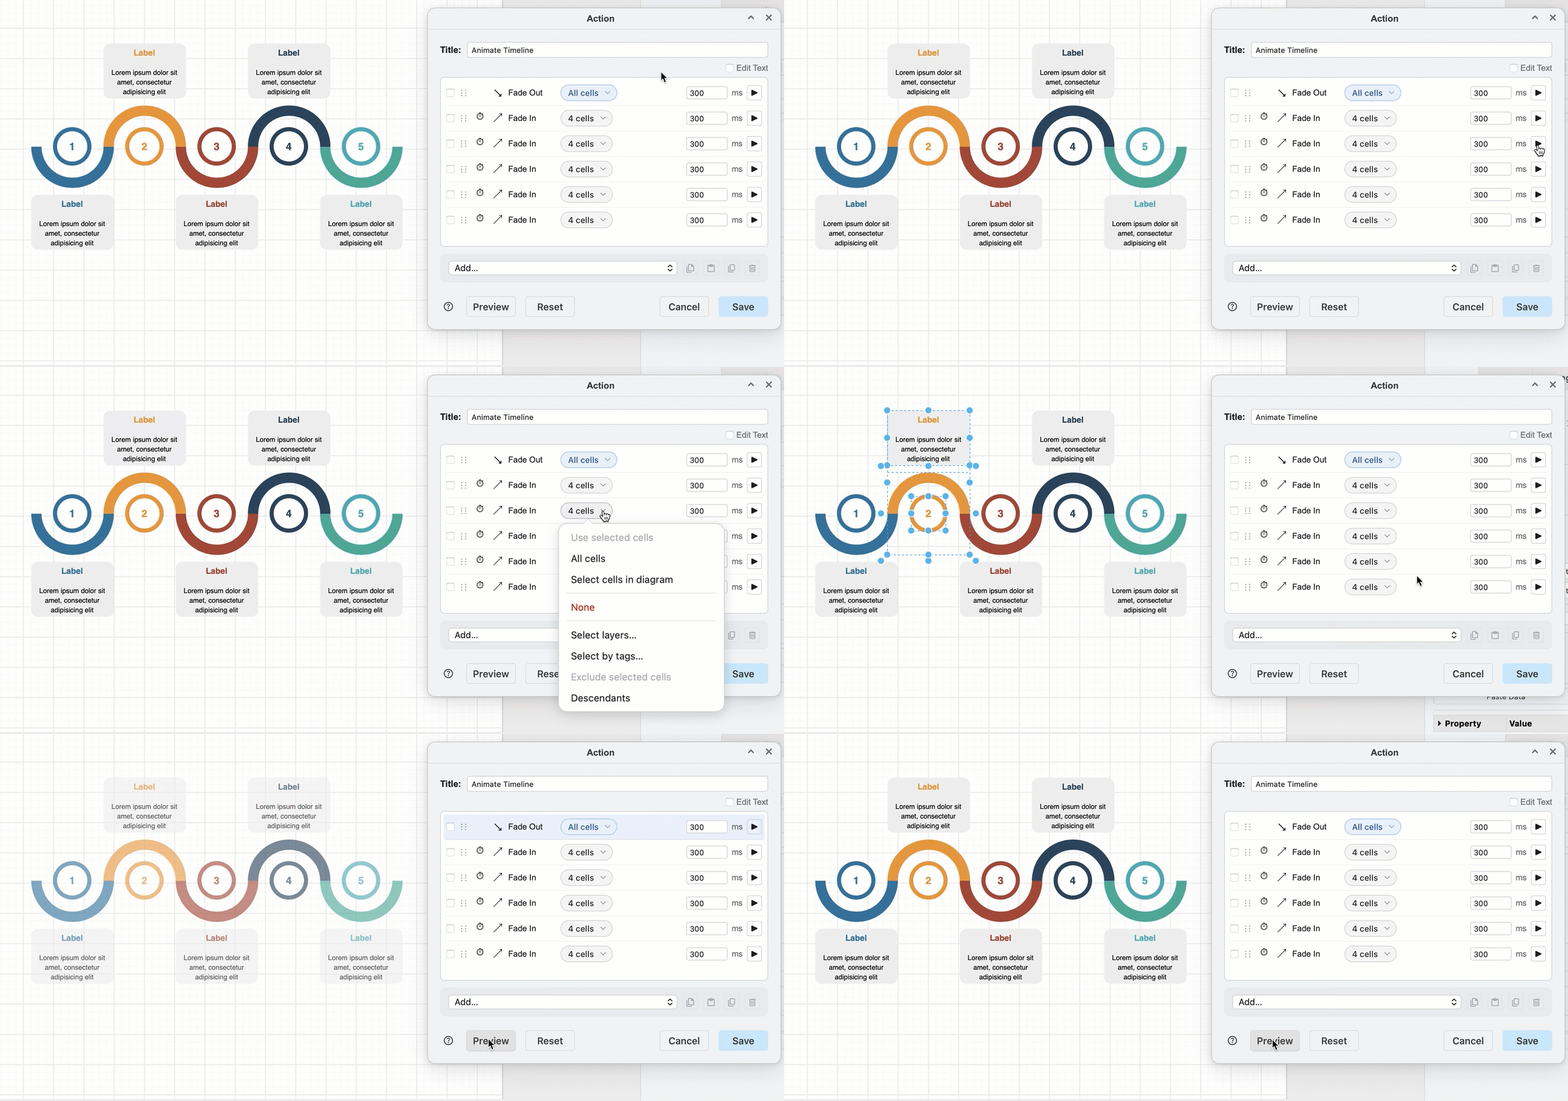
  3. Preview a single action via the Play icon to the right of that action. Or click Preview to see the entire animation sequence. Choose Select cells in diagram from the selector lists to see which cells will be affected by that action.
    Preview actions, action sequences and see which cells the action acts upon
  4. Click Reset to return to the initial diagram state.

These effects are transient - only you will see them if you are collaborating on a diagram page with multiple users. Some of the action effects can be applied persistently by writing a flag into the action's JSON text directly - see legacy persistent actions for more details.

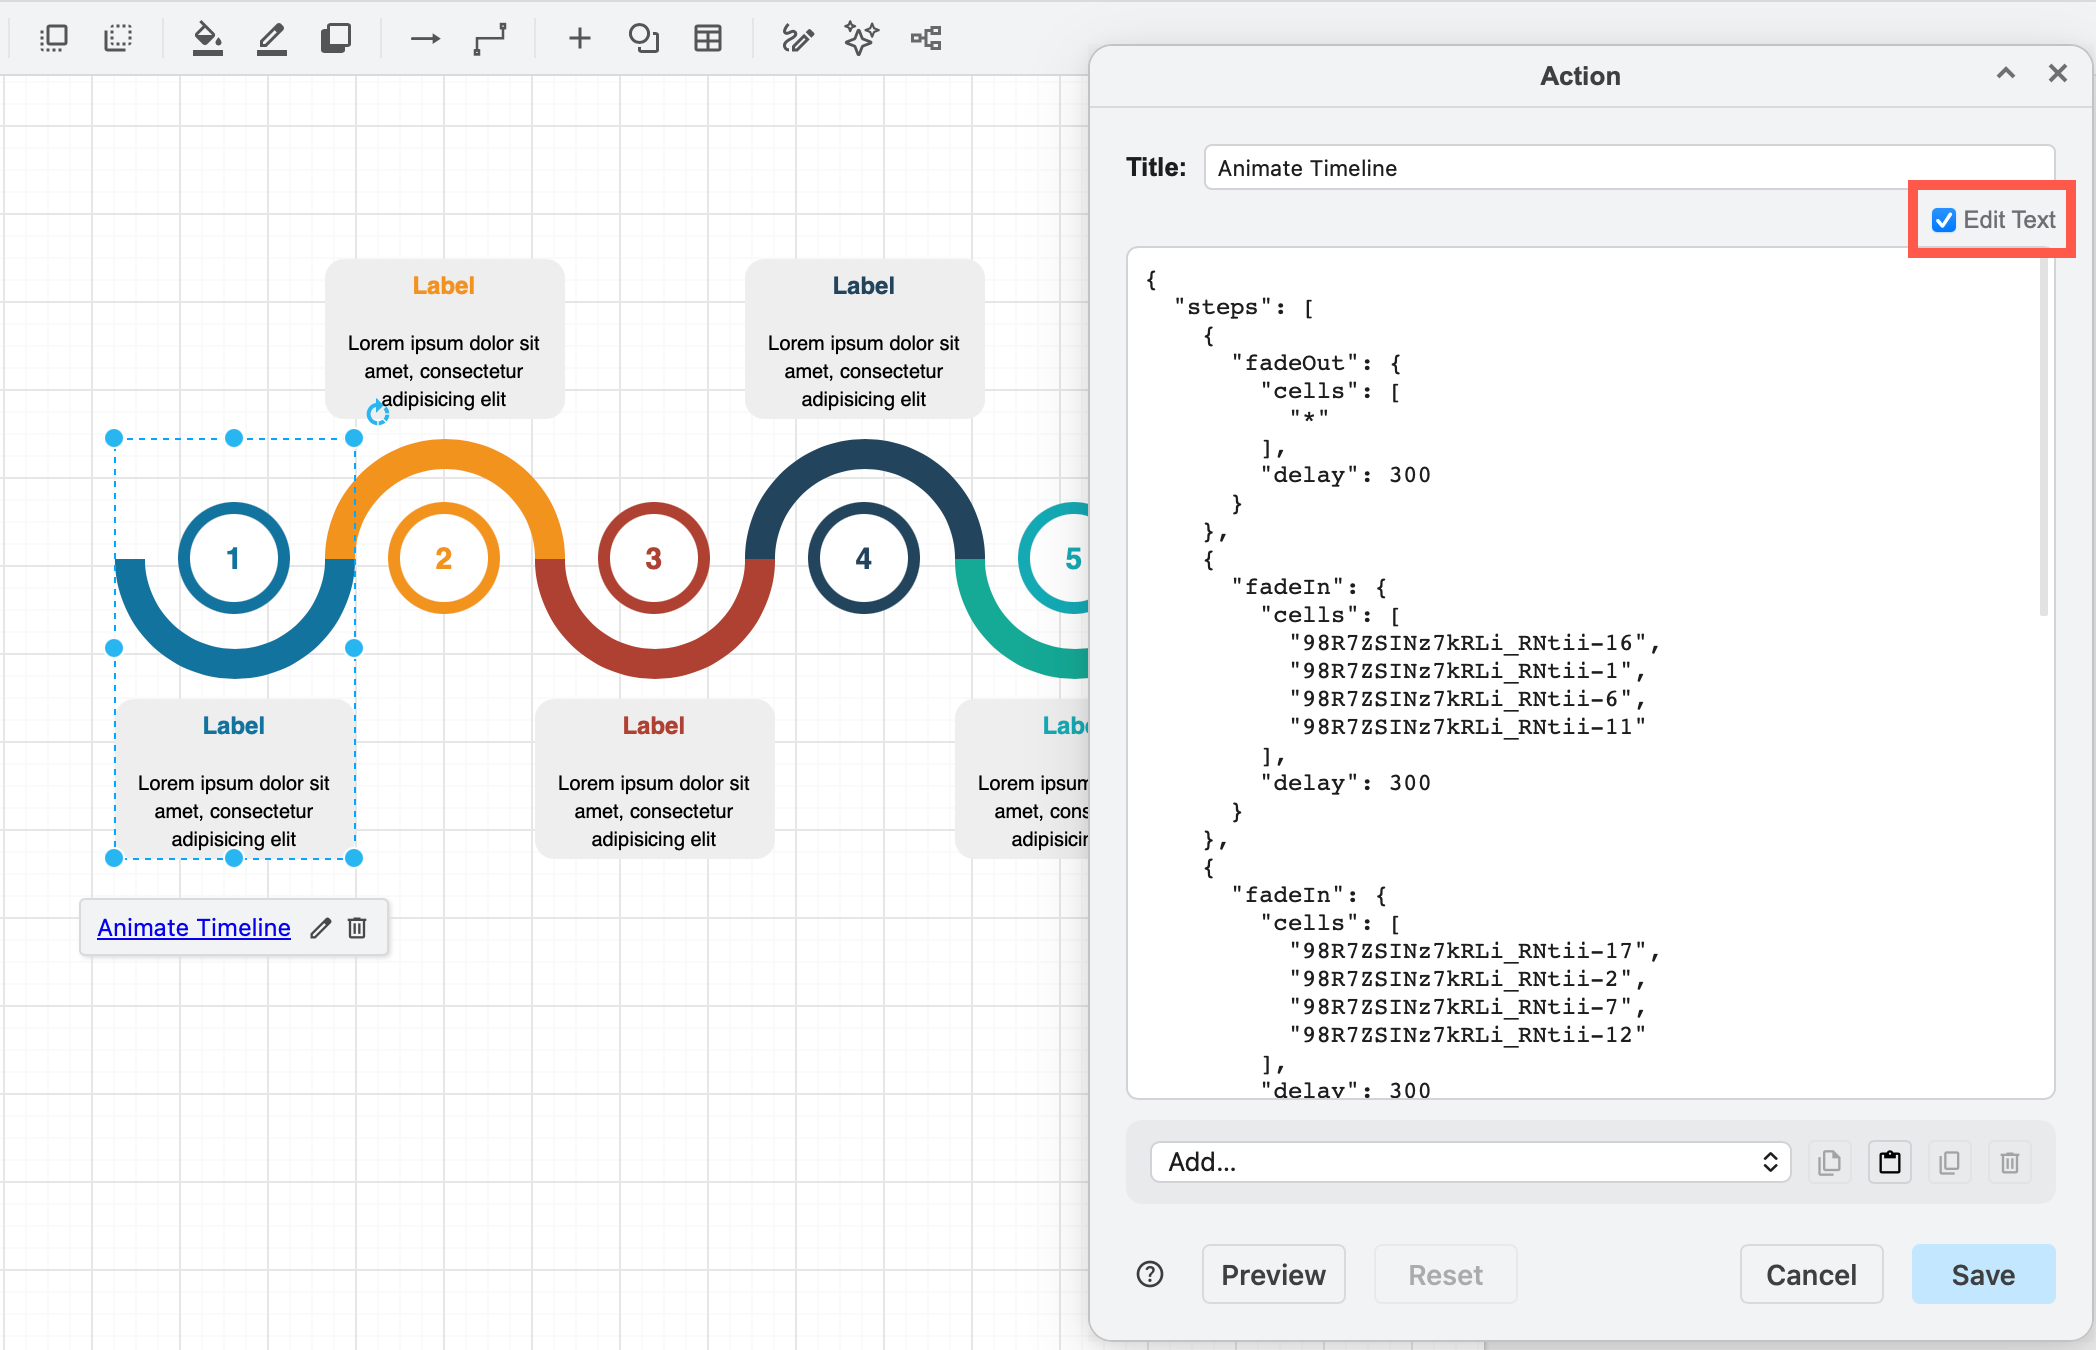
Advanced: Custom actions are stored in a JSON string in the shape metadata in the link shape property. You can edit this directly via the Edit Text checkbox in the top right of the action editor dialogs. Refer to the JSON action reference for more detail.
Select the Edit Text checkbox to directly edit the JSON string that describes the page animation

Add page animations​

Page animations play automatically in a loop when you open the diagram in the lightbox viewer or in presentation mode. Each page in a multi-page diagram has its own page animation stored in its page data.

The action editor uses the same action sequence editor as custom links, and you can copy and paste selected actions between the two editor dialogs.

Click on File > Page Setup, expand the Advanced section and edit the page animations.

Change the animation settings above the action sequence list to Disable all animations or deselect the Loop checkbox to play the animation only once.
Disable page animations or set it to play once only (not looped) via the File > Page Setup > Advanced > Animations

Change the action timing​

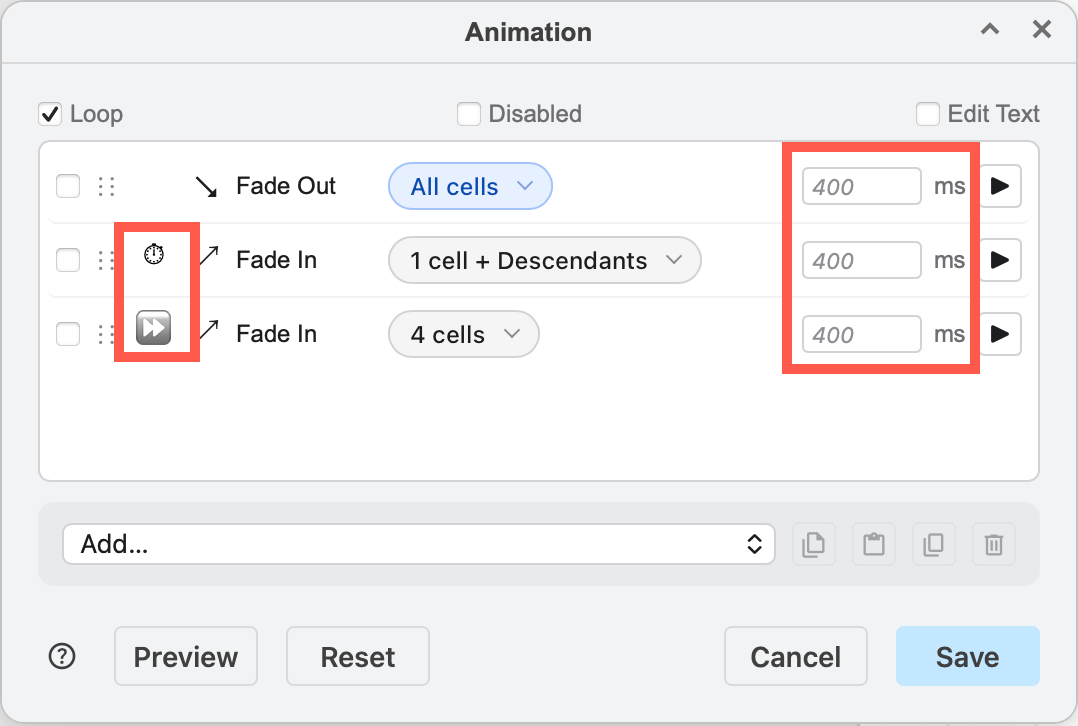
  • Click on the Wait (Timer) or Immediate (double arrow) icon on the left of the action to toggle between waiting for the previous step to complete (the default) or playing immediate with the previous step.
  • Drag the actions using their grab handle on the left to move them to another position in the action sequence.
    Change an action step to wait for the previous step or play immediately with the previous step by clicking on the timer/double arrow icons, and set a delay in millisecond in the field on the right

Customise action effects​

On most actions, you can set a delay duration - how long it will play the effect for before moving to the next action in the sequence. But many of the actions have additional configurable fields. For example:

  • Fade In/Out: Change the duration of the fade.
  • Highlight: Set a colour via the colour picker.
  • Open: Enter a URL to open in a new browser tab, or open a different diagram page (e.g. data:page/id,ttOyNaaBSf6ha2BtVIuw)
  • View: Scroll and pan to a different section of the diagram - use the current viewbox or specify the location and zoom level, and enable a Transition effect.
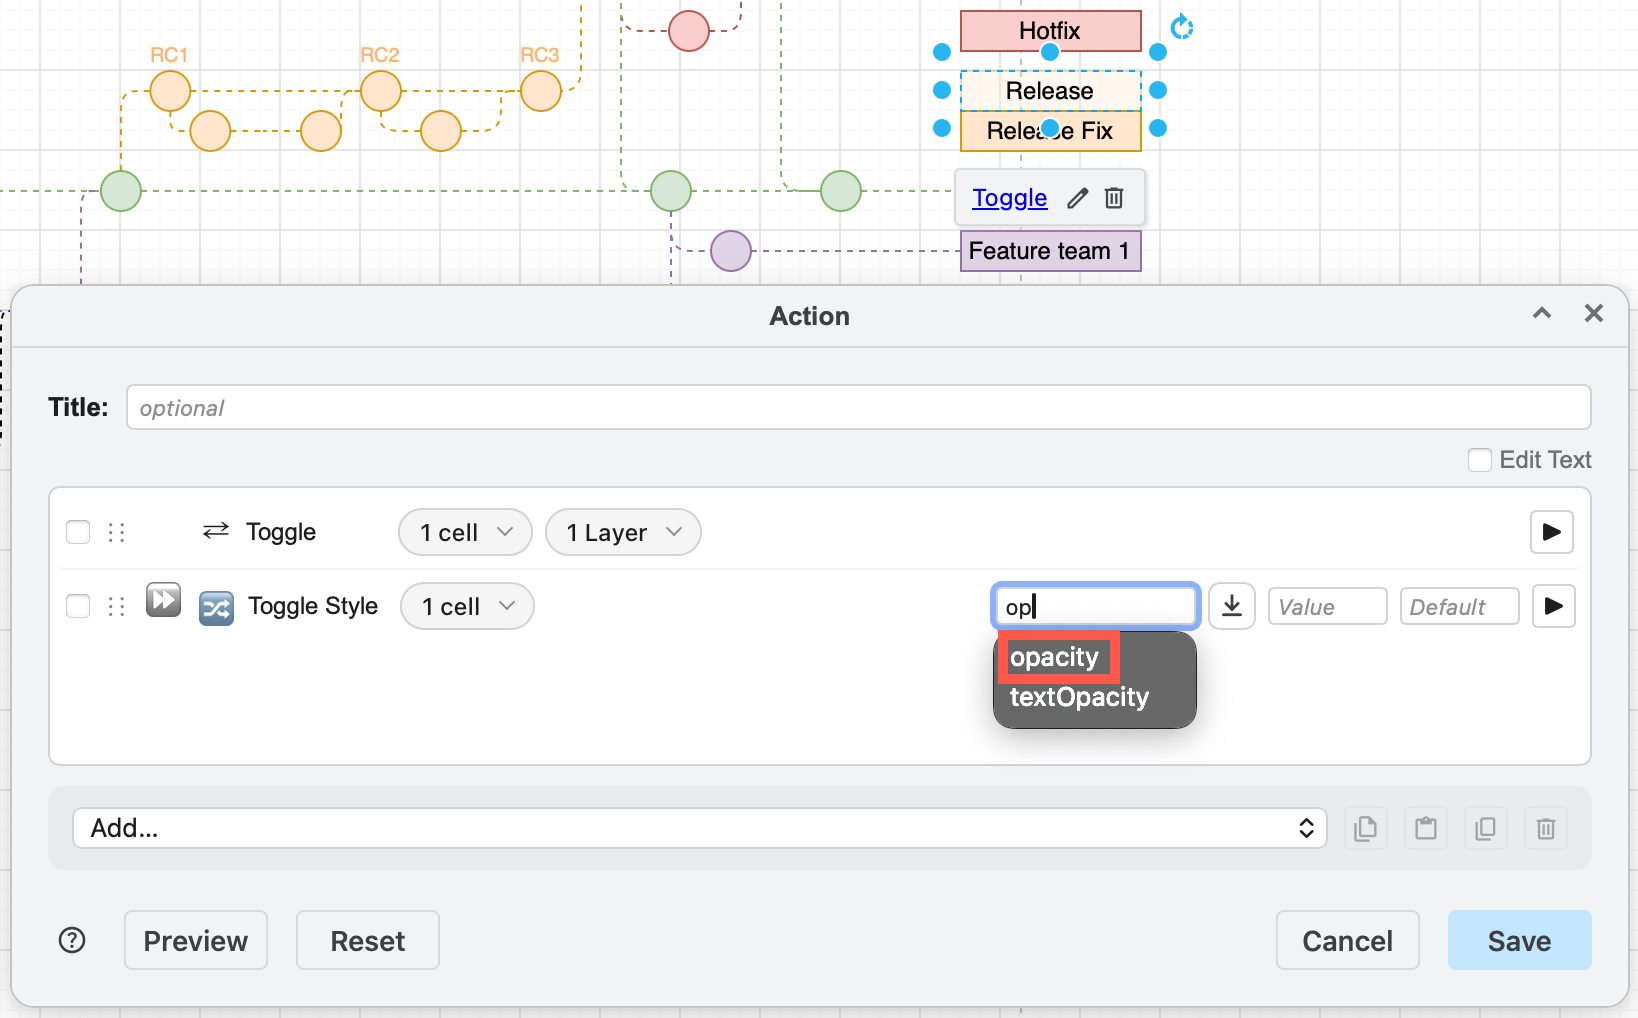
  • Style: Enter a style key (e.g. opacity) and set a value. If you are toggling a style, you can set two values. Style keys will autocomplete when you start typing.
    Add a style toggle to change the opacity of the branch label

See all the different animation actions you can use in custom links and page animations.

Step-by-step tutorial​

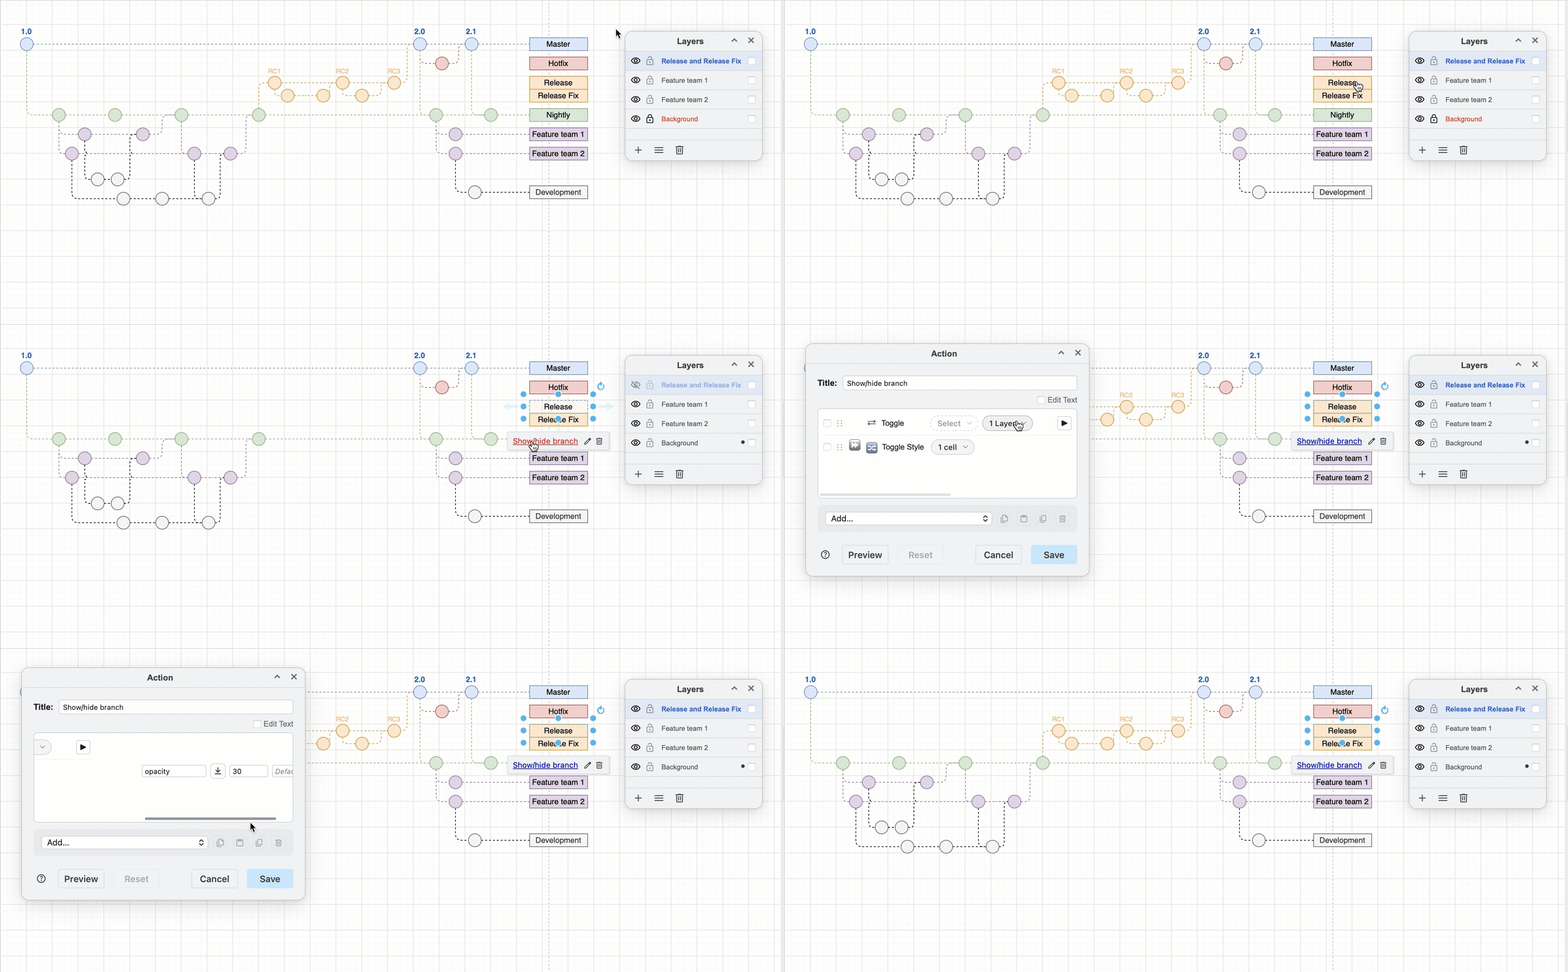
Follow this tutorial to create an interactive gitflow diagram with custom actions and layers for new staff who need to learn your branch management strategy.
Interact with your diagram via the Layers dialog or a custom link on a shape

Advanced layout shapes and layout containers

· 3 min read

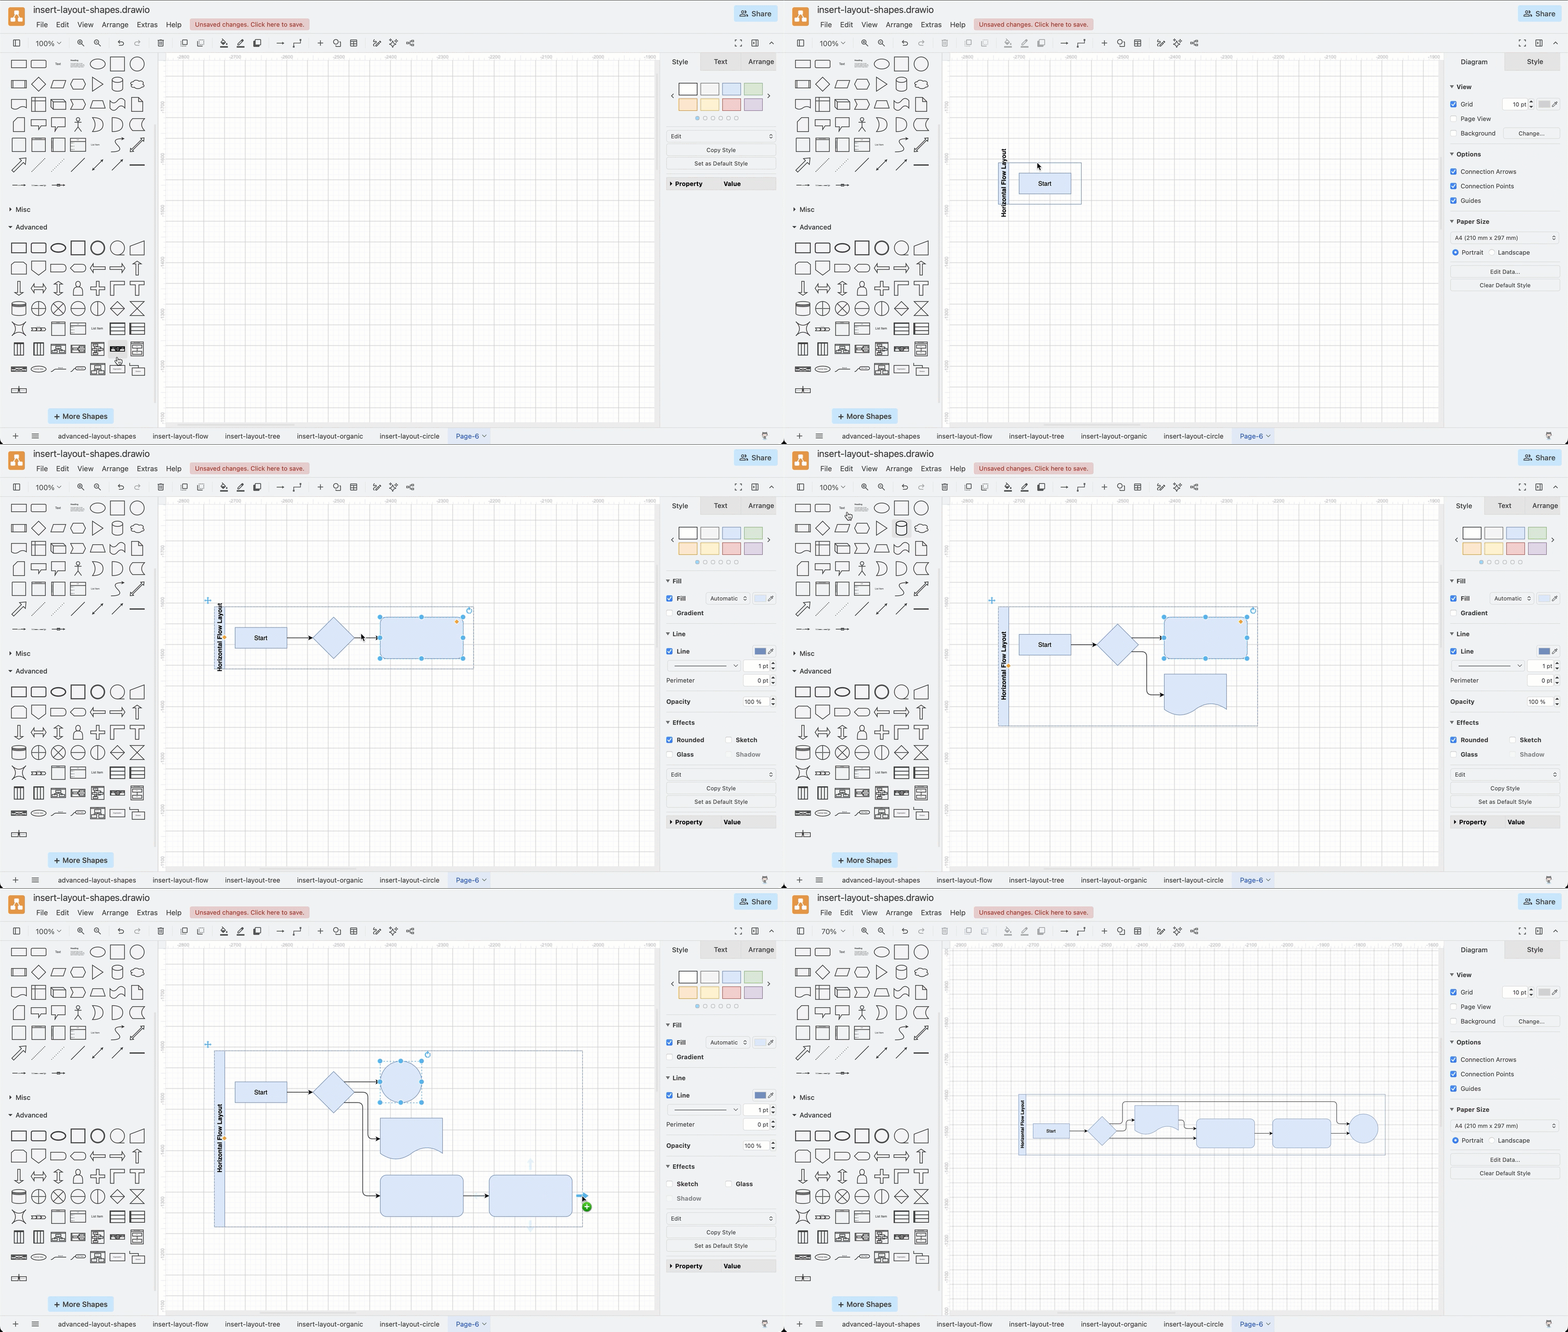
The advanced shape library contains several automatic layout shapes that let you quickly build flowcharts, trees and mindmaps without needing to worry about manually rearranging shapes.
Hold down alt as you click on shapes in the shape library to add and connect them inside a automatic flow layout shape

Add an advanced layout shape​

Advanced shape library: Click on More Shapes at the bottom of the left panel, select the General shape library, and click Apply.

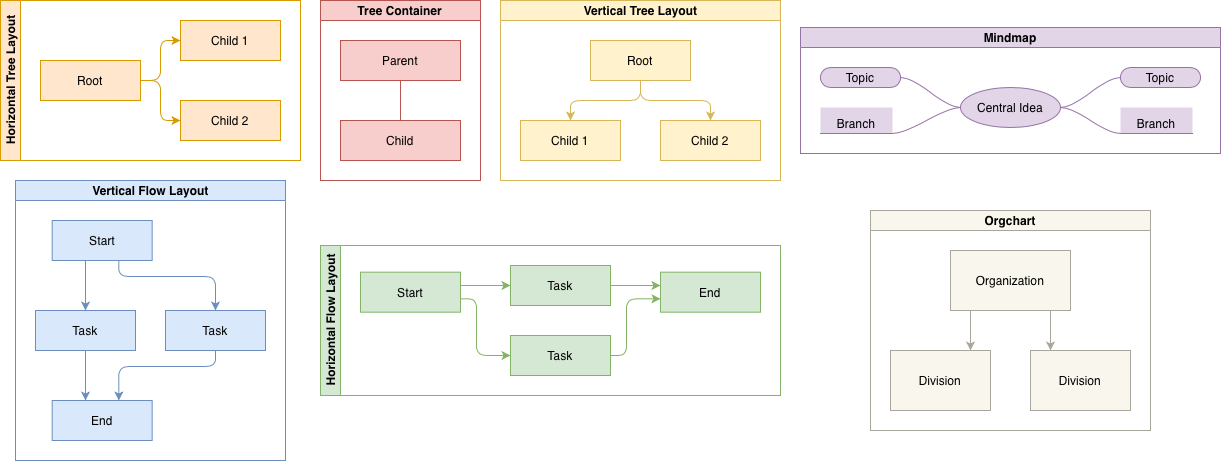
The layout shapes in the Advanced shape library include vertical and horizontal trees, vertical and horizontal flows, mindmaps and org charts. The Tree Container, mindmap and org chart layout shapes have expand/collapse functions in the top left of their shapes.
The Advanced shape library contains a number of automatic layout shapes surrounded by a swimlane shape

Add more shapes to your layout shape​

The diagram inside the layout shape will automatically rearrange to fit any new connected shape that you add or delete. Be careful not to delete all of the shapes inside though - when you delete the last contained shape, the entire layout shape is also deleted.

  • Drag and drop a shape from the shape library onto one of the direction arrows of the shapes inside the layout shape.
  • Hold Alt and click on a shape in the shape library to automatically add and connect it to the selected shape inside the layout shape as in the example at the top of the page. This selection will move on to the newly added shape, so you can quickly build your diagram inside the layout shape.
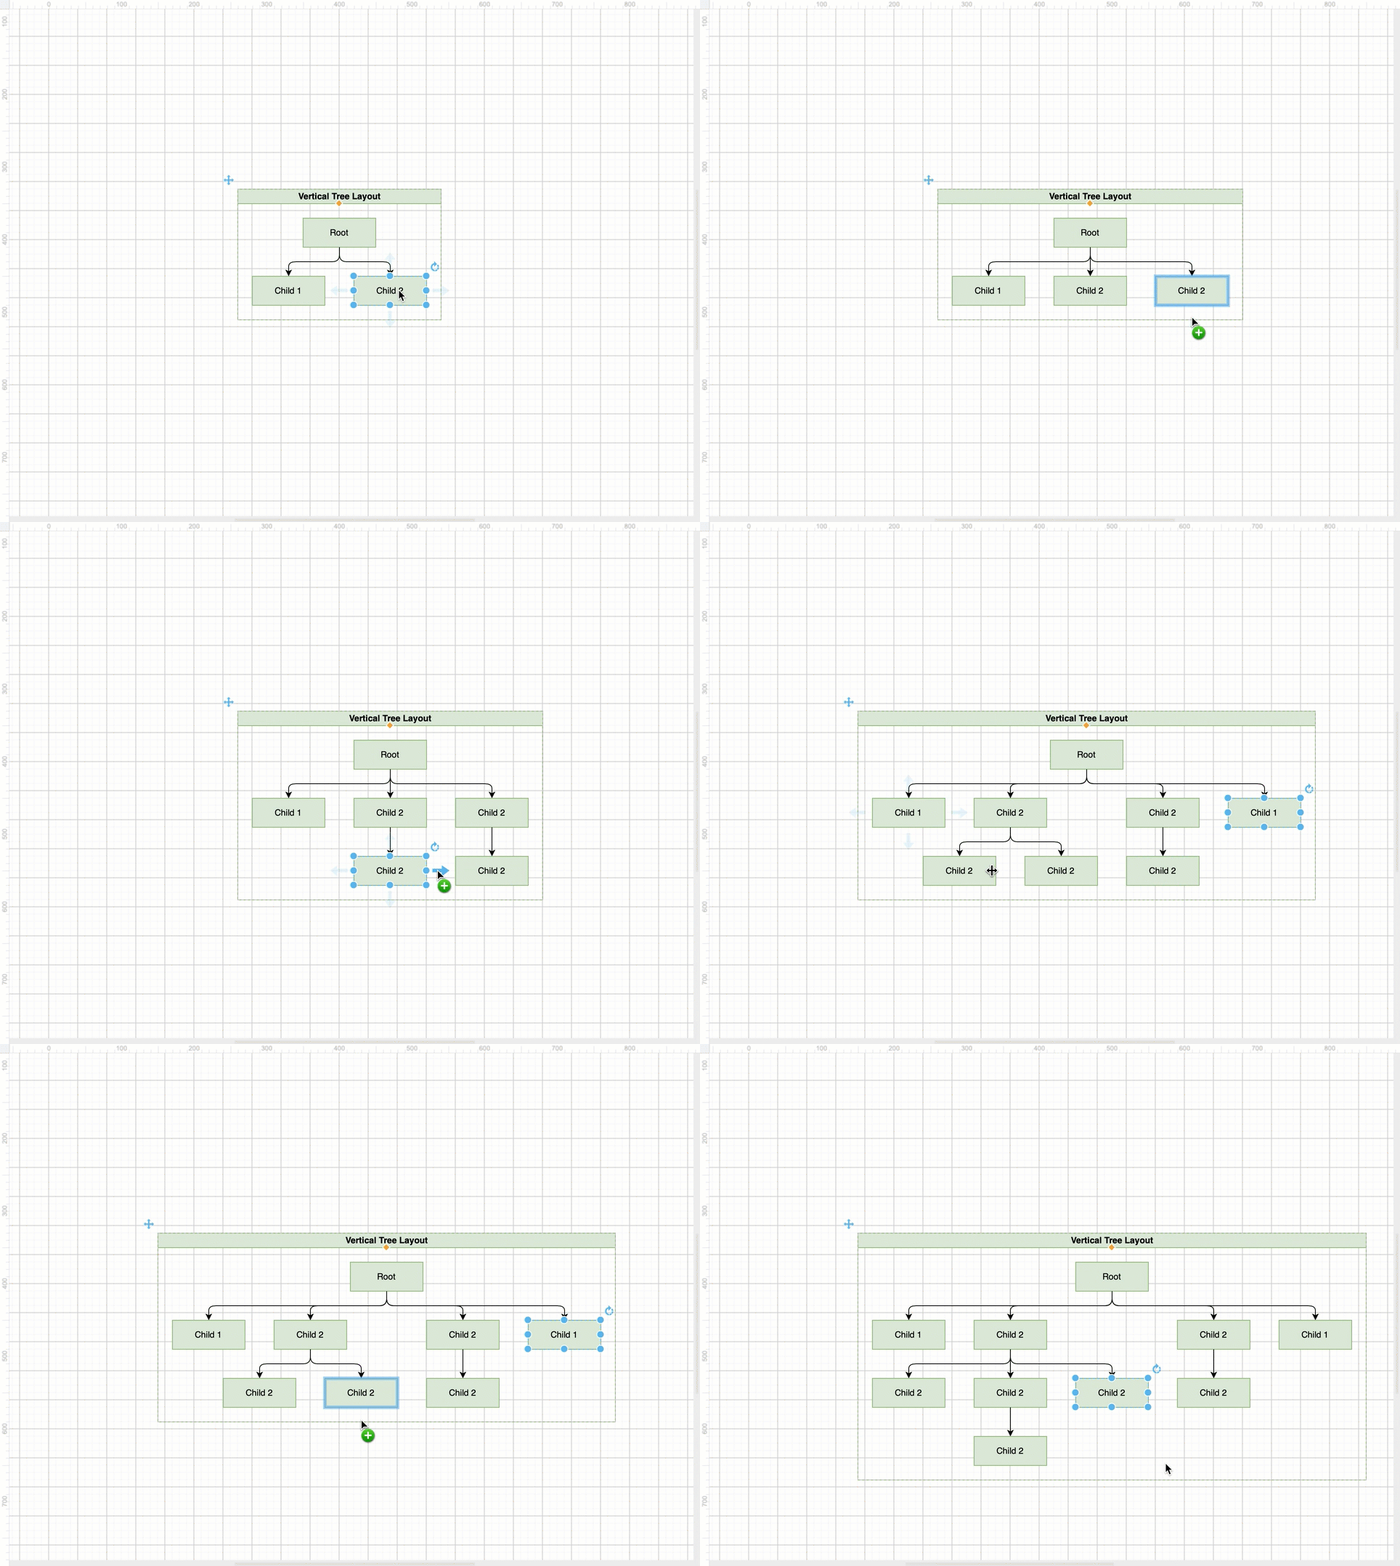
  • In the tree layout shapes, click on the left and right direction arrows to quickl add sibling nodes and connect it to the same parent node.
    Click on the directional arrows that appear when you hover over a shape to clone and connect a new shape inside of a container layout shape

Insert a layout container​

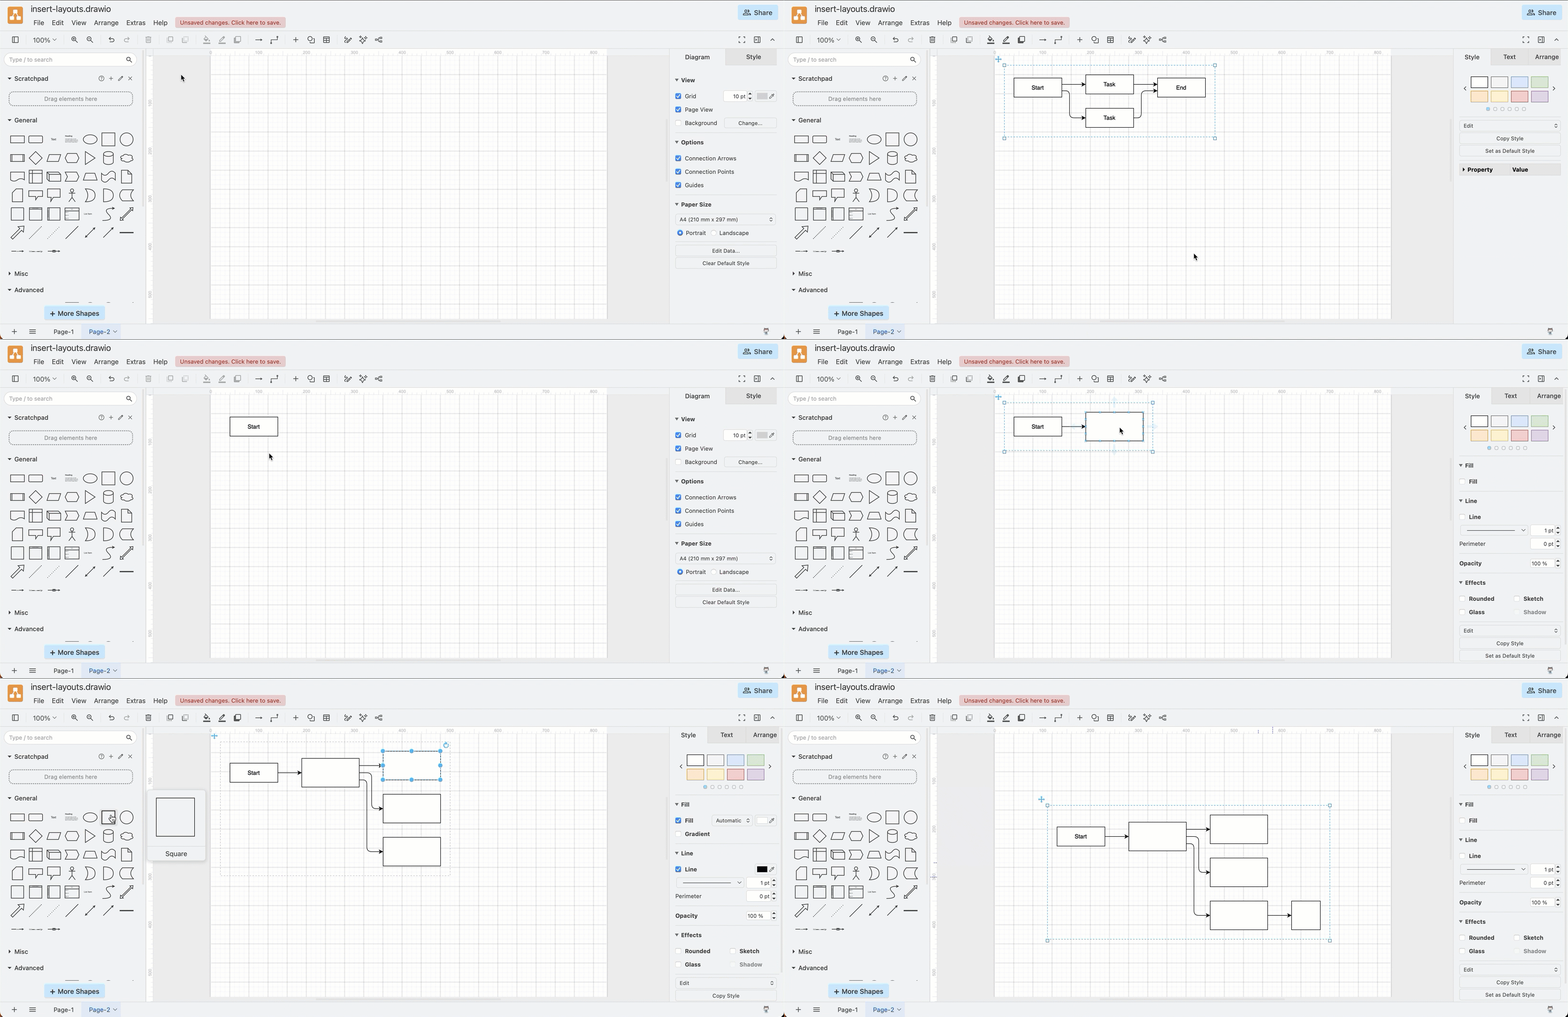
While the layout shapes from the Advanced shape library are surrounded via a swimlane shape that you can connect to and from, when you insert a layout container via Arrange > Insert > Layout or via the toolbar + > Layout it will have an invisible/transparent border.
Quickly click together a horizontal flow in draw.io

Note: You can not connect to the border of these layout containers, only to the shapes inside.

The layout algorithms for both the Advanced layout shapes and these layout containers is the same. Add and remove shapes just as you would one of the Advanced layout shapes. Similarly, when you delete the last remaining shape inside a layout container, the layout container itself will also be deleted.

Do diagram layouts apply to layout containers?​

No. If your diagram has layout containers (from the Advanced shape library or via Arrange > Insert > Layout), the shapes and connectors inside those layout containers will not be rearranged when you apply a diagram layout from Arrange > Layout. While the layout container shapes follow the same algorithms, they are treated as a single shape when applying a diagram-wide layout.
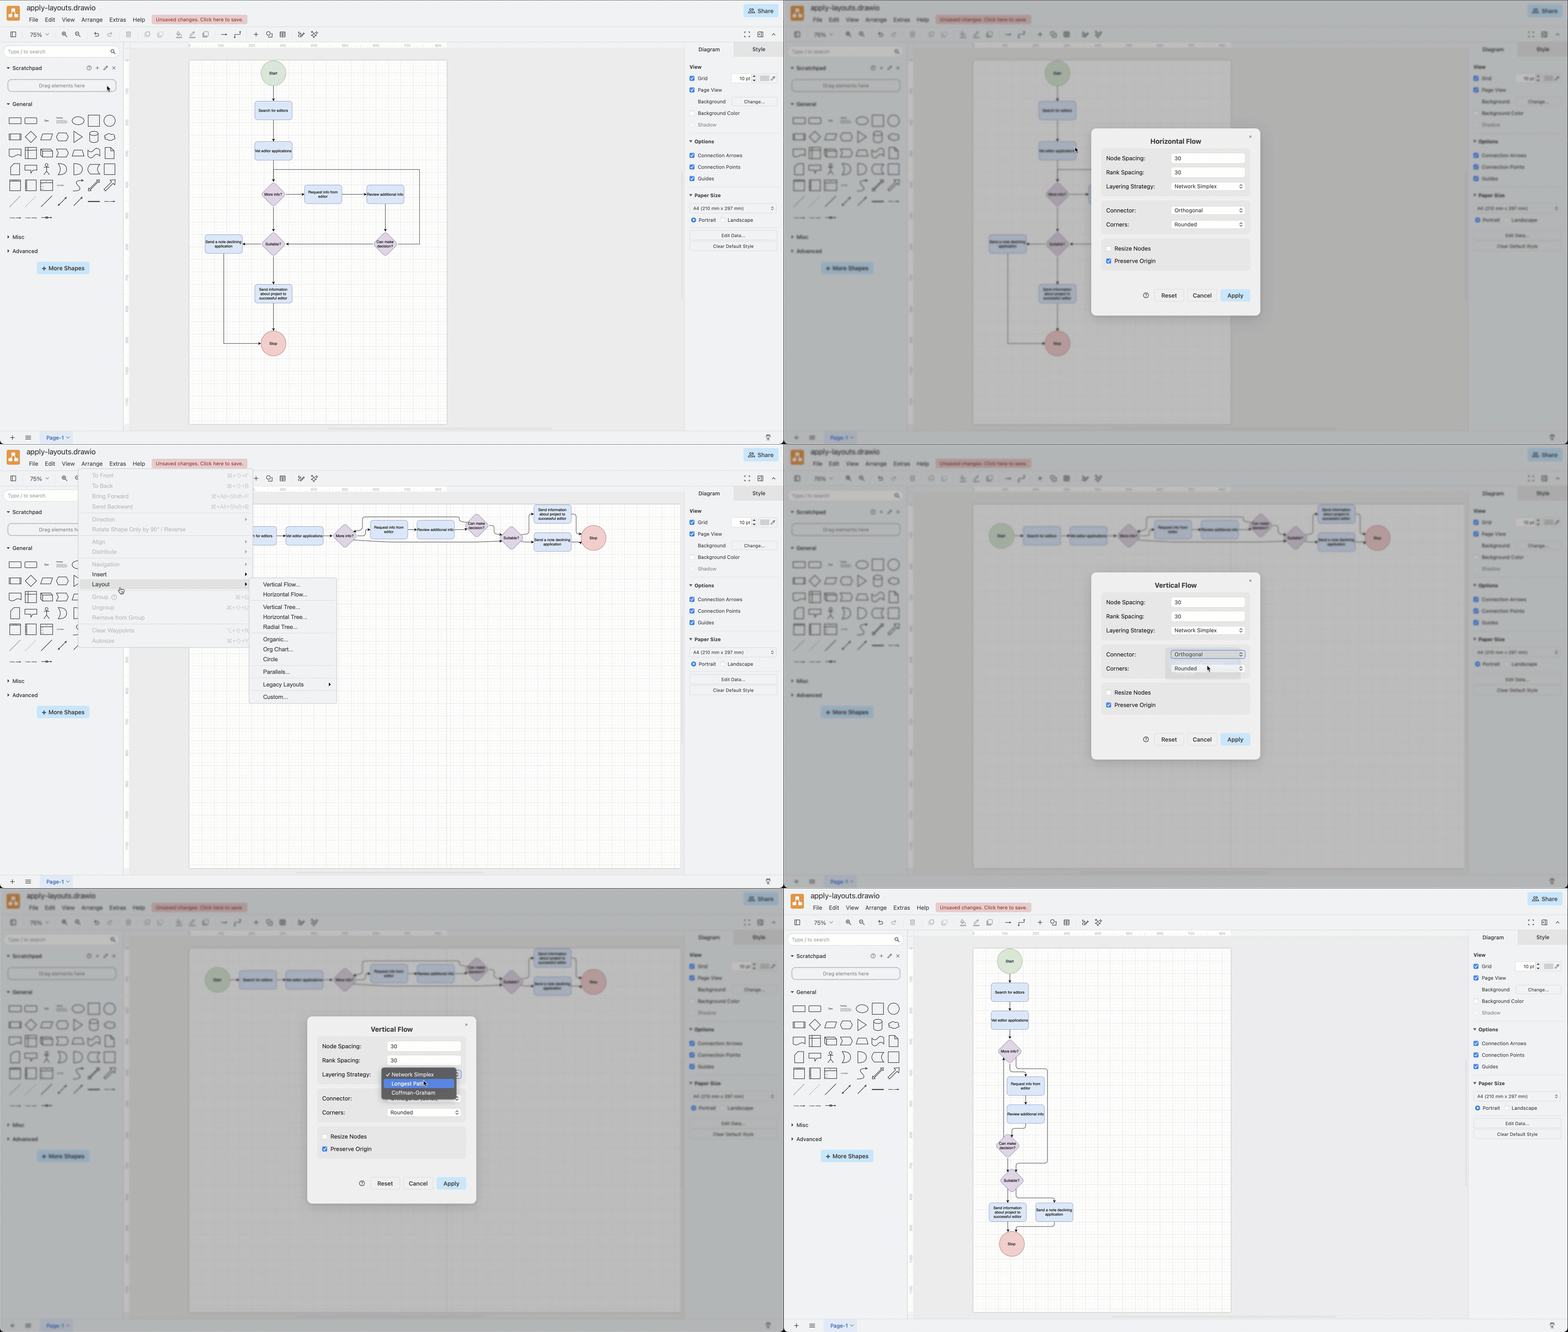
Rearrange your diagram quickly by applying a layout - select Arrange > Layout from the menu

Updated Generate tool for better AI diagrams

· 5 min read

The Generate tool has been overhauled so that it is more flexible and more customisable via the draw.io configuration dialog.
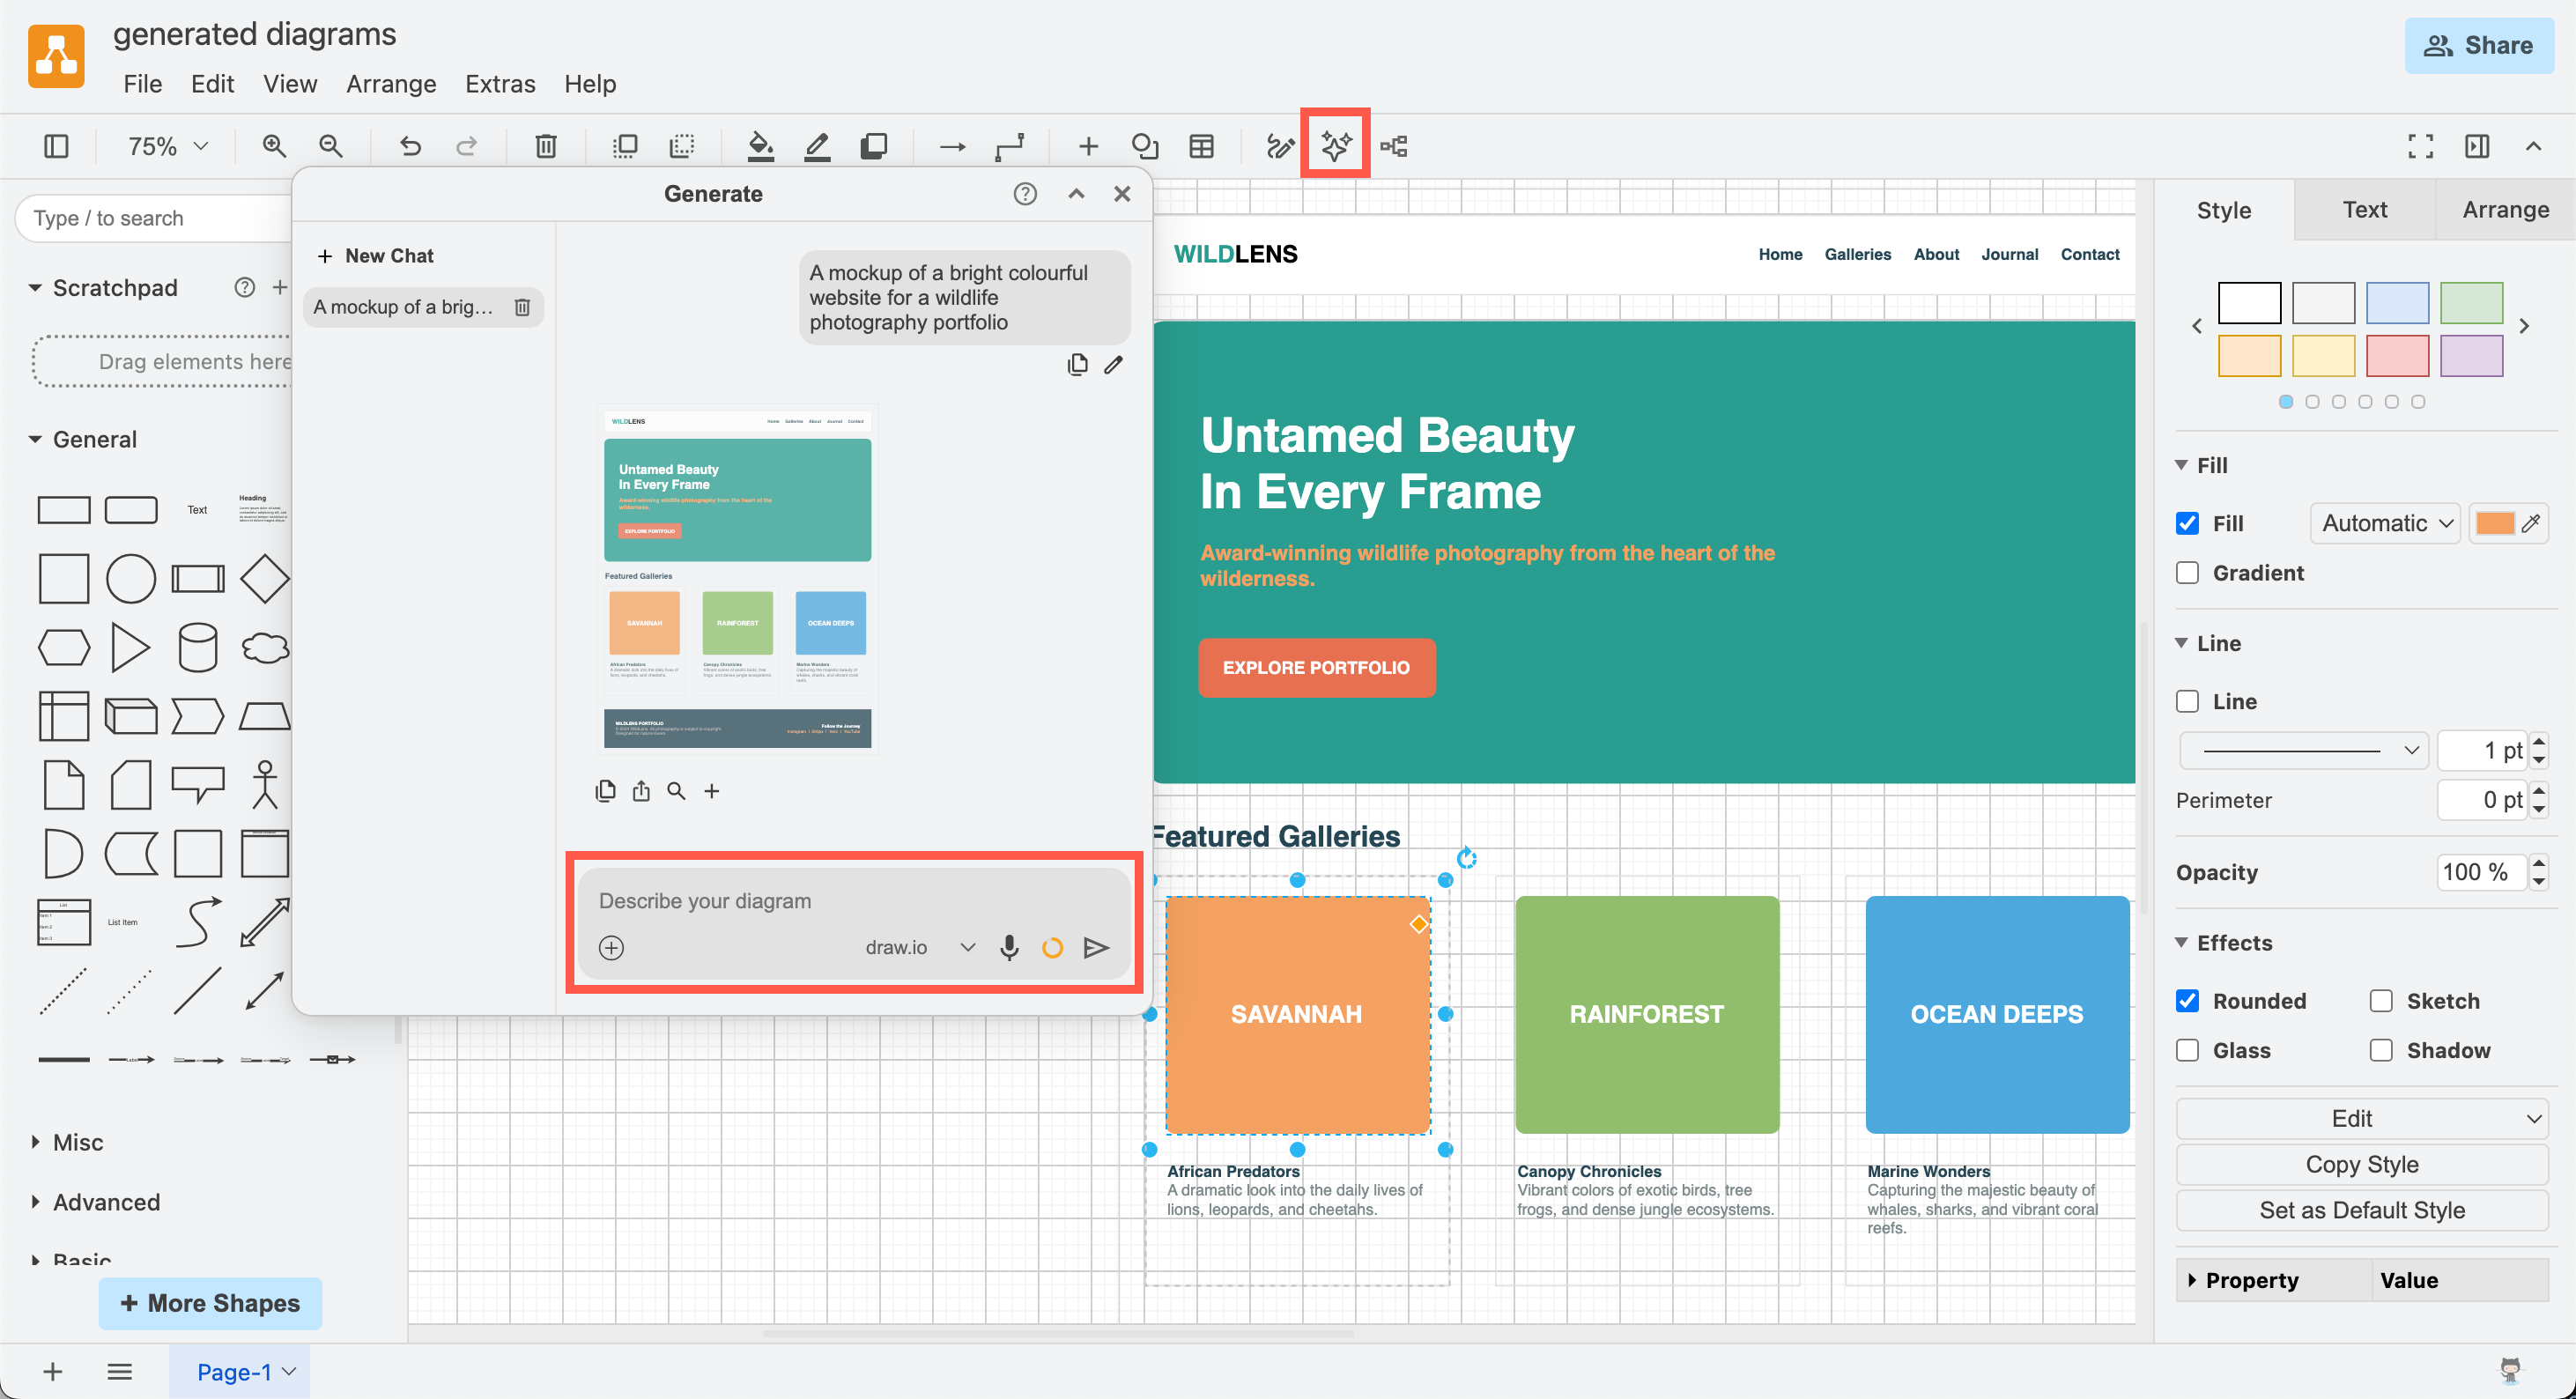
The updated Generate tool in draw.io with a chat list on the left, generated diagram previews in the middle, and a query text box at the bottom

  • Start a New Chat in the Generate dialog to generate a new or different diagram.
  • Edit the query, or Send a clarification query to make changes to an already generated diagram. Apply those changes to the diagram you had already added to the drawing canvas.
  • Change the default initial LLM instructions, set specific LLM models, and use your own LLM API keys via the draw.io configuration.
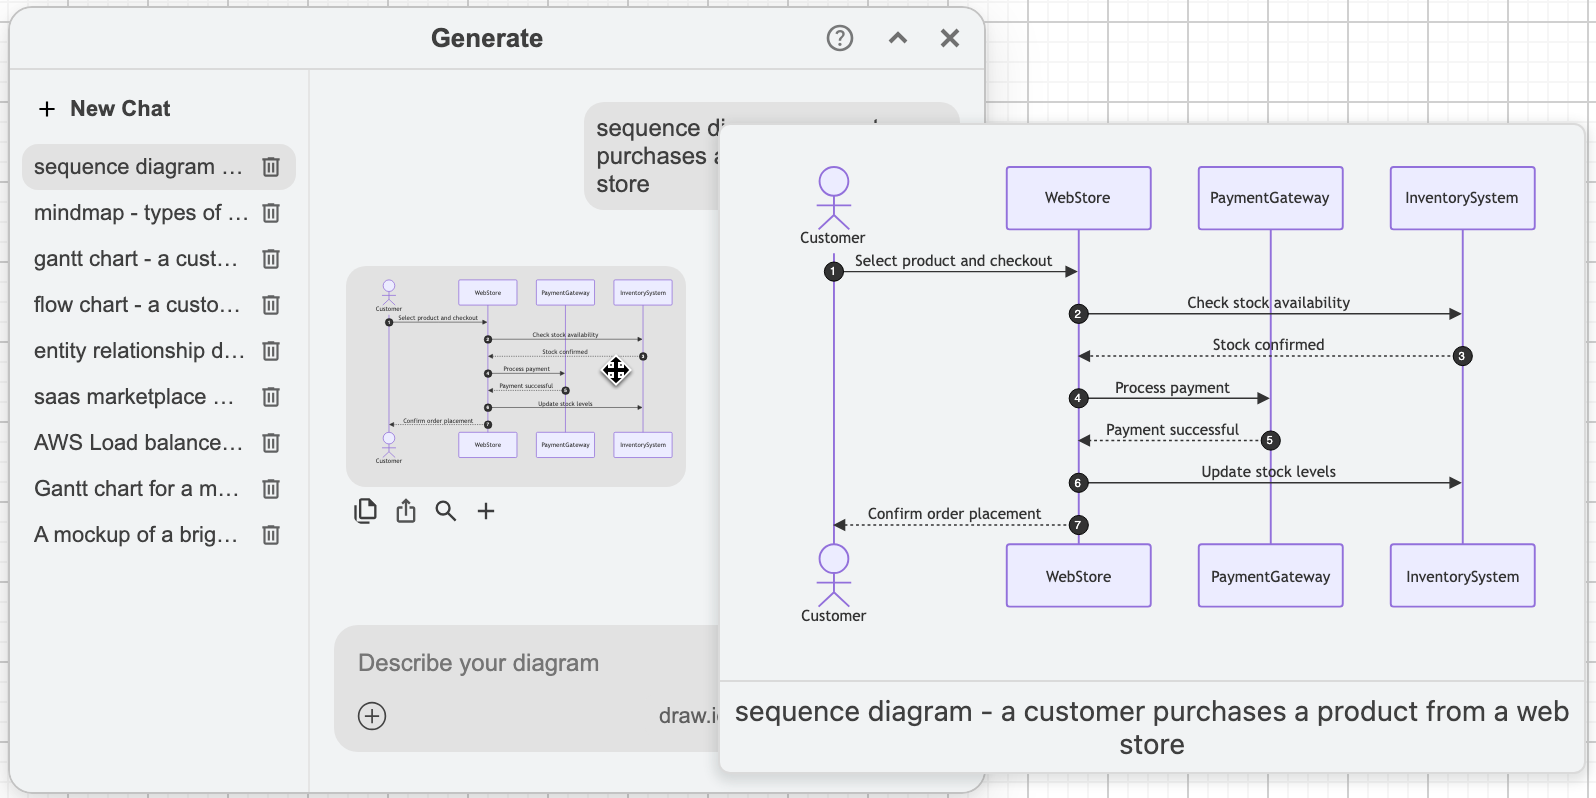
Generate a UML sequence diagram from a text description via the diagram generate dialog in draw.io

Which LLM models?​

The most appropriate LLM model for the diagram type you specified in your query will be chosen automatically. The model list that draw.io uses changes frequently - currently, OpenAI, Claude and Gemini are used.

Using multiple AI generators supports a wide range of diagrams, including interface mock-ups, infrastructure diagrams, Mermaid diagrams and more.

You can also set specific instructions and configurations for each action and/or model in the draw.io editor configuration.
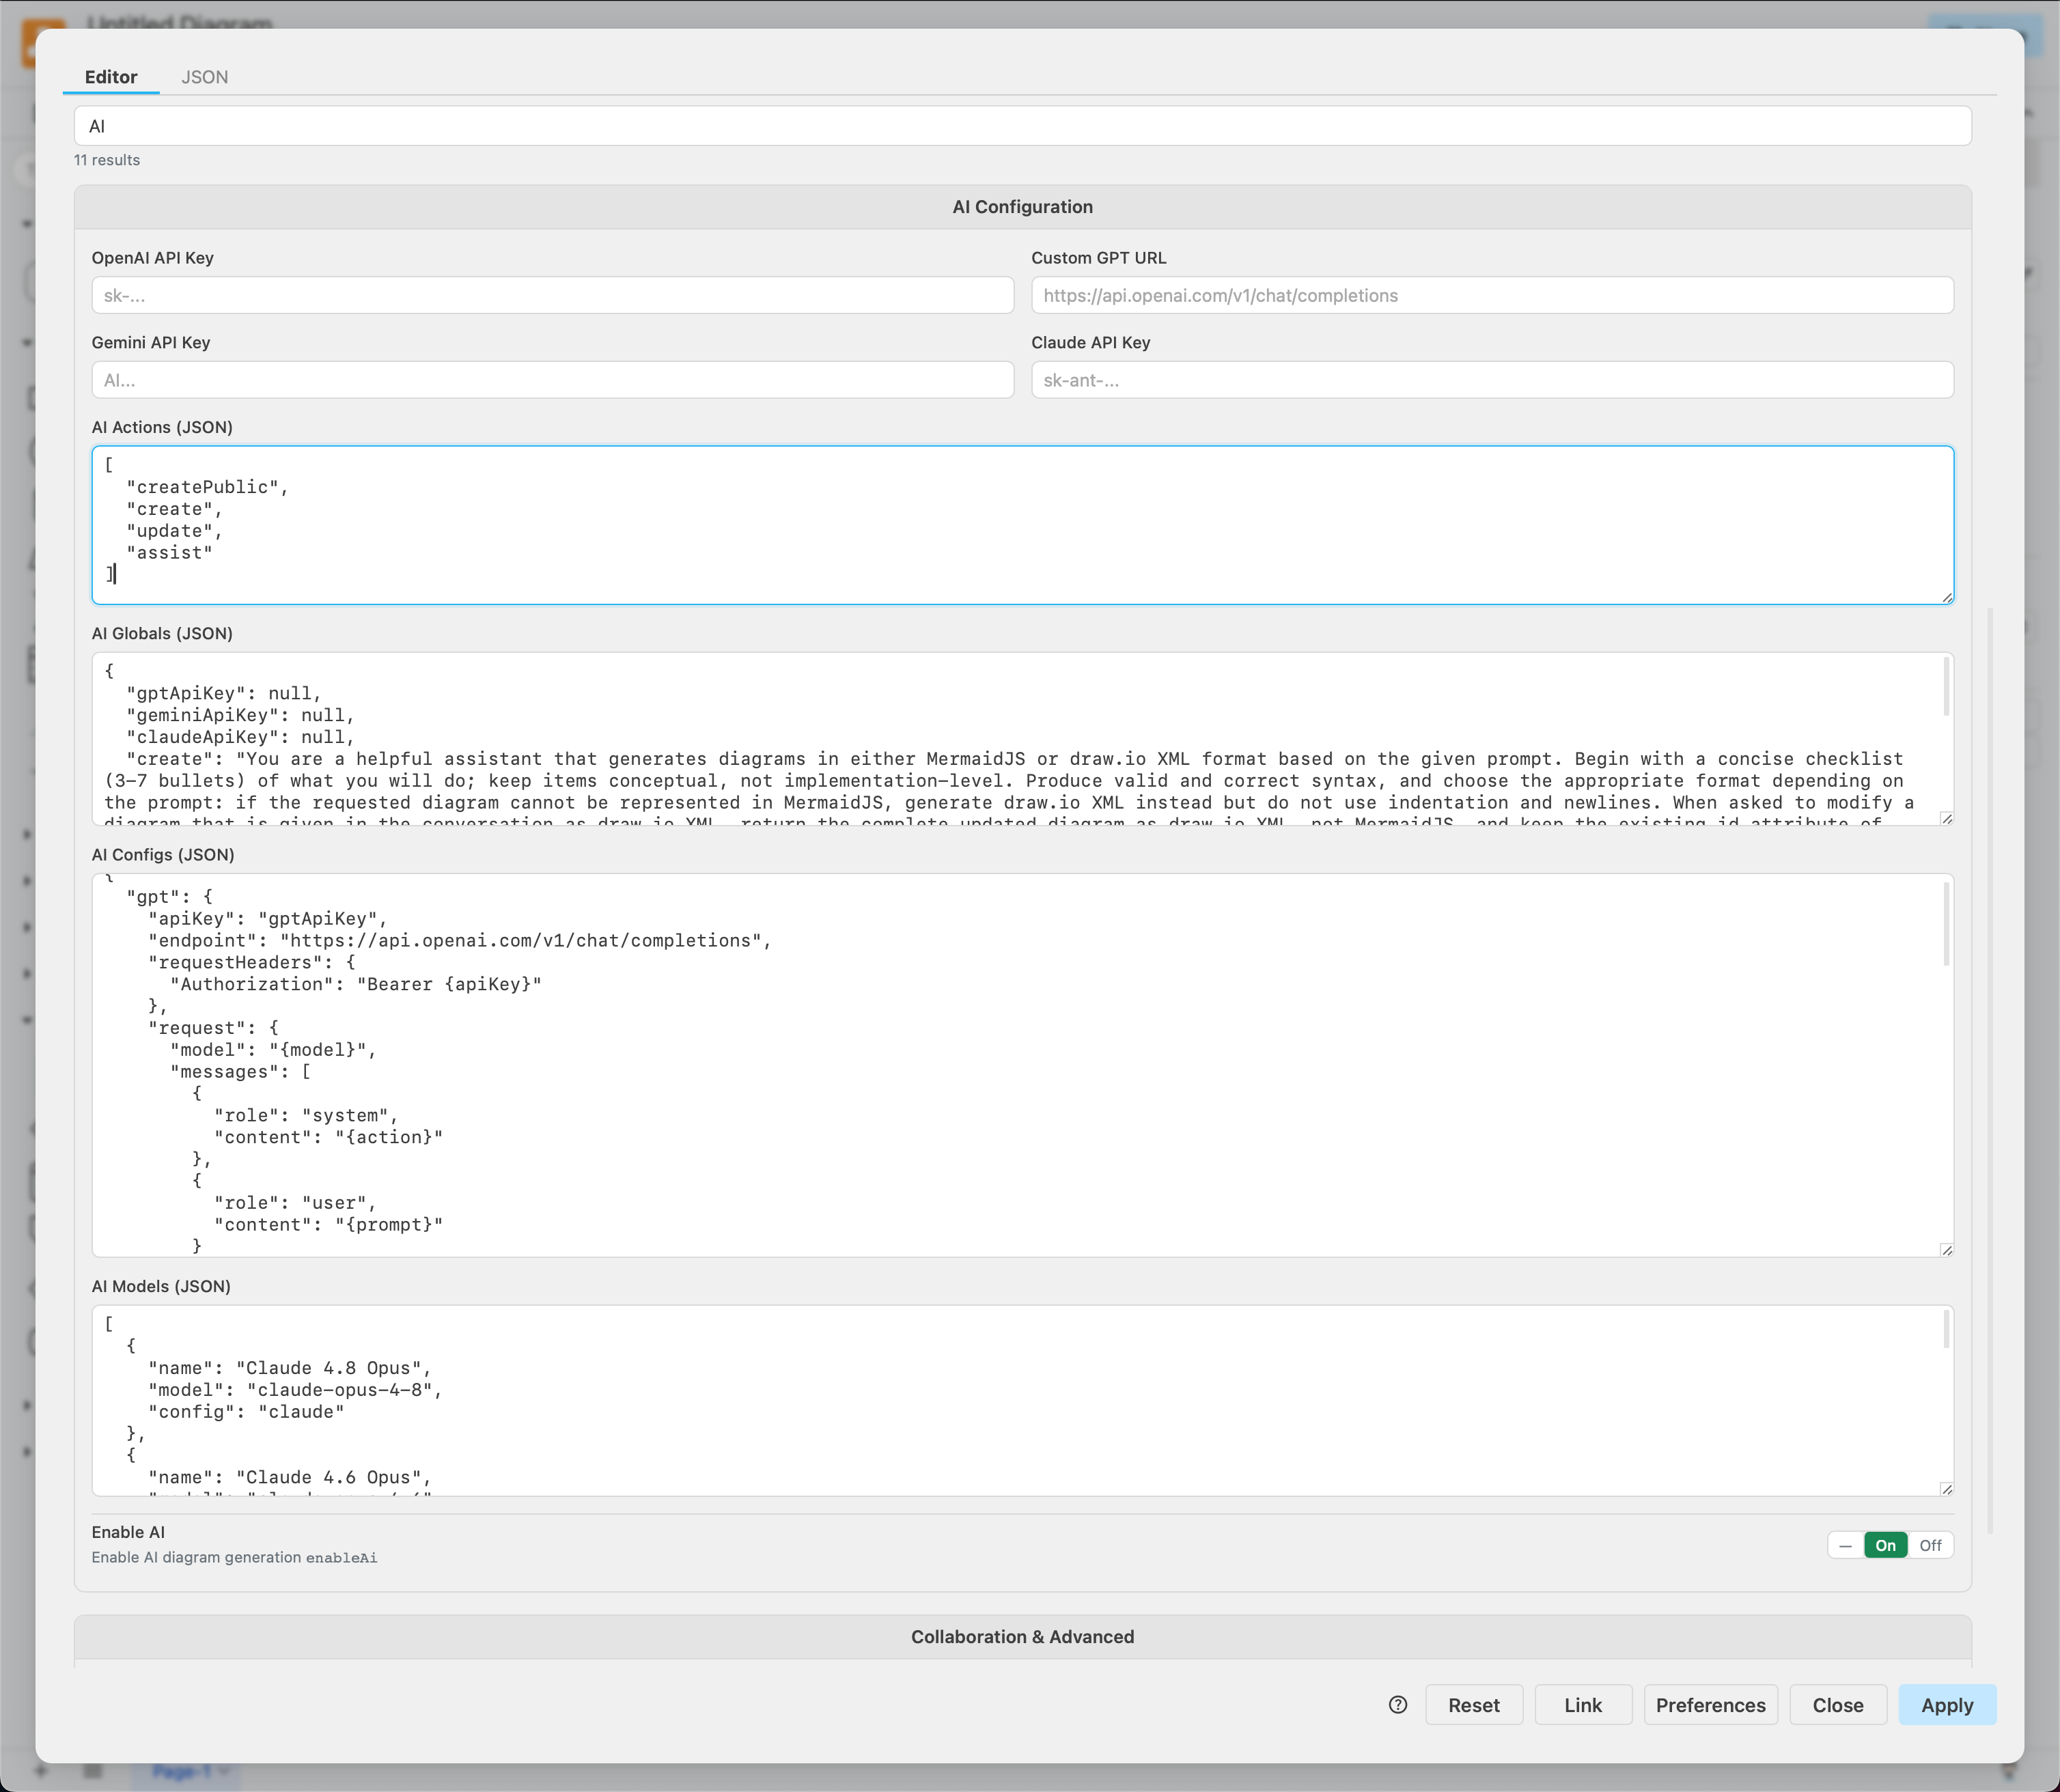
customise the AI models used in diagram generation in draw.io via Extras > Configuration

Set specific AI models​

Add your own LLM API keys to choose specific models from the Claude, Gemini and GPT families in the Generate dialog, instead of using the free hosted draw.io backend.

  1. Select Extras > Configuration from the menu.
  2. Enter your API keys in the AI configuration section, then click Apply.
    Add your own LLM API keys in the draw.io configuration to choose specific AI models in the Generate dialog

The model selector in the Generate dialog will list your configured models. Via the configuration options, you can also add new or self-hosted models with compatible APIs, customise the system prompts, or disable the AI features completely.

Tip: The Clipboard backend needs no API key - it copies your request to the clipboard so you can paste it into an external AI tool, then paste the response back into the Generate dialog.

Generate a diagram​

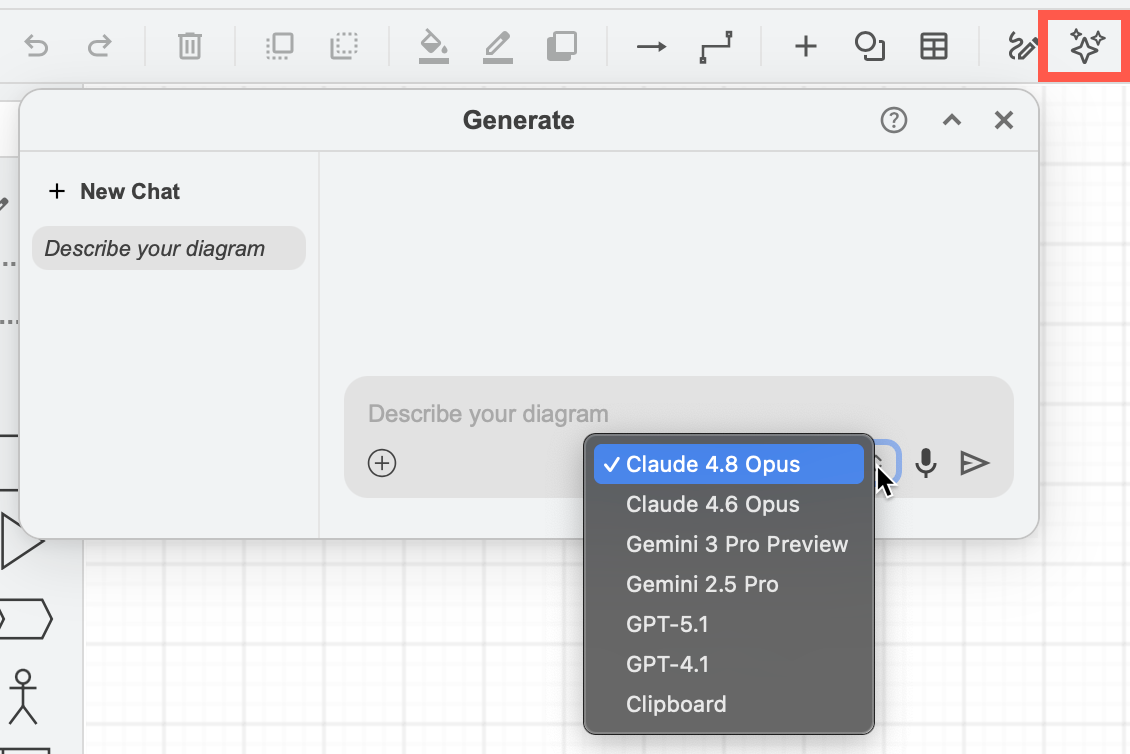
  1. Click on the Generate tool (sparkle button) in the toolbar, or select Arrange > Insert > Generate from the menu.
    Click on the Generate tool in the draw.io toolbar to open the Generate diagram dialog
  2. Describe your diagram, starting with the type of diagram you want, then press Enter or click on Send.
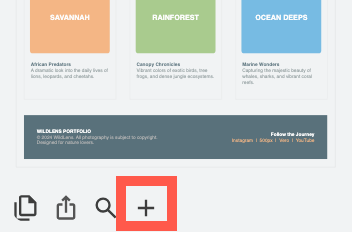
  3. Click + to add the generated diagram to the drawing canvas.
    Insert the generated diagram on the drawing canvas in draw.io

The diagram will be added to the drawing canvas, where you can edit its shapes, connectors, text and styles as in any other draw.io diagram.

Tips: Hover over a diagram in the dialog to see a larger preview, and click on the microphone to dictate your query instead of typing it. Click + Chat to start a new chat for each new diagram - see examples of generated diagrams.

Share your diagram data with the LLM​

Do you want the Generate tool to make changes to an existing diagram, page, or selected shapes and connectors?

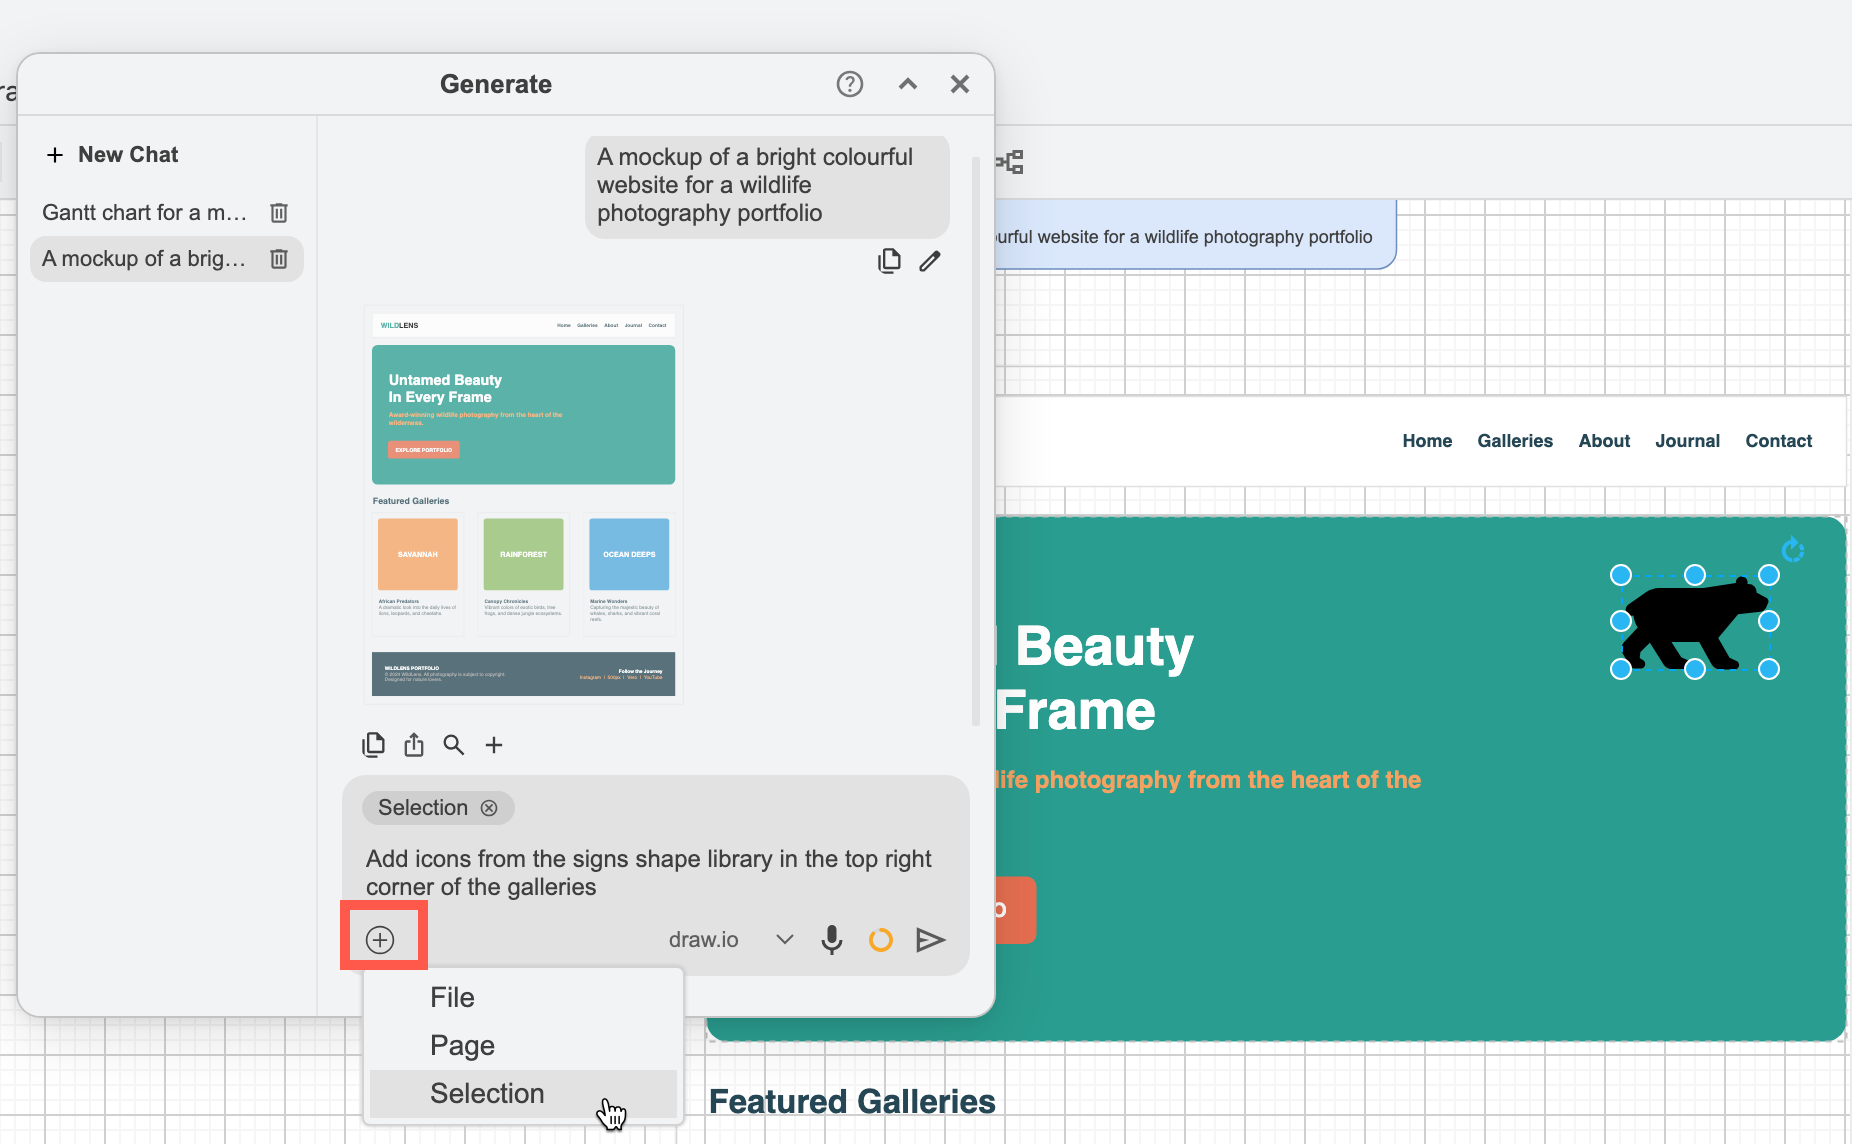
Click on the + in the lower left of the query text box and attach the diagram File, the current diagram Page, or just the Selection of shapes and connectors.
Share your draw.io diagram file, the current diagram page or the selected shapes and connectors with the Generate tool via the + in the bottom left of the query text box

The Generate tool will return an updated version of your diagram.

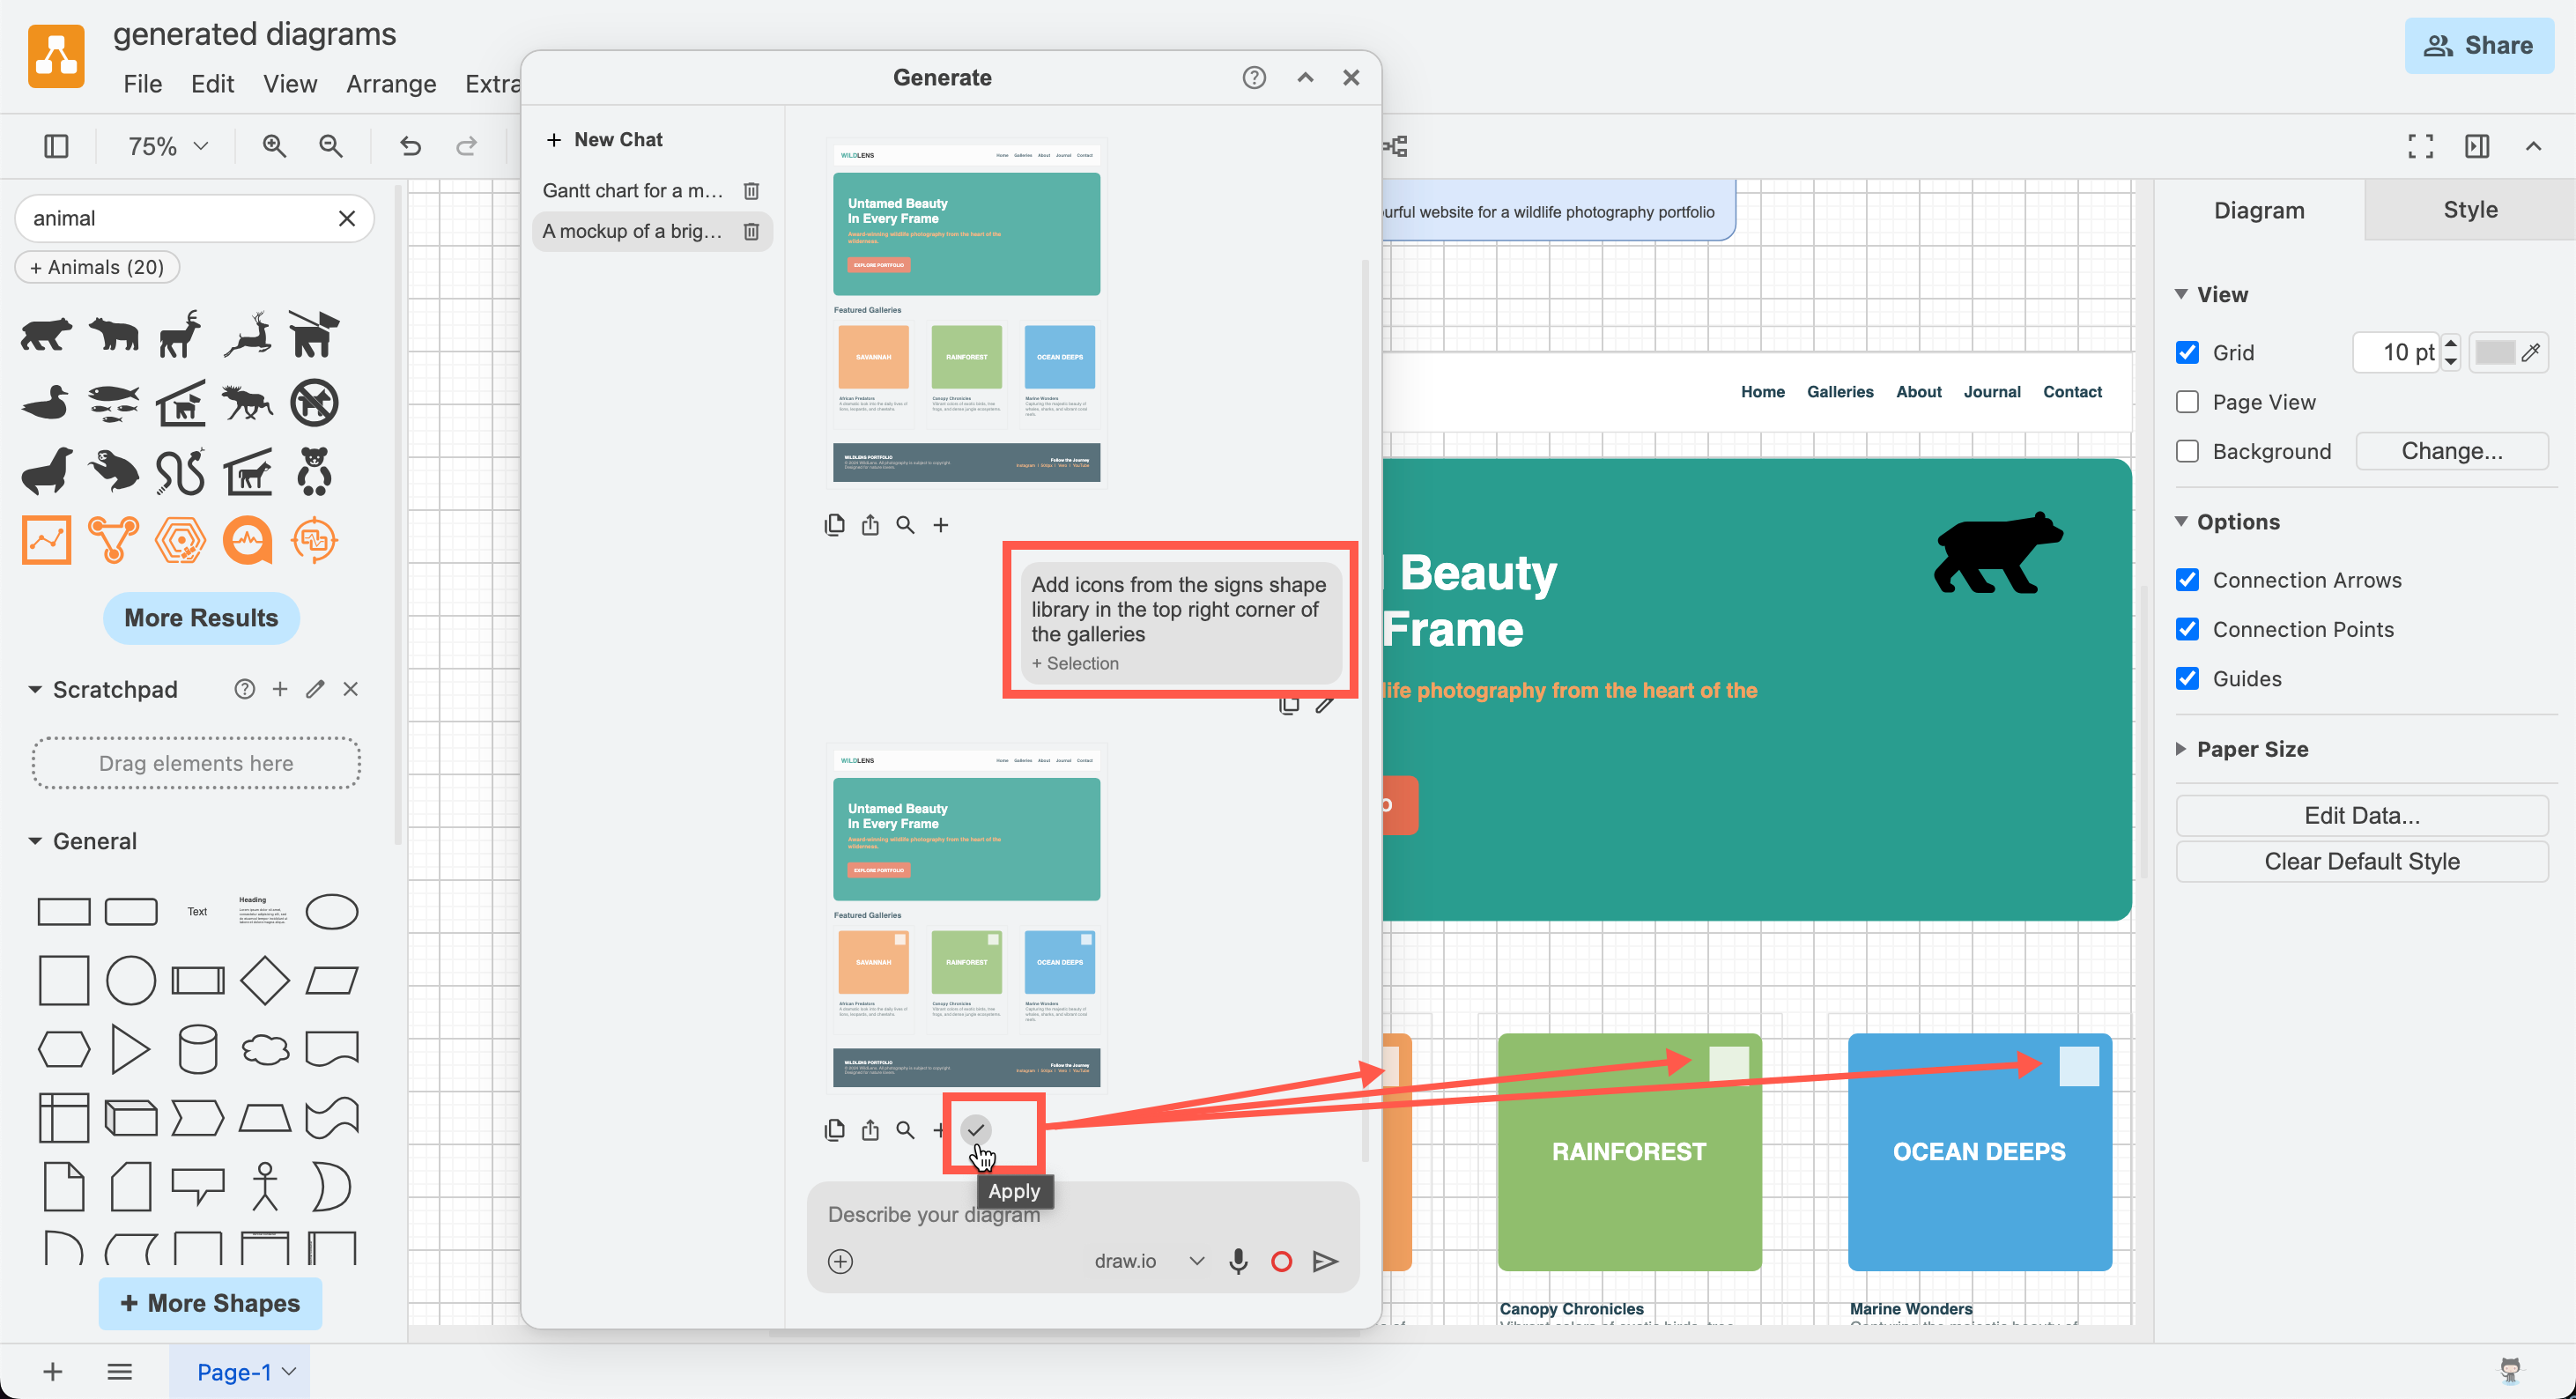
  • Click on the tick to Apply the changes to the diagram on the drawing canvas.
  • Click on the + to Add the new version to the drawing canvas in addition to any existing shapes and connectors.
    Apply the suggested changes to your diagram on the drawing canvas, or add the new version alongside the existing shapes

Note: The Generate tool only has access to the diagram data that it has generated in that chat and anything you have explicitly shared with it. Learn more about AI diagram generation.

Generate diagrams in your AI chats​

If you prefer to work in your AI tool instead, use the draw.io MCP server. The MCP server lets LLMs create draw.io diagrams and open them in the draw.io editor. With AI services that support MCP Apps, such as Claude.ai and VSCode, diagram previews will appear inline in your AI chat.

The draw.io configuration dialog

· 5 min read

While you could always configure draw.io via a JSON script, there is now a configuration dilaog where you can set each of the options via checkboxes and list selectors. That makes it easier to configure the draw.io editor if you are not comfortable with JavaScript Object Notation (JSON).
Access the draw.io configuration via Extras - Configuration

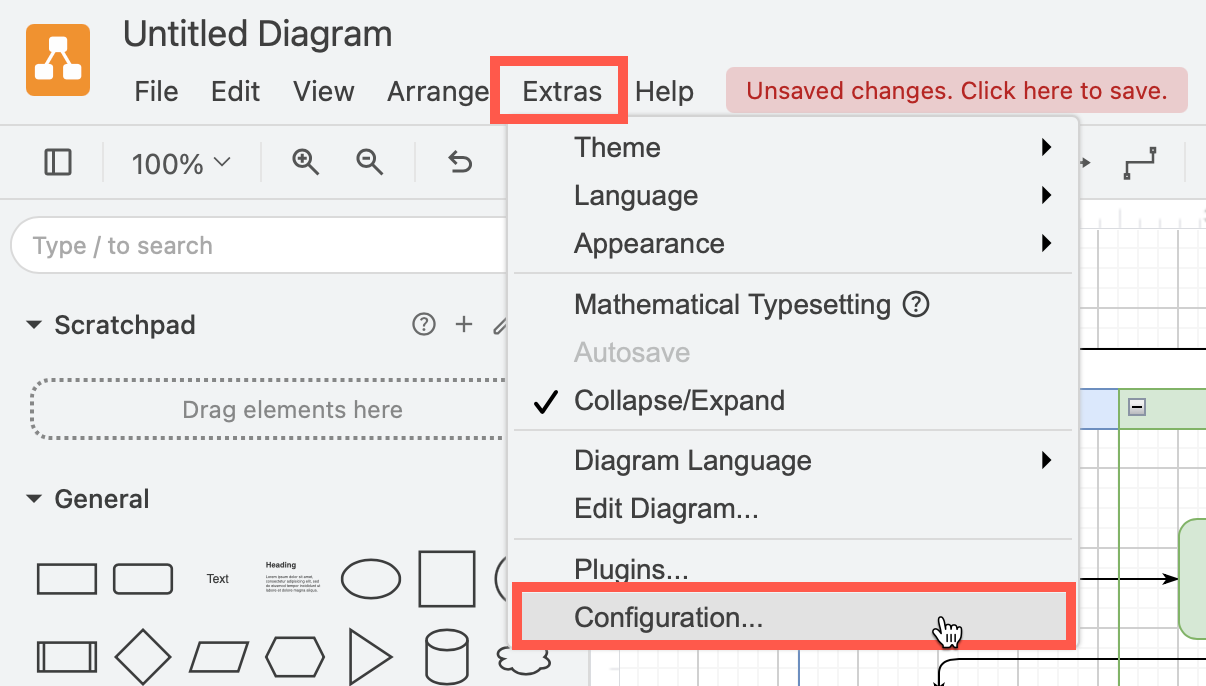
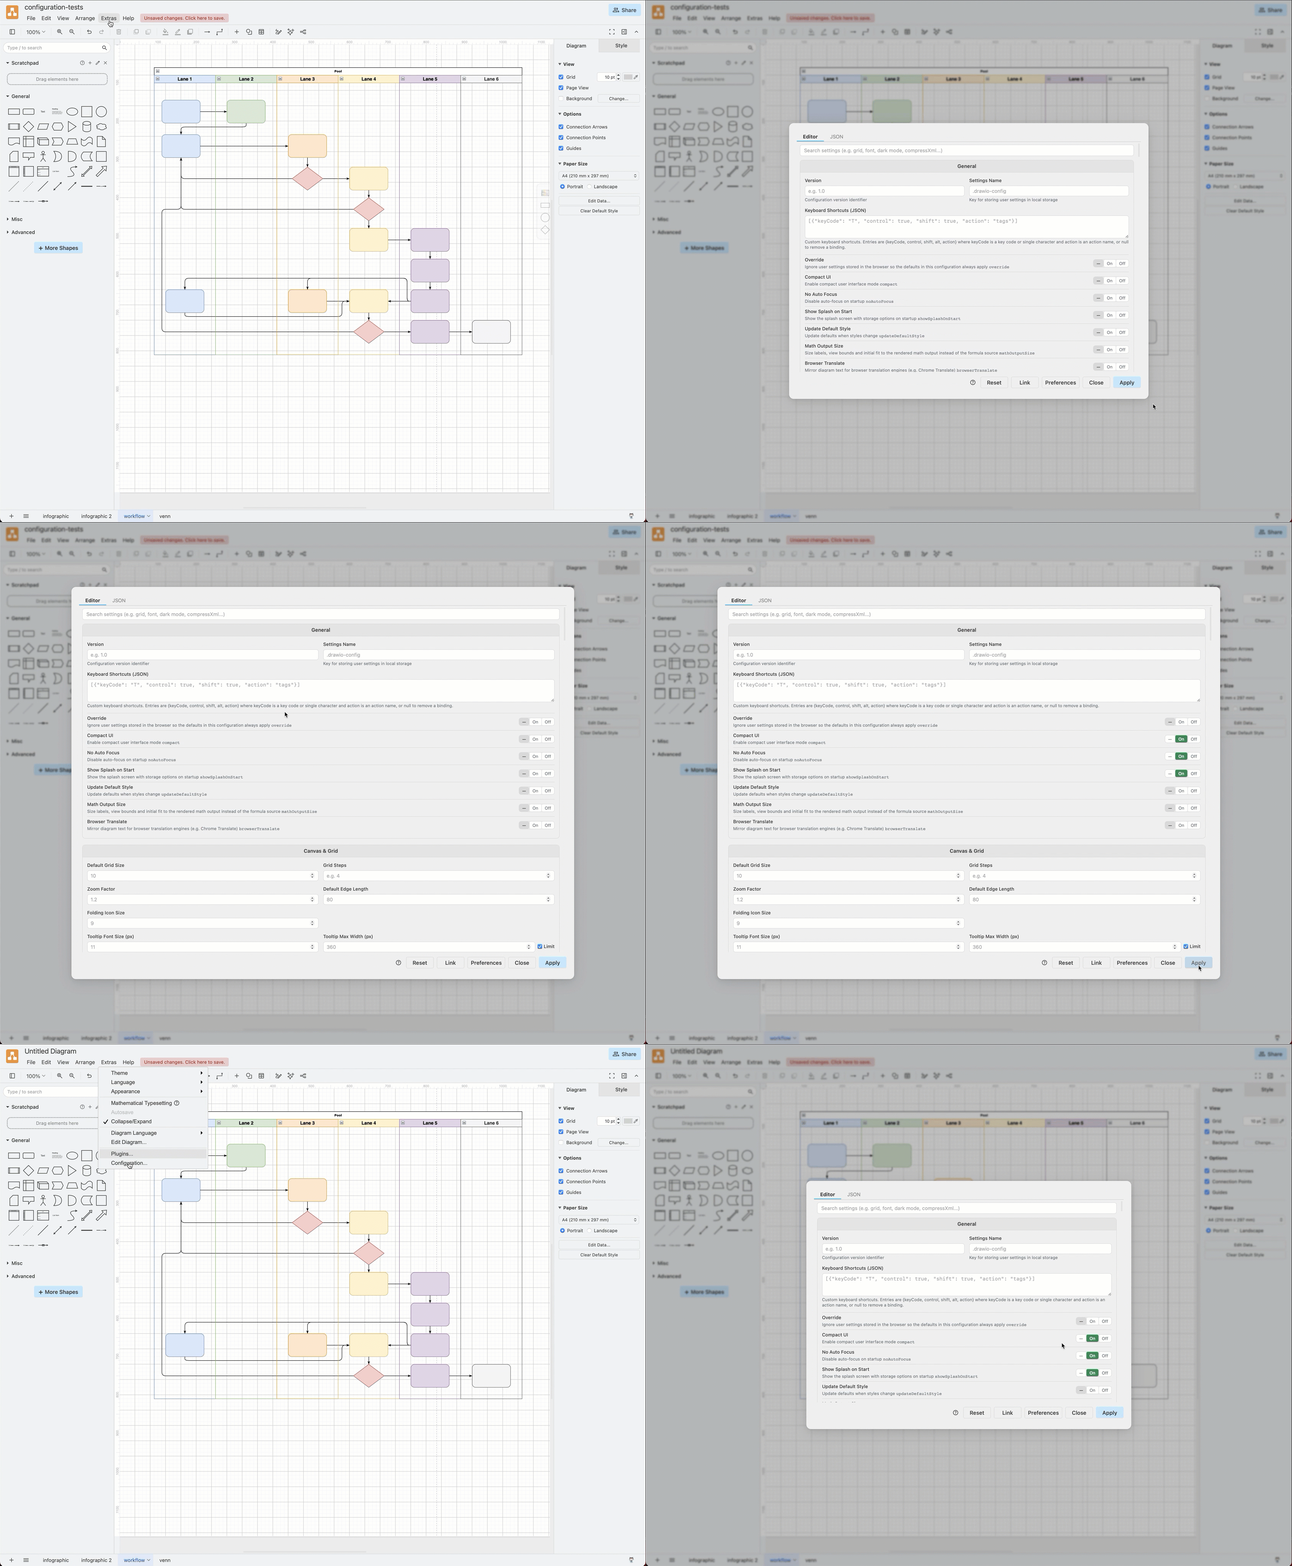
  1. Select Settings > Configuration from the draw.io menu, or Extras > Configuraion if you are using the Classic or Atlas editor theme.
    Access the draw.io configuration via Extras - Configuration
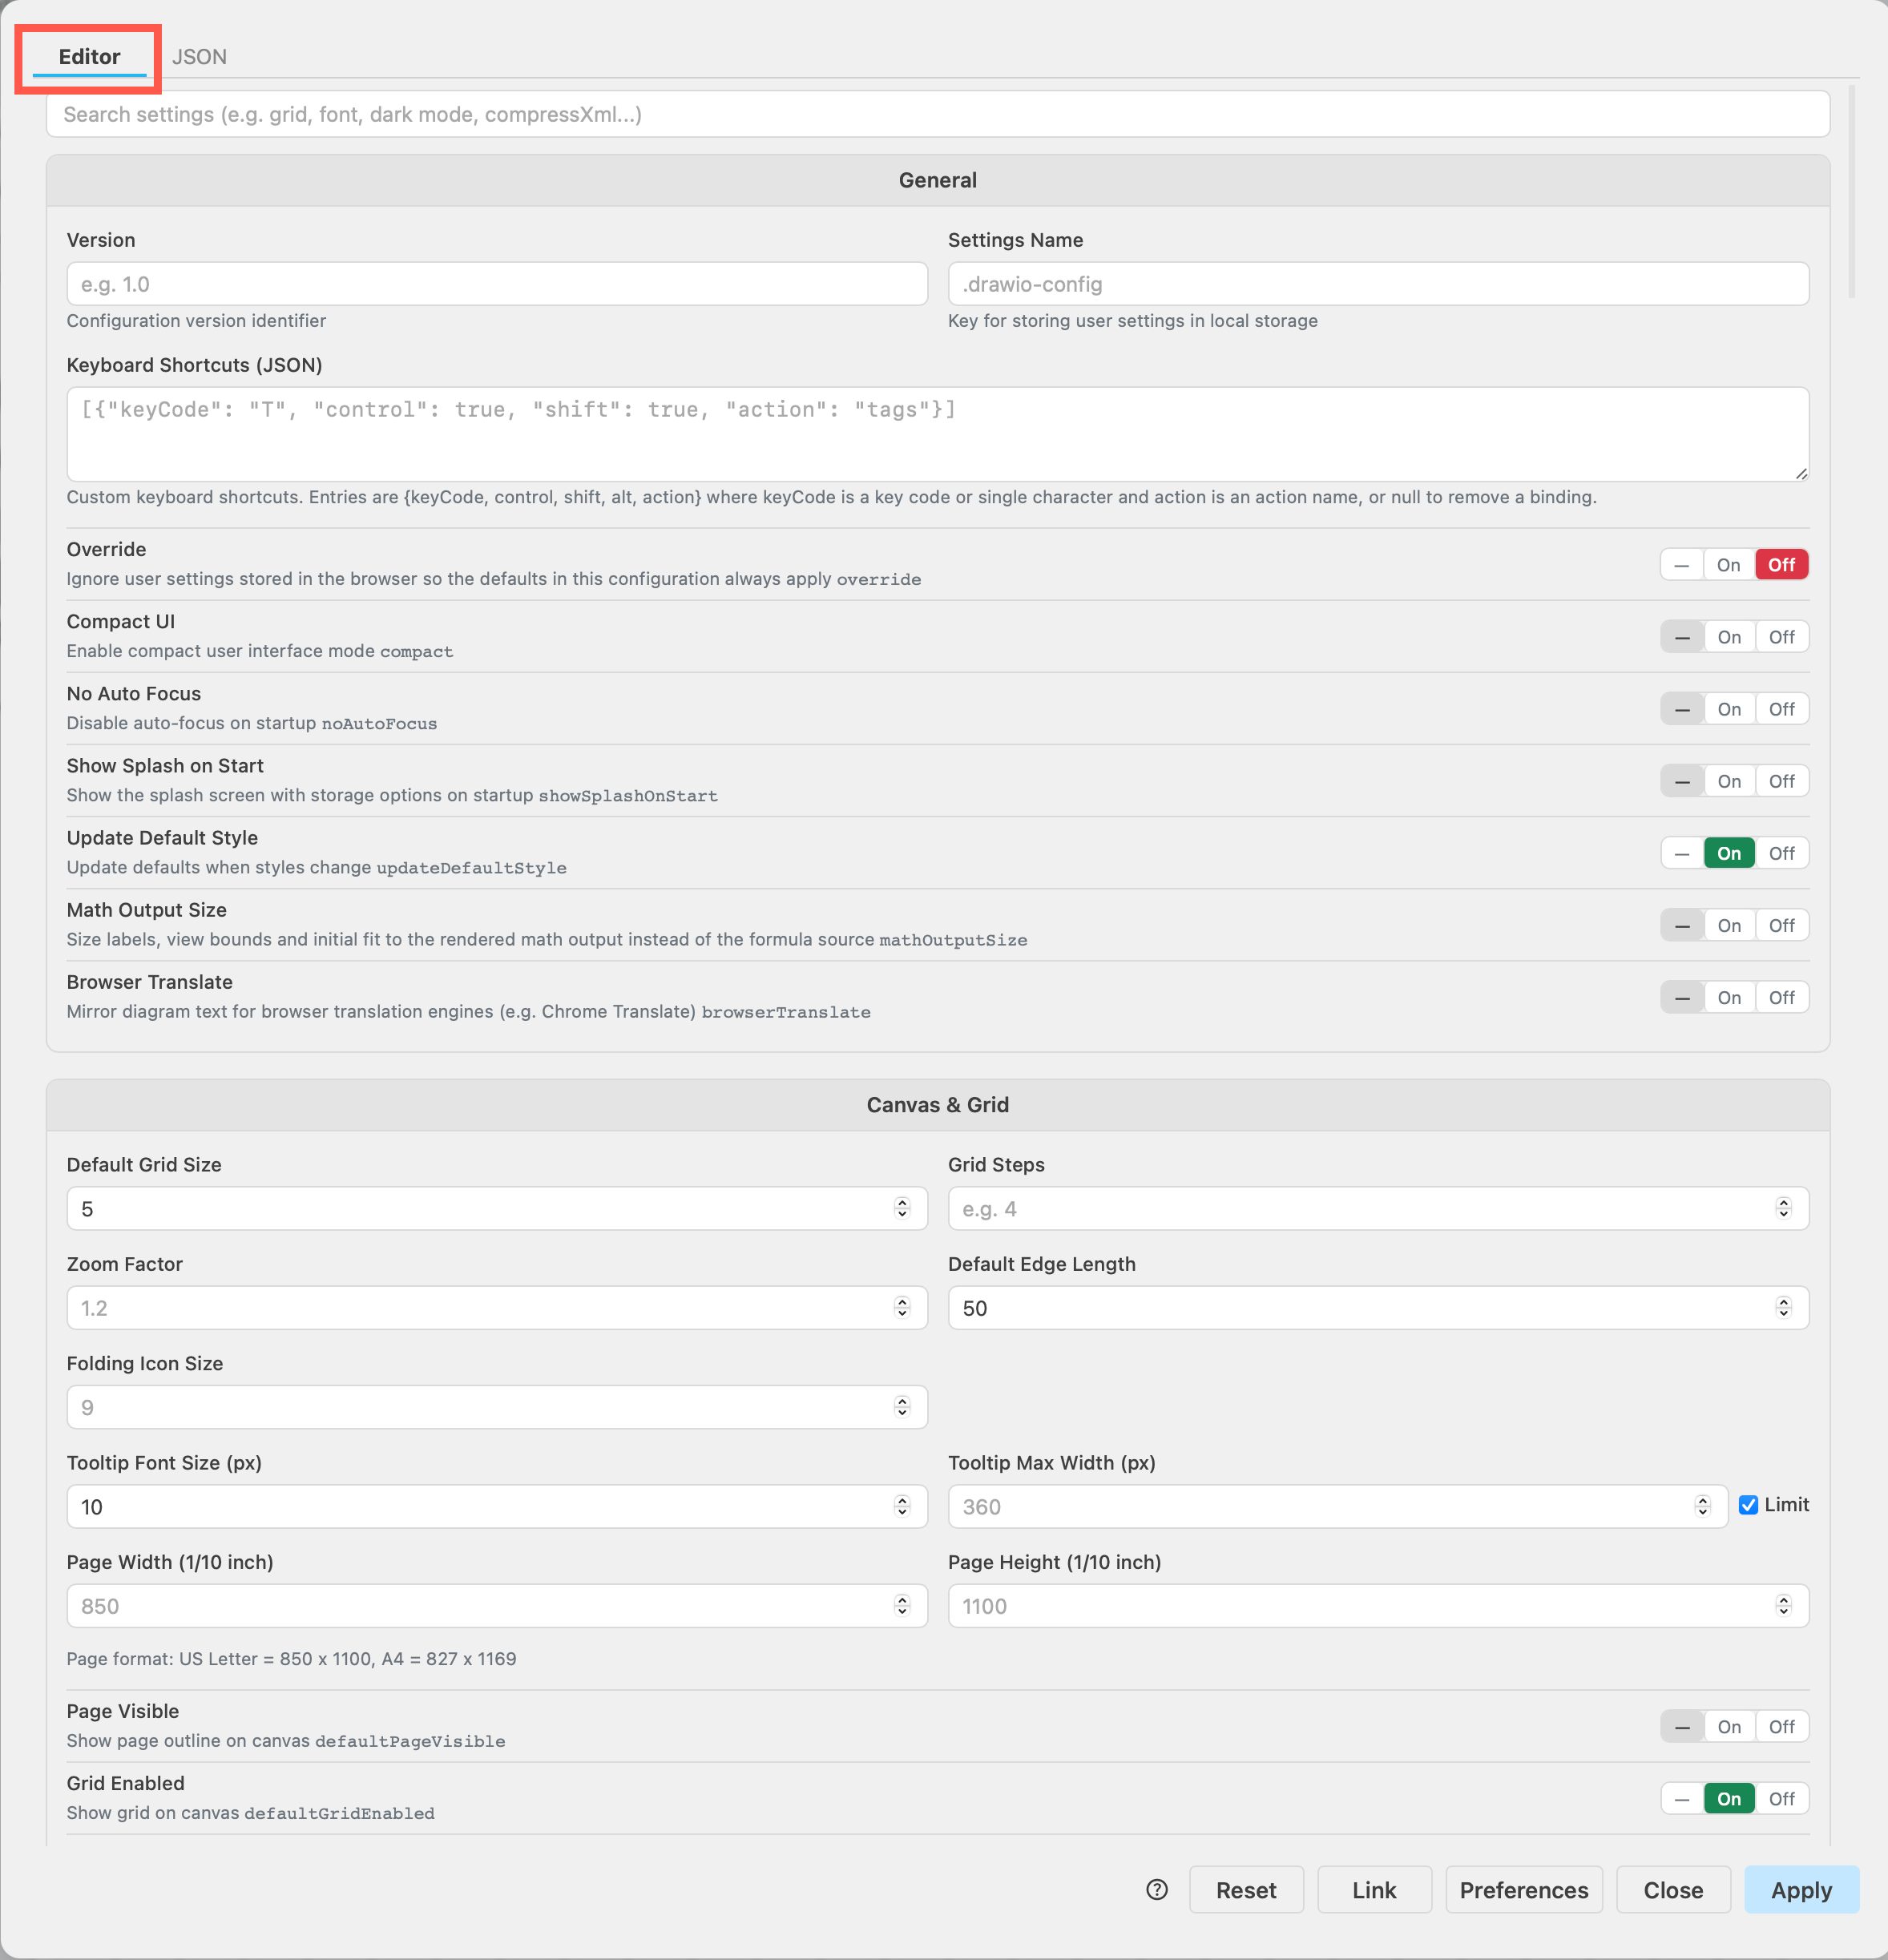
  2. While on the Editor tab, click on the toggle switches, enter values, select options from the drop down lists, and select custom and new default colours from the palette picker to customise the draw.io editor.
  3. Click Apply to save, then reload your browser tab (Ctrl+R or Cmd+R) to reload the draw.io editor using the new configuration

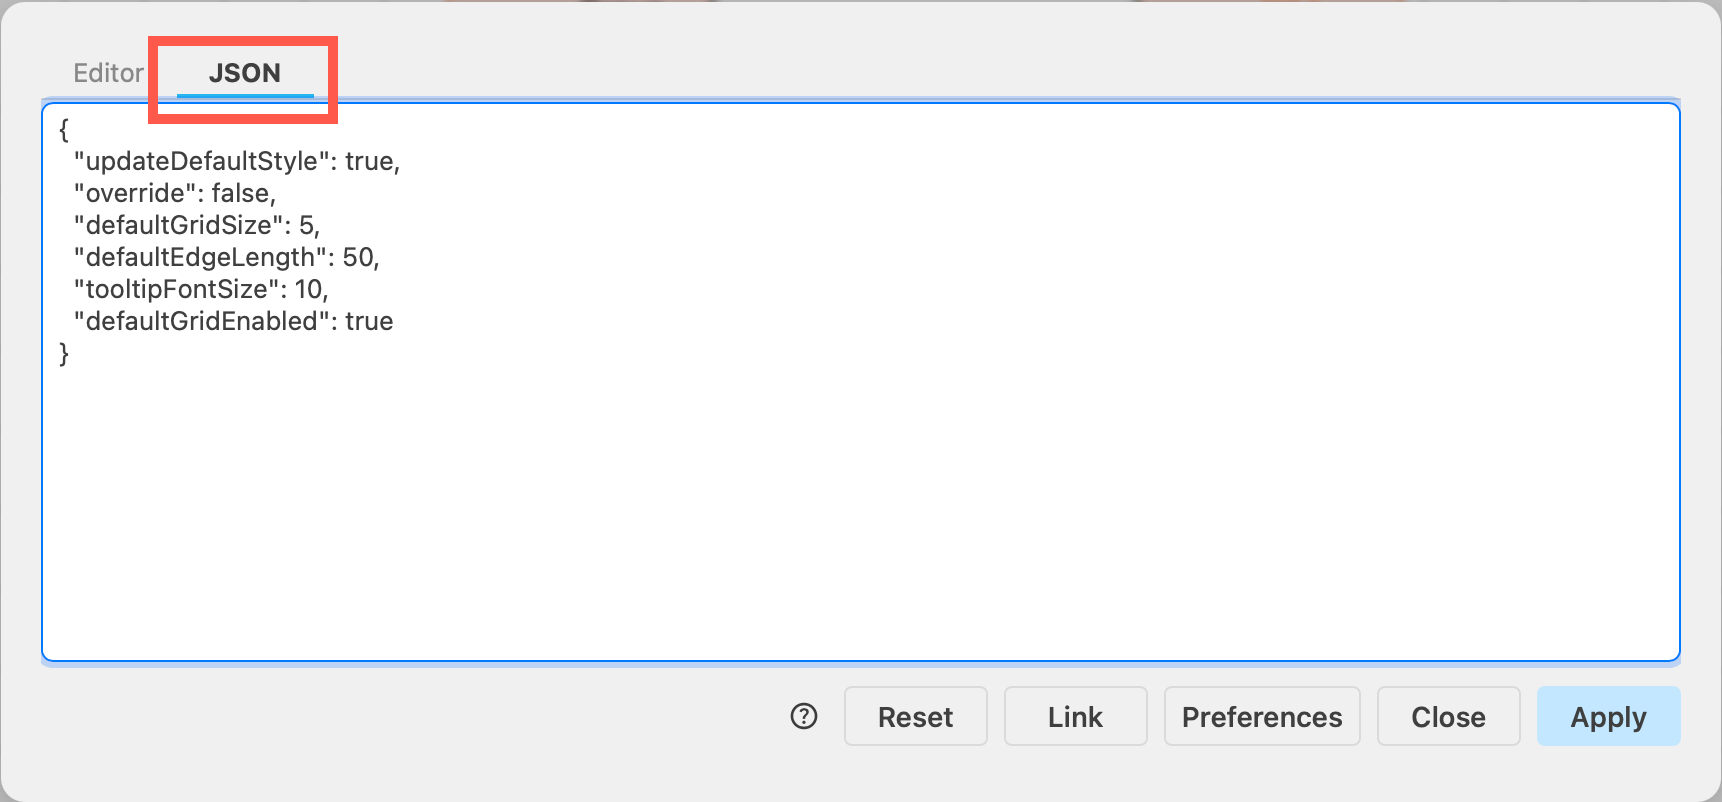
The editor configuration will updae the JSON code whenever you change a configuration setting via the Editor tab.
Access the draw.io configuration via Extras - Configuration

Make sure you reload the browser tab to reload the new draw.io editor configuration.

Access the draw.io configuration via Extras /> Configuration

Tip: This is a very long dialog with all of the different configuration options, but it is resizeable - grab the bottom right corner to make it larger inside your browser tab.

Configure the draw.io editor​

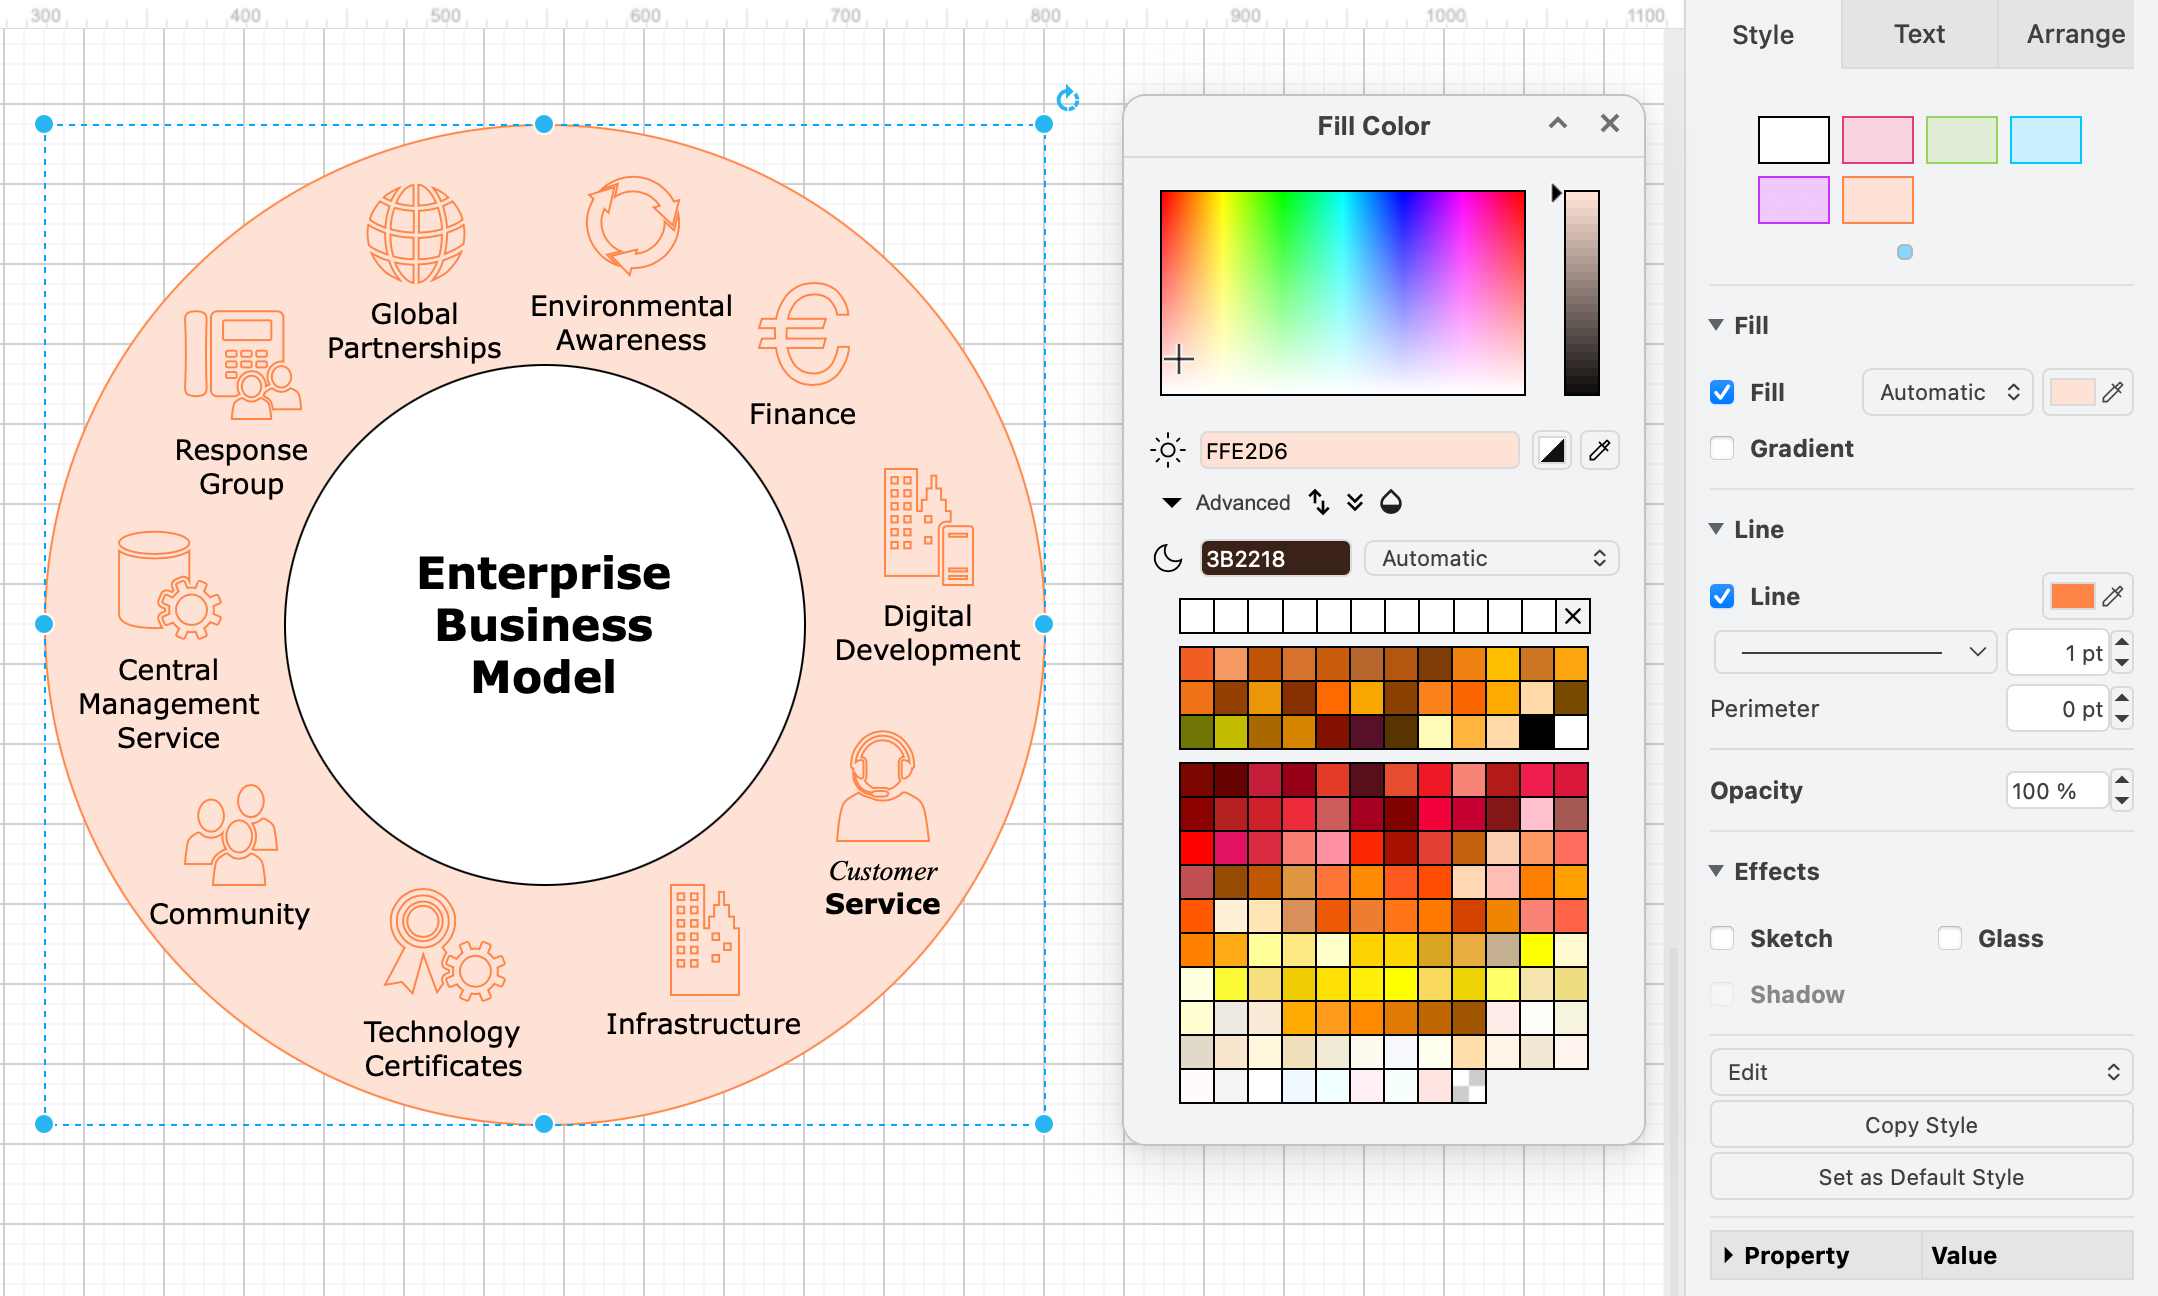
The default preset colours and style palette can be customised in draw.io

A few custom settings for colours and fonts via the Configuration dialog and the Editor tab are described below.

At any time you can edit or delete the JSON configuration string via the JSON tab of the configuration dialog. See the configuration reference for all JSON configuration options.

Search for configuration options​

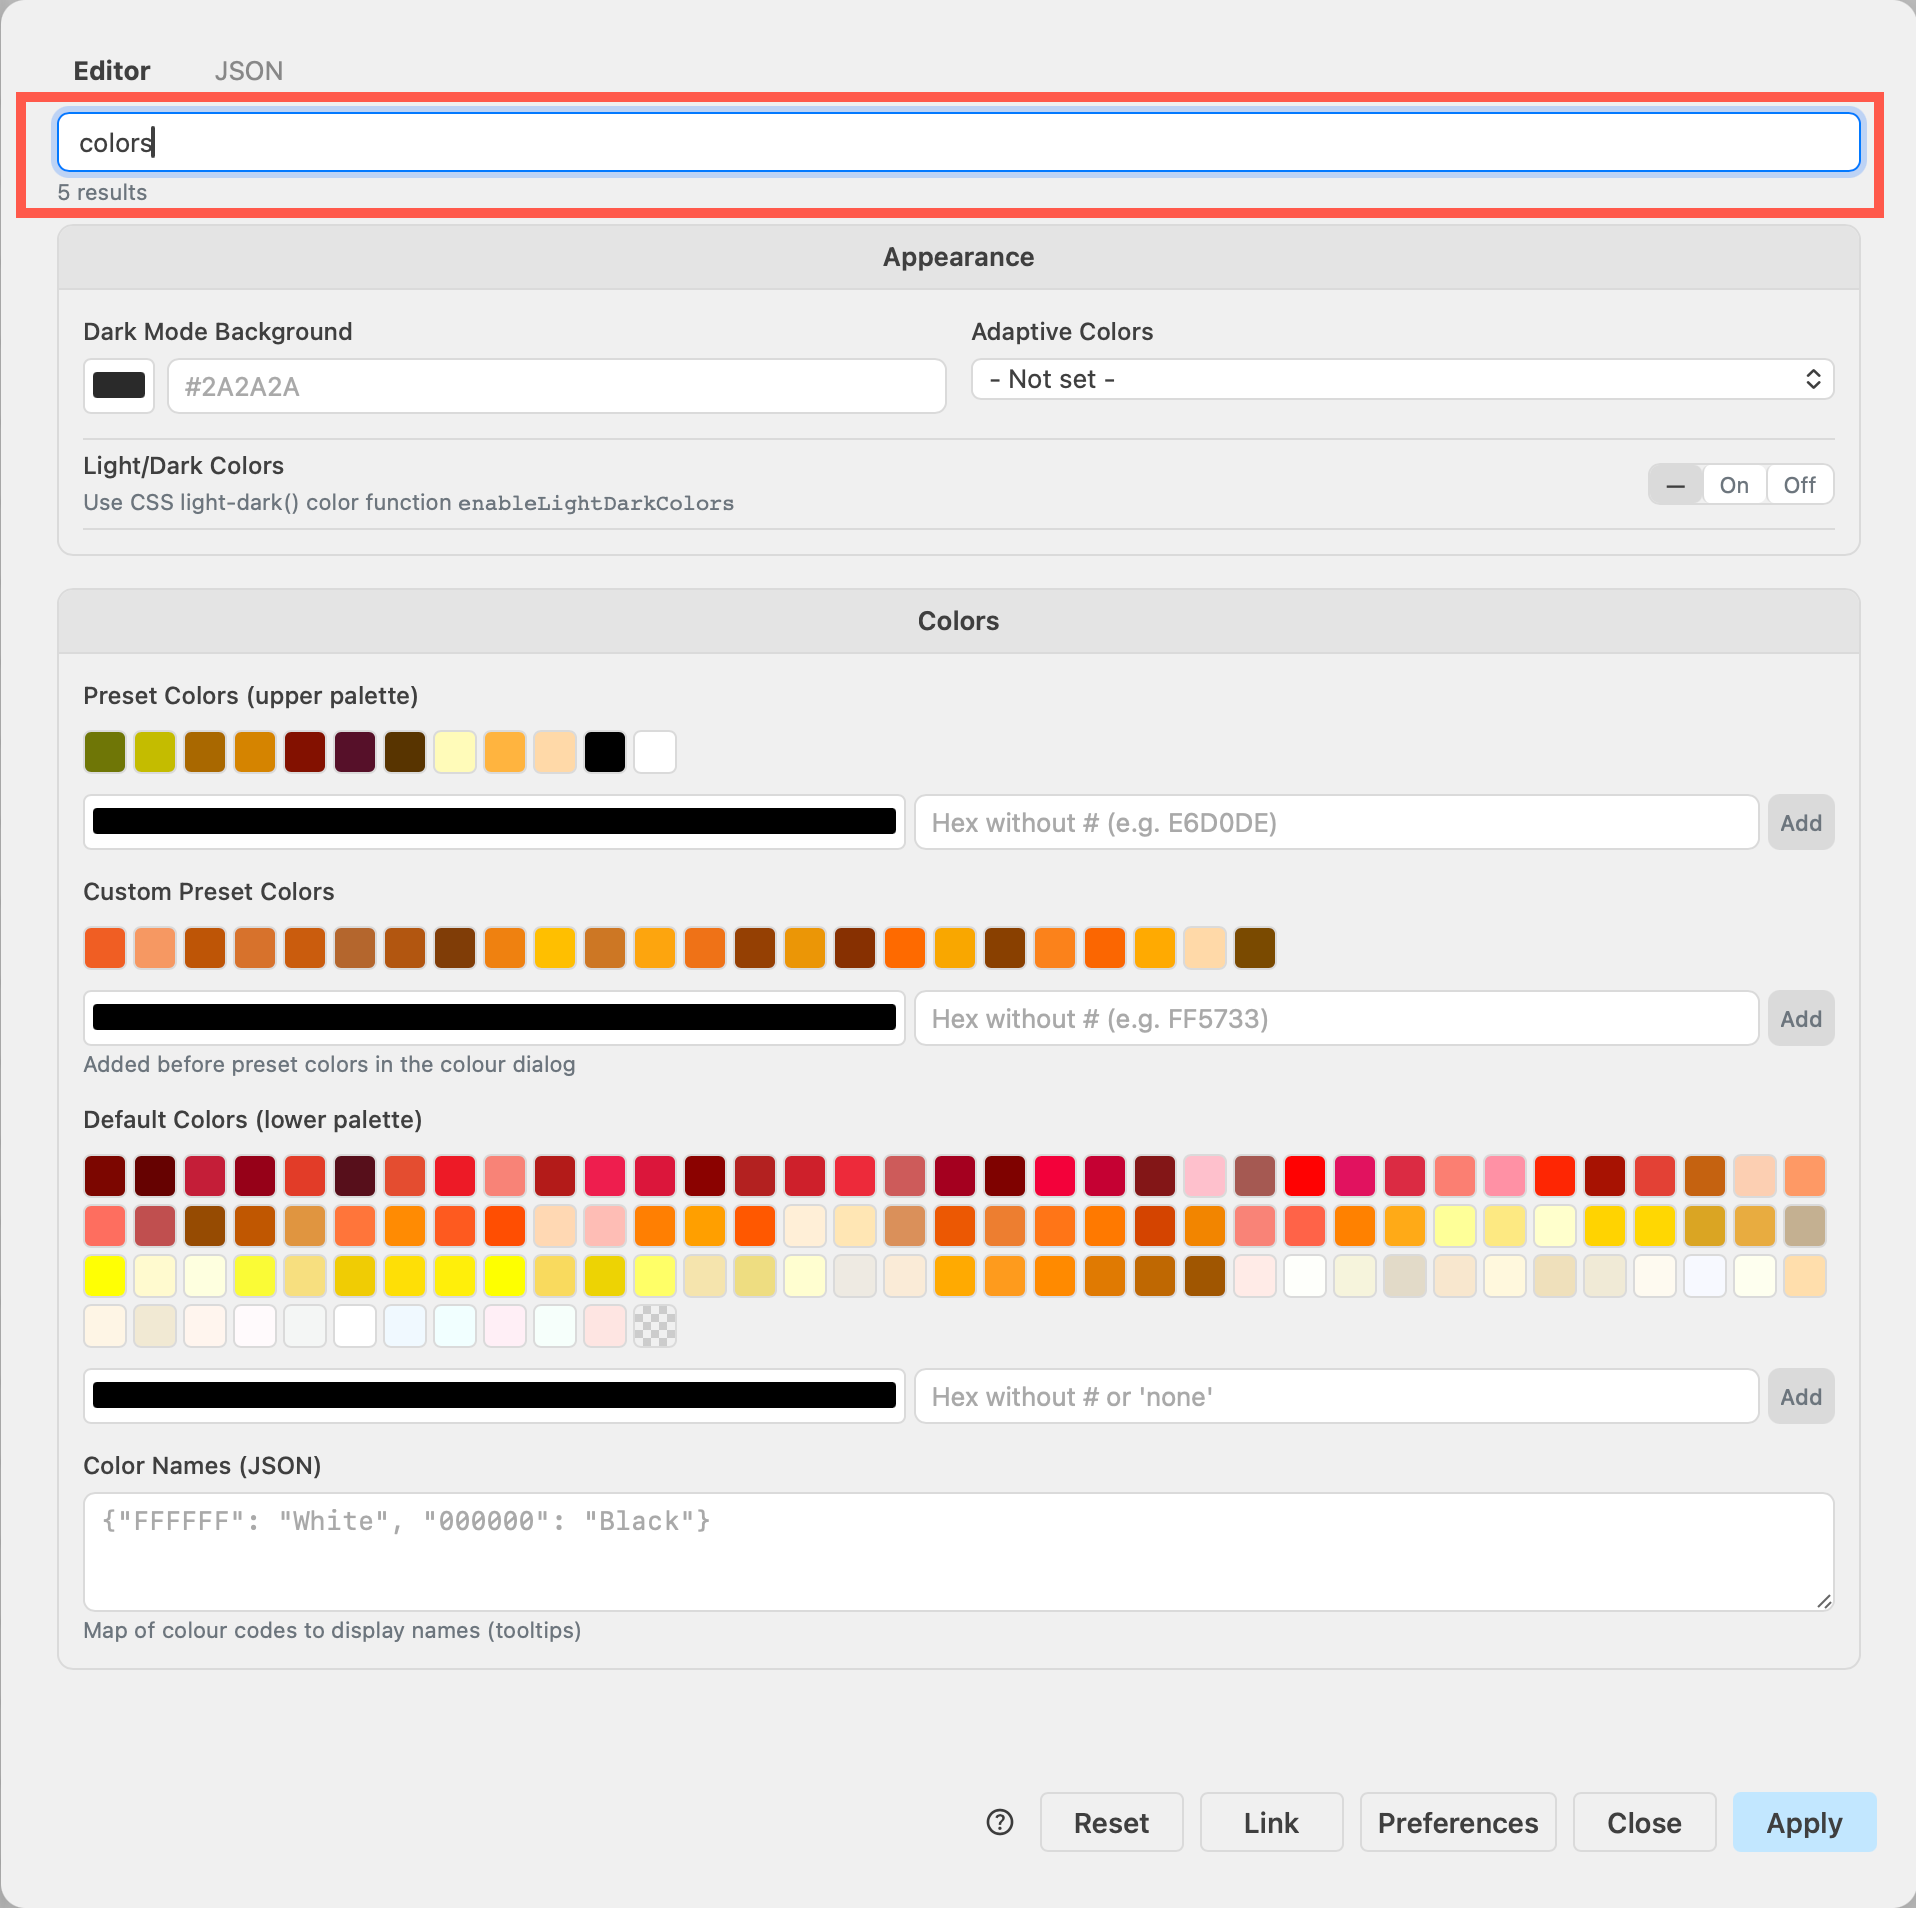
Search for a string and press Enter to find a configuration option quickly. For example, searching for colors:
Search for configuration options

Set custom colours​

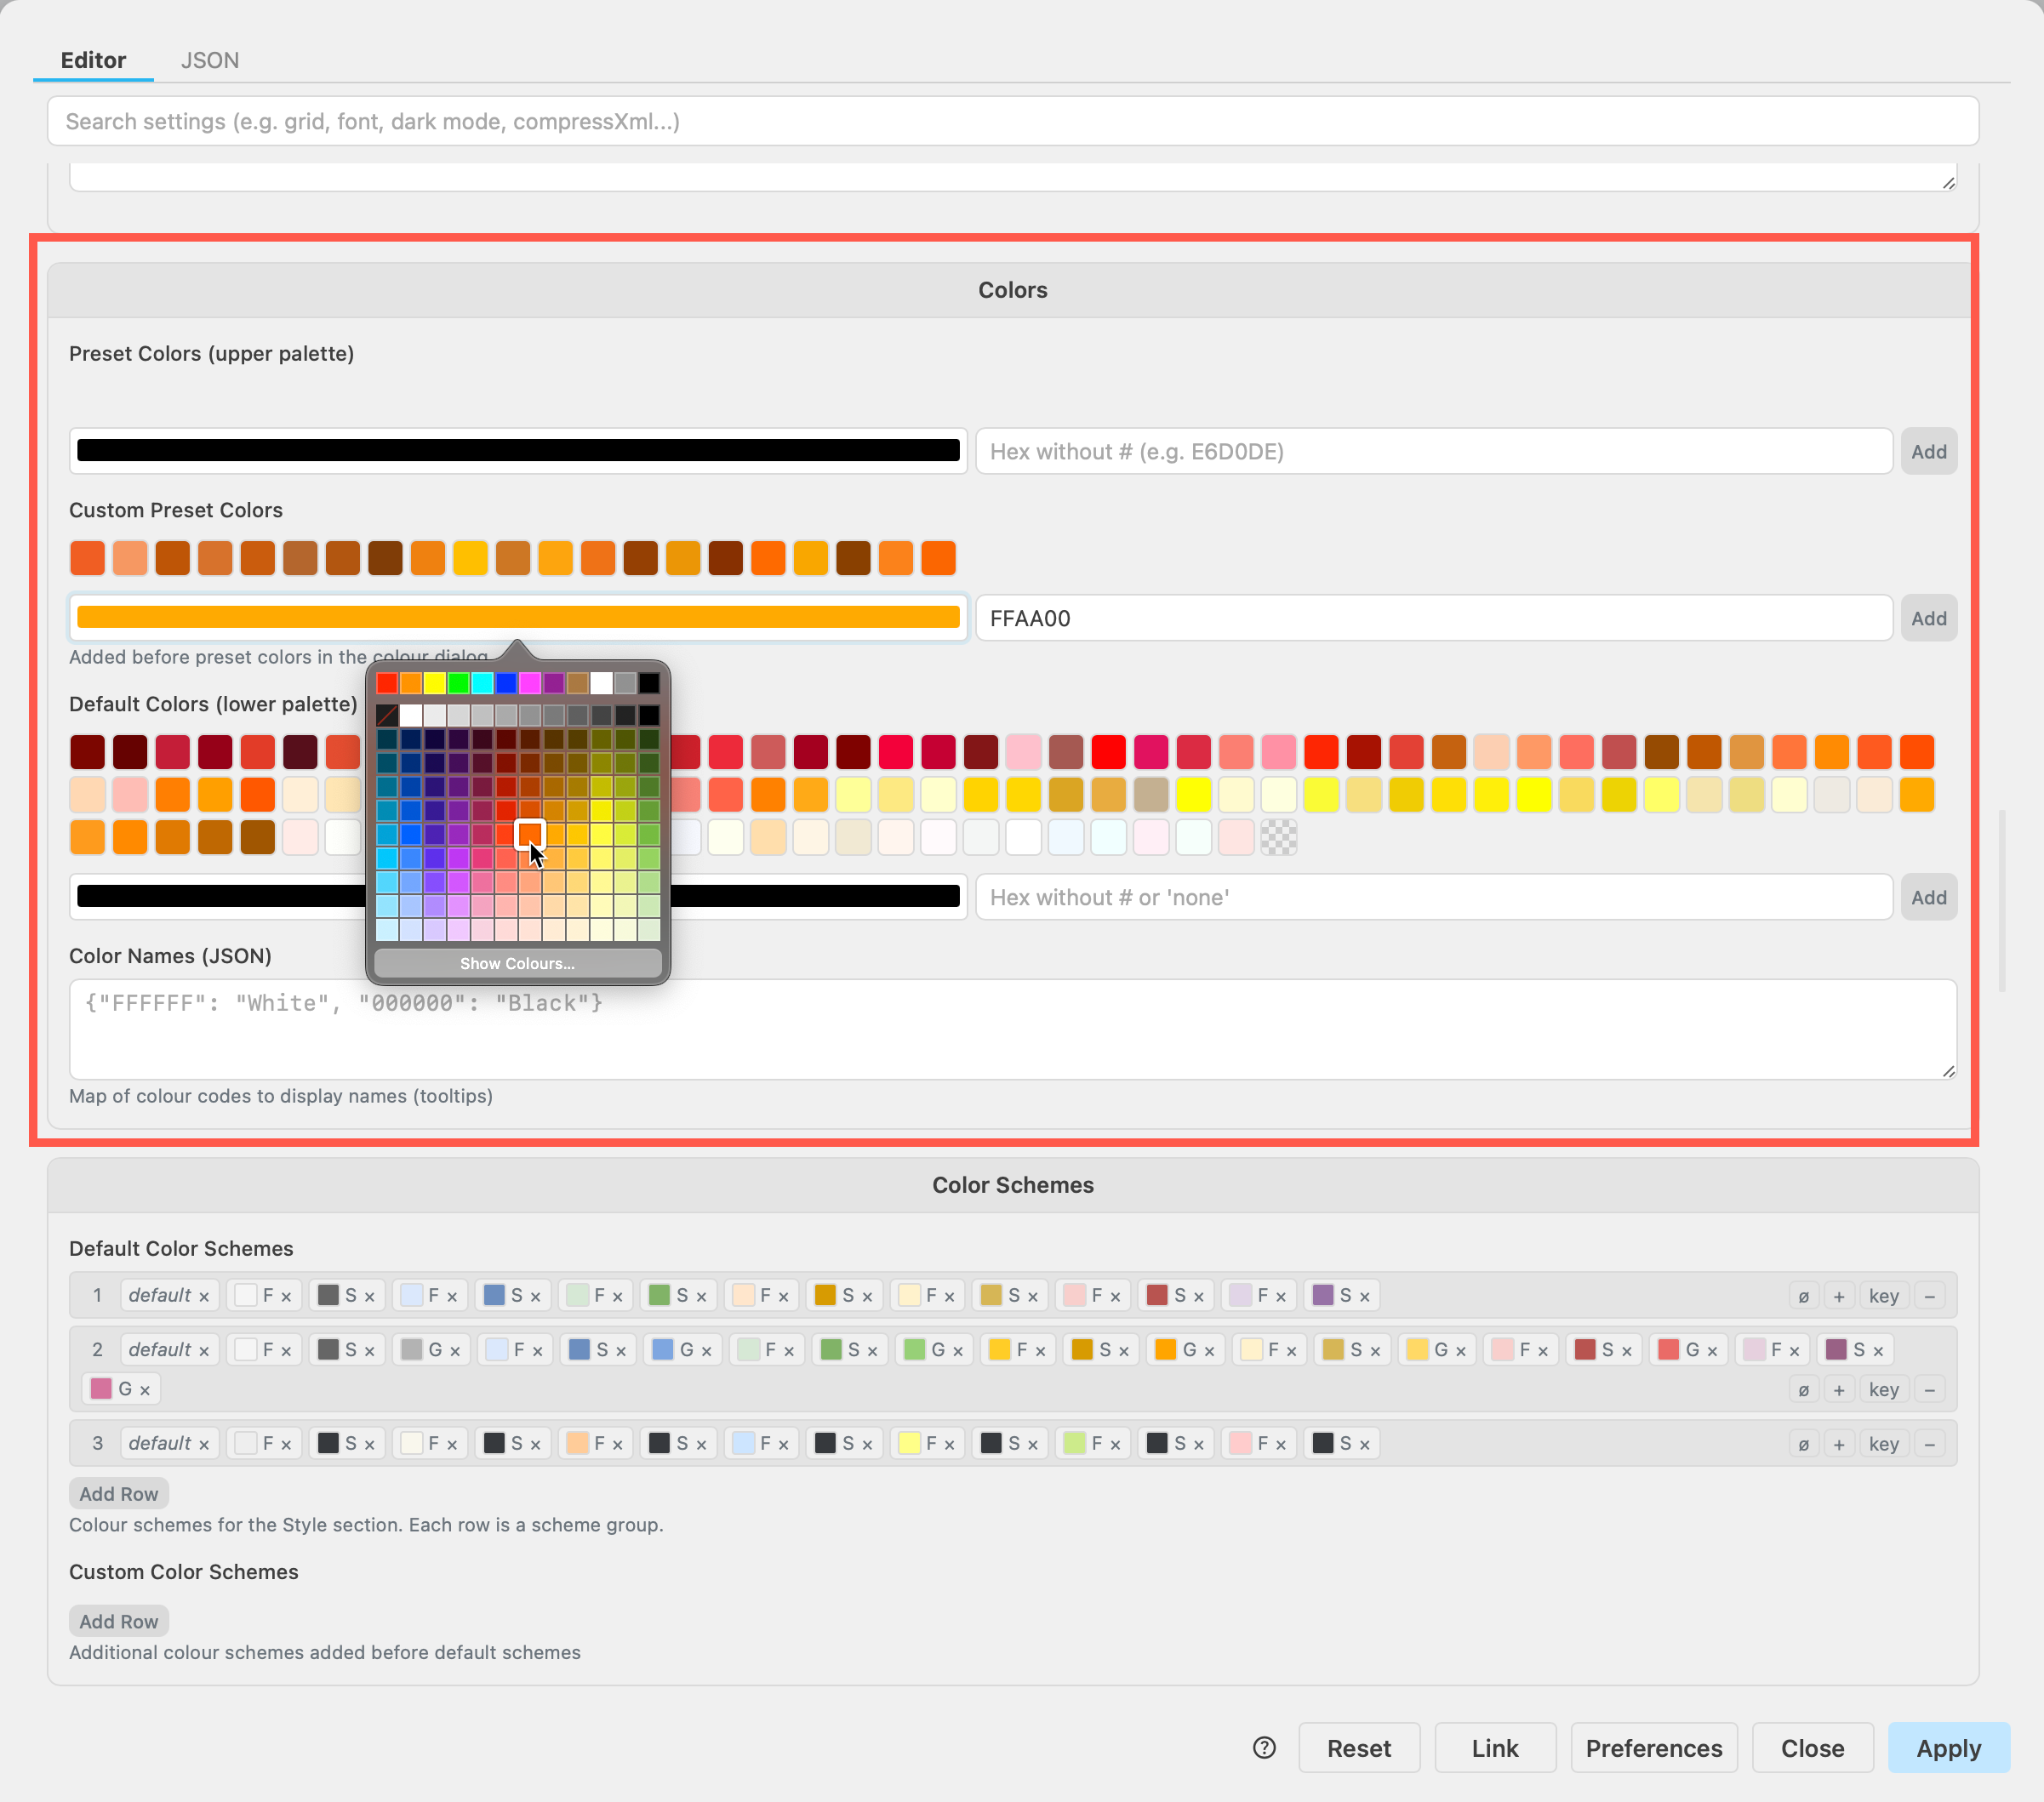
Set custom palette colours and style colours. customPresetColors in the colour picker dialog used for shape fill, line colour and text colour are followed by presetColours in the top palette. In the larger lower palette are the defaultColors.

  • Hover over existing colours and you'll see a small x appear in the top right of the colour. Click that to delete a colour from the palette.
  • To add a new colour, either paste in a hex code and click Add, or click on the colour box to open a colour picker and click Add.
    The default preset colours and style palette can be customised in draw.io

The default and custom colour schemes below are for the Style palette in Style tab of the format panel. Each style consists of a pair of colours.

  1. Click on the + button to add a new pair at the end of the list.
  2. Click on the colour to the left of F to change the fill colour, and to the left of the next S to change the line (Stroke) colour.
  3. Click on the small x to delete that fill or line colour from the style palette.

Set custom fonts​

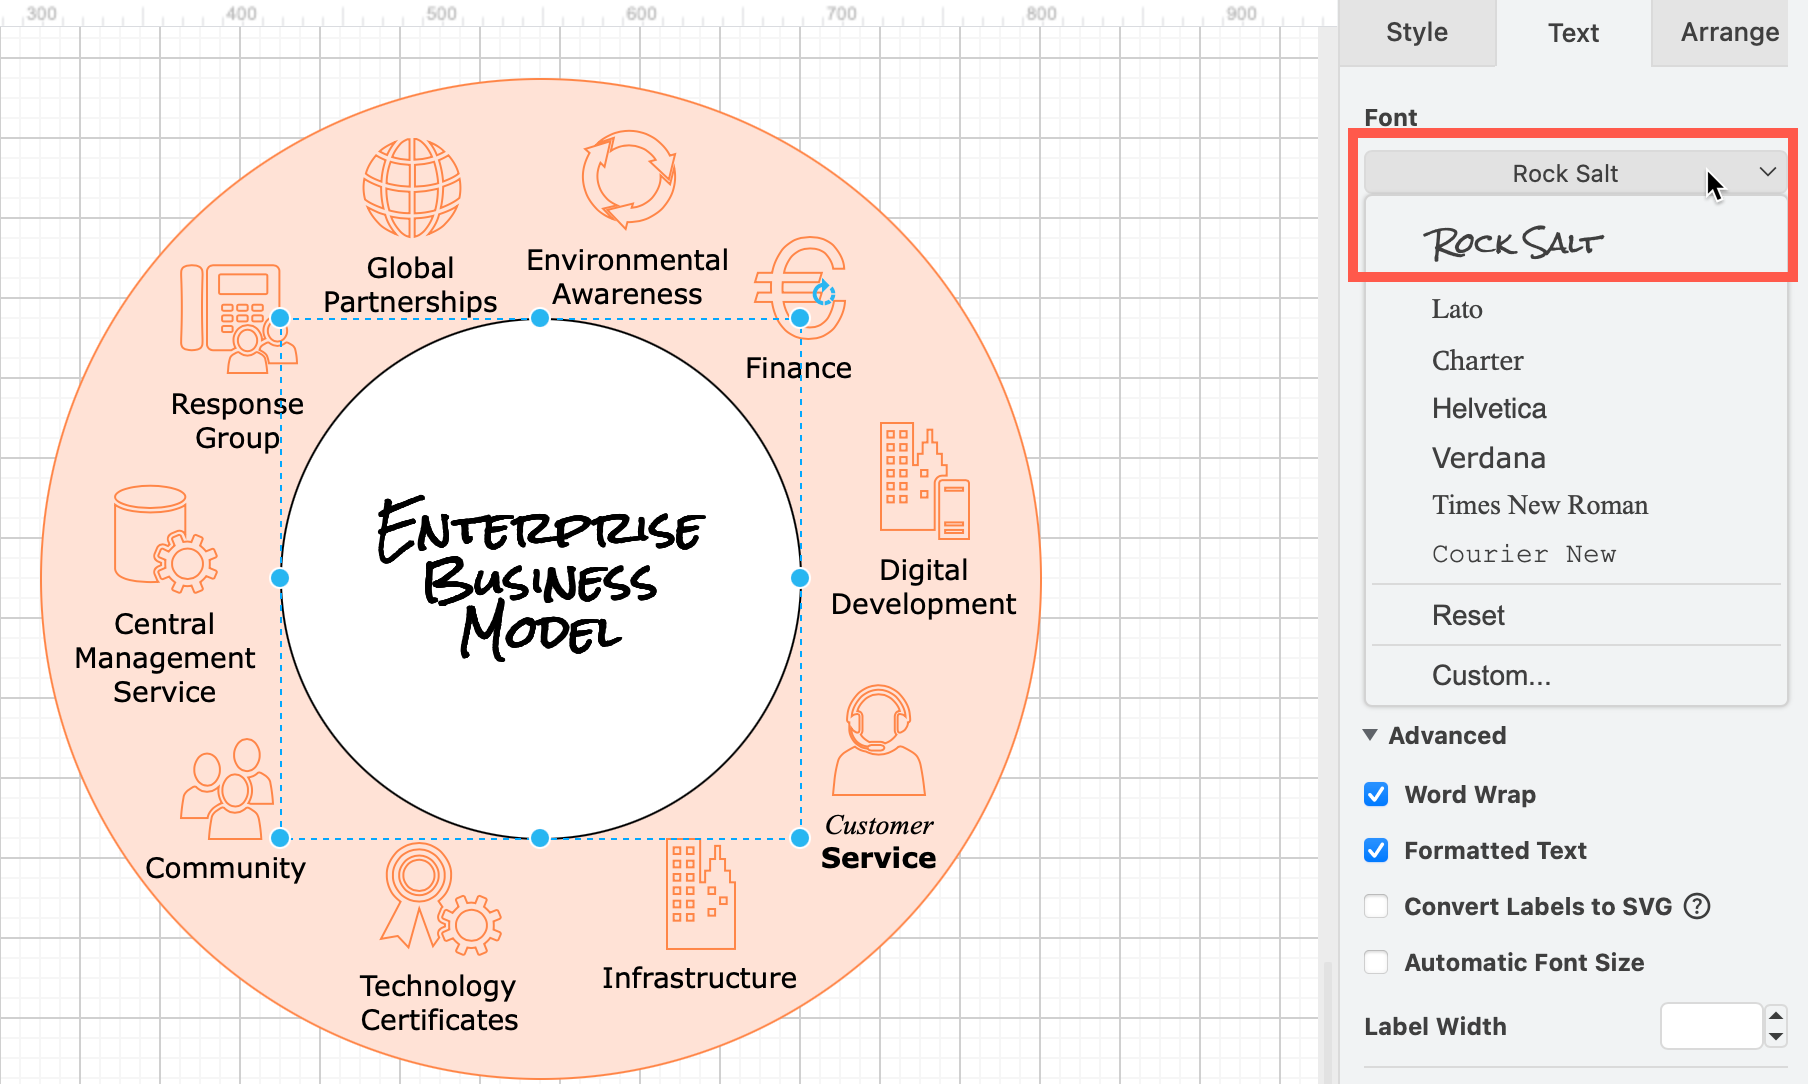
Customise the fonts in draw.io

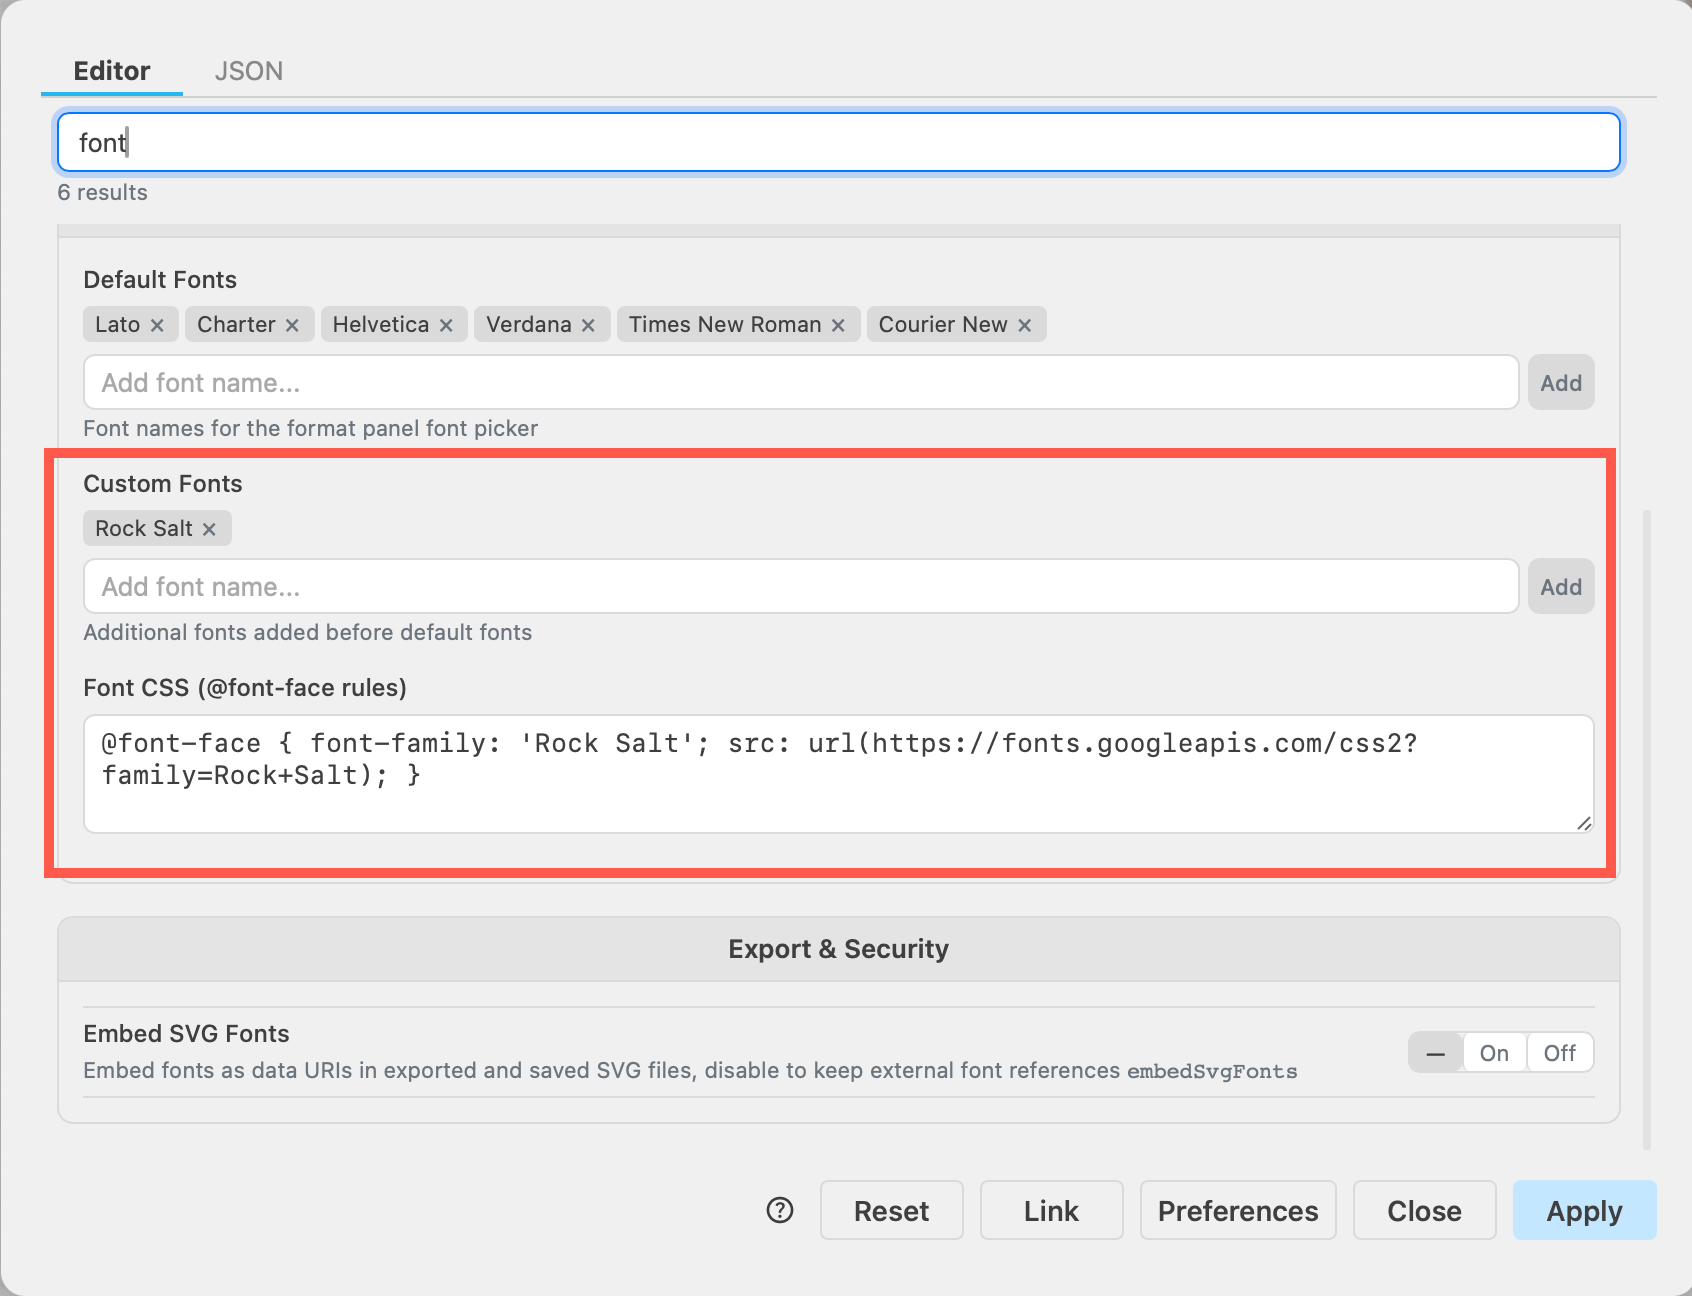
Add font names to the Default Fonts list, pressing enter or clicking Add after each name to change the list of fonts available in the font selection list in the Text tab of the format panel.

Custom Fonts will appear above the default fonts. To use a web font, you'll need to add its Font CSS, including the URL where the font file is hosted.
Customise the fonts in draw.io

Find integration specific options​

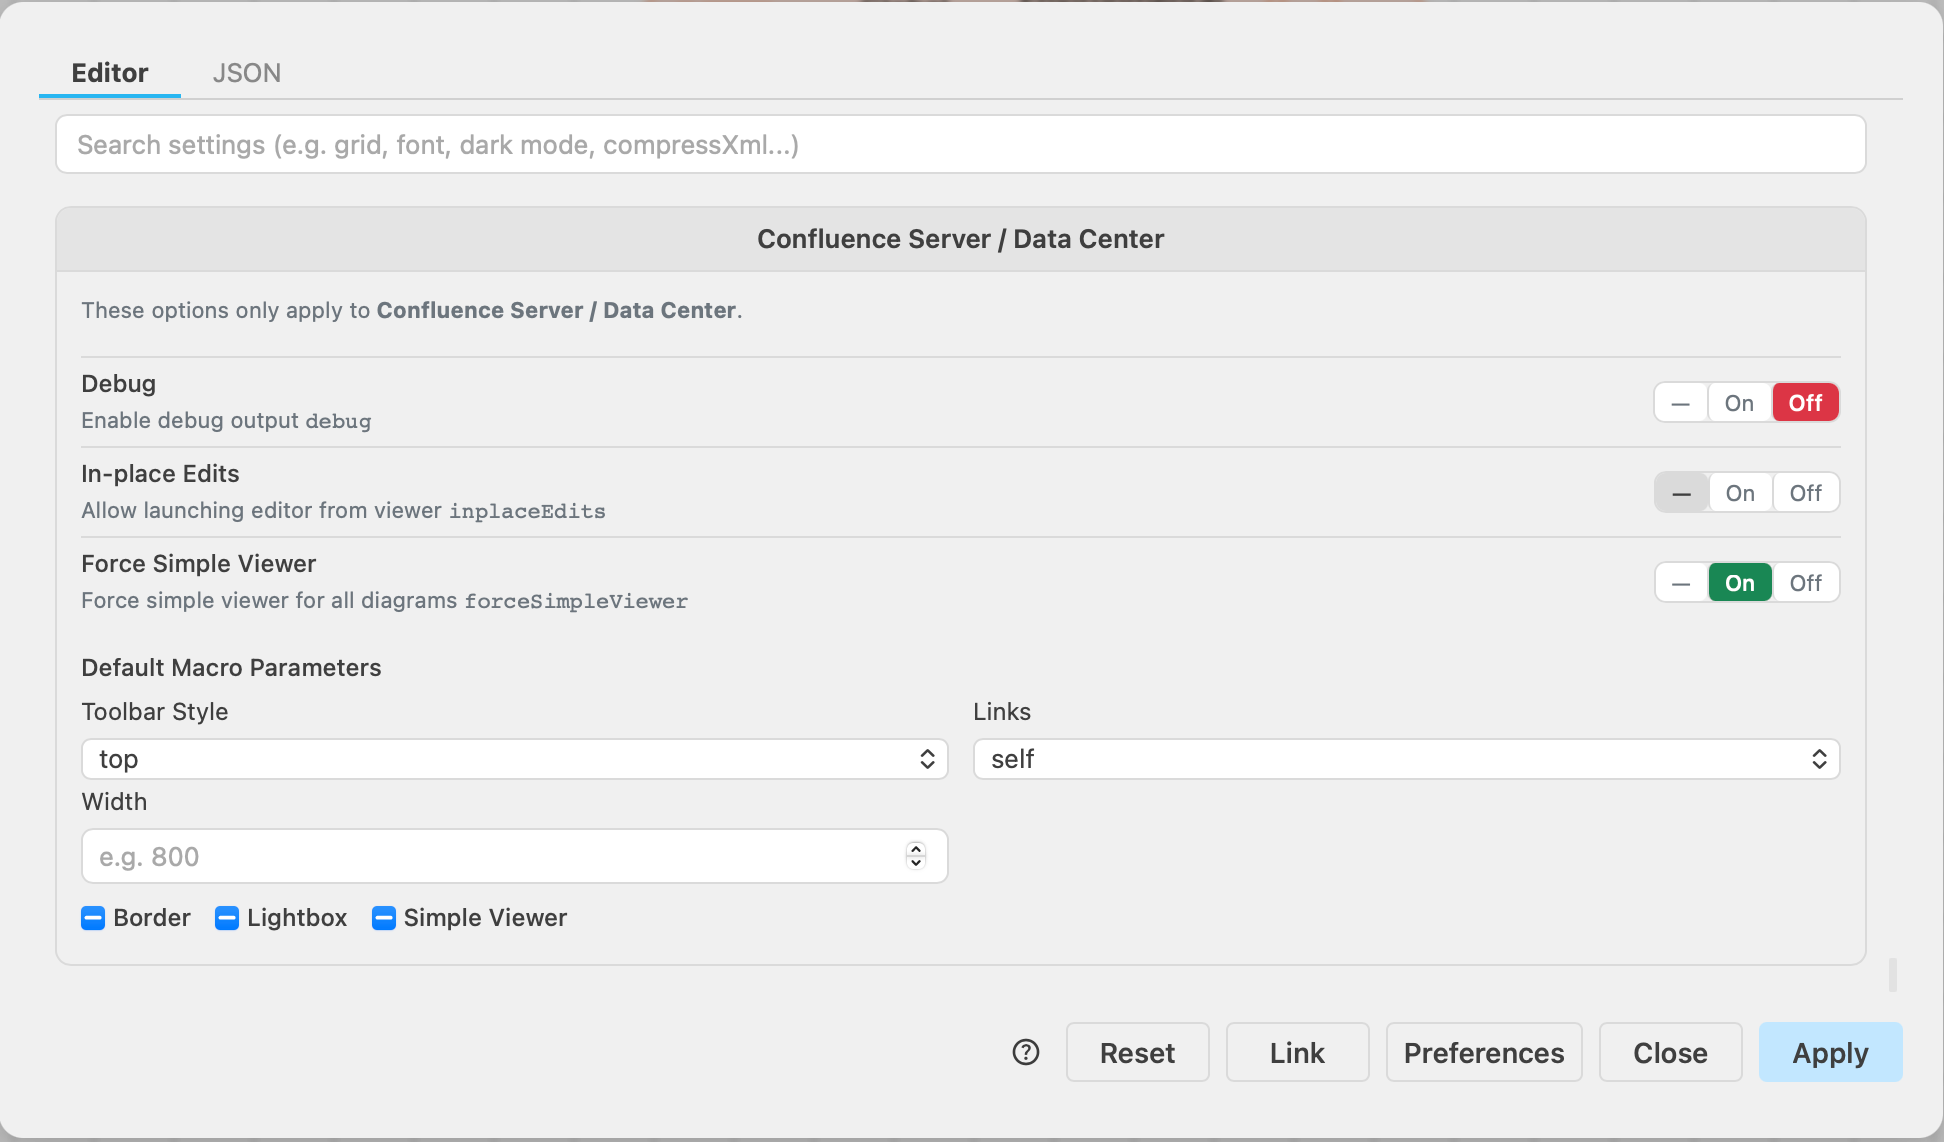
It's also easier to see what configuration options are integration only - for example, the section at the bottom are options for draw.io in Confluence Data Center/Server.
Customise the the editor settings for draw.io in Confluence Data Center/Server via Extras - Configuration

New and updated export formats

· 3 min read

You can export your diagram to multiple formats, including various image files (PNG, JPEG, SVG), PDF, XML, HTML and a URL with the diagram data encoded within it.

Export to an animated GIF image​

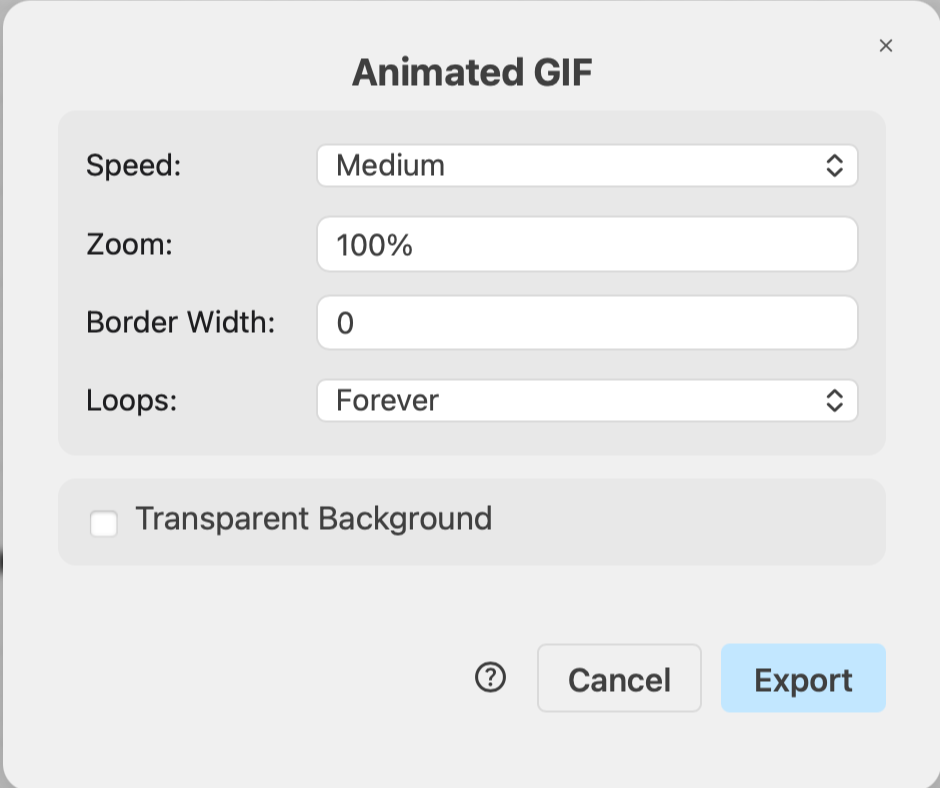
You can now also export your diagram to an Animated GIF. This is ideal for diagrams where you have animated the connectors with flow animations from the source shape to the target shape.
Animated flows on connectors in a draw.io diagram can now be exported to animated GIF images

  1. Select File > Export as > Animated GIF from the draw.io menu.
  2. Set the animated GIF export options.
    • Set the Loops to continue forever or repeat 1, 3, or 5 times. The default is Forever.
      Choose the export settings for the animated GIF image

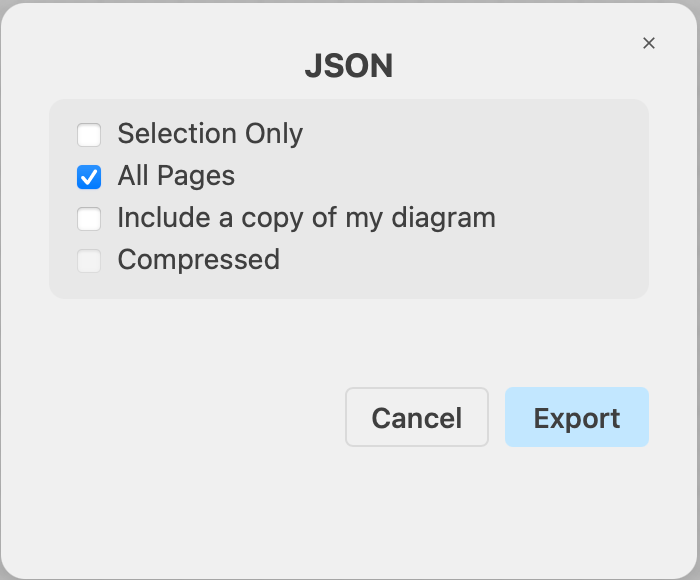
Export to a JSON file​

The JSON file format has less processing overhead that the native .drawio XML format when a program, such as an LLM, is required to parse or transform your diagram.

Export your diagram to a JSON file when you need to pass it into a Javascript-heavy pipeline, into an API for a web application, or to an LLM for further manipulation.

Choose the export settings when exporting a diagram as an XML file

Publish to presentation mode​

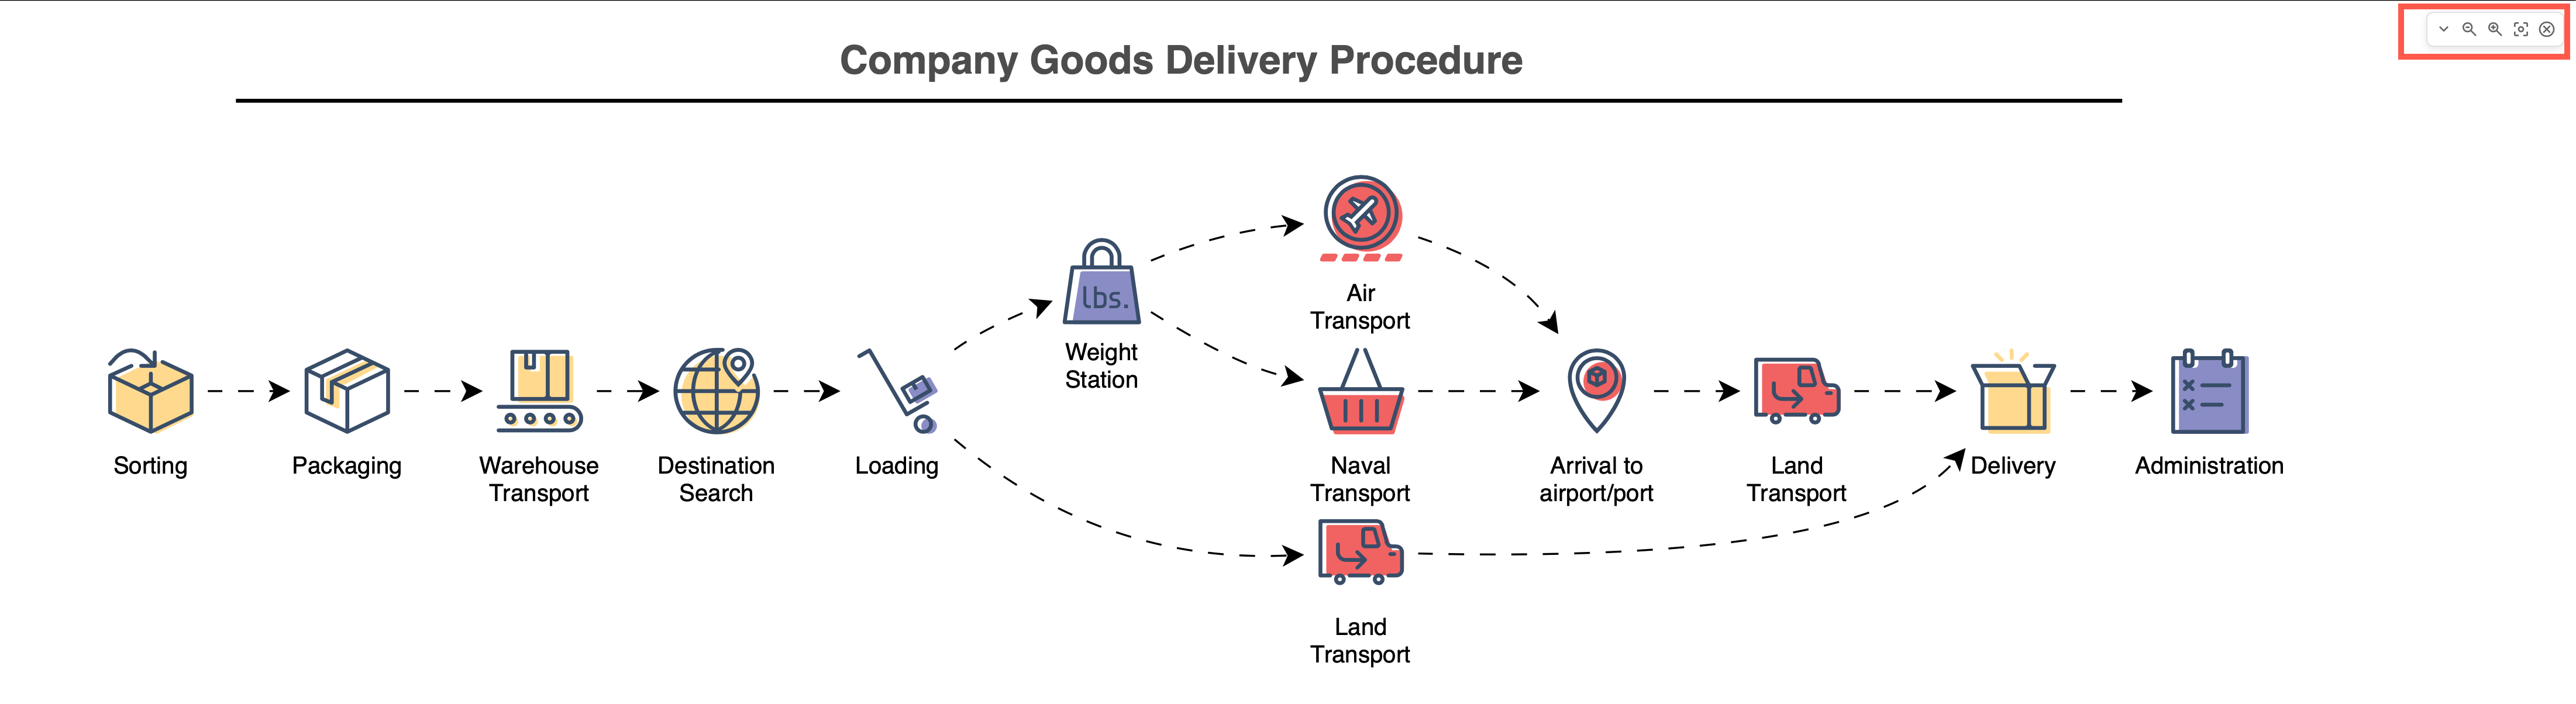
Presentation mode uses a simplified viewer with the toolbar that is normally at the bottom of the Lightbox moved into the top right of the browser tab. This is ideal when you want to present a diagram at a meeting, or use draw.io to create a slide deck.

Select File > Publish > Presentation Mode to open your diagram page in a simplified viewer.

While in presentation mode:

  • Hover over the diagram to see tooltips, tags, links and shape metadata if you have added these.
  • Click on links - ideal for navigating to another diagram page.
  • Change the zoom level and step through diagram pages using the mini-toolbar in the top right.
The simpler presentation mode in draw.io has a toolbar in the top right

Editable Mermaid diagrams

· 3 min read

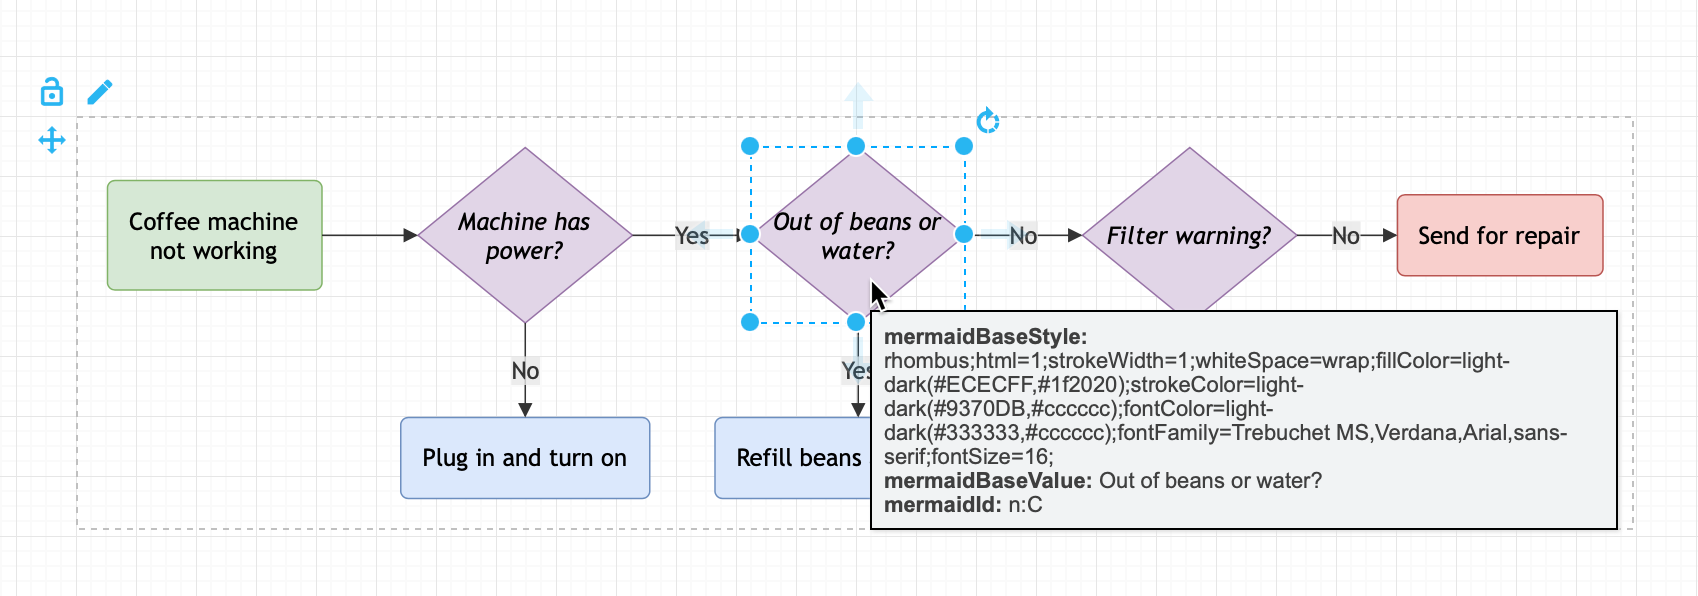
When you insert Mermaid description of a diagram via Arrange > Insert > Mermaid, it is now rendered with native draw.io shapes inside a Mermaid container group. The Mermaid source is attached to this container group so you can re-edit it and regenerate an updated Mermaid diagram.
You can restyle the Mermaid diagram and change its shapes - styles will be kept if you regenerate, but geometry changes will not

Insert an editable Mermaid diagram​

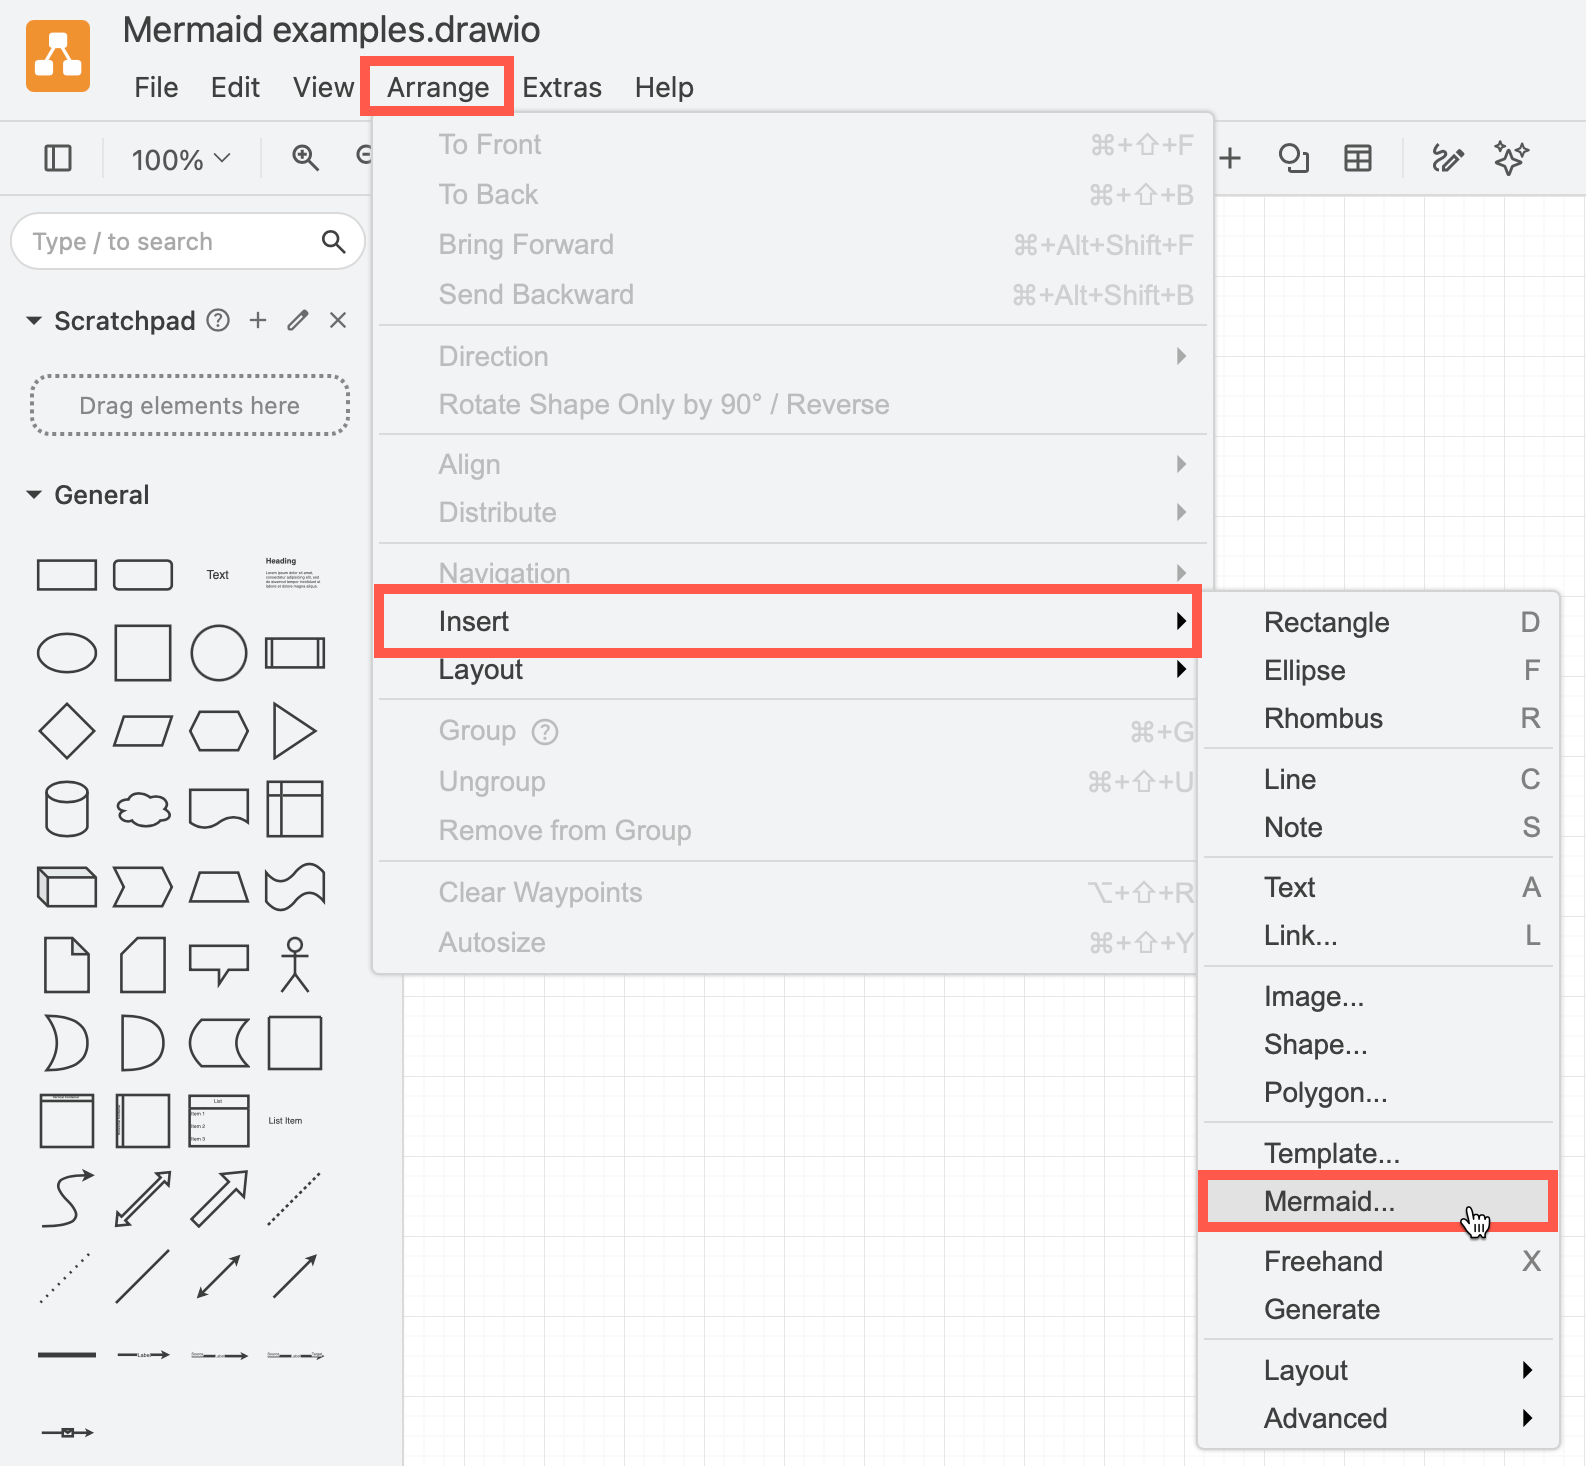
  1. Click Arrange > Insert > Mermaid. Alternatively, click the + icon in the toolbar, then select Mermaid.
    Click Arrange /> Insert > Mermaid to create a diagram from Mermaid Markdown-inspired code
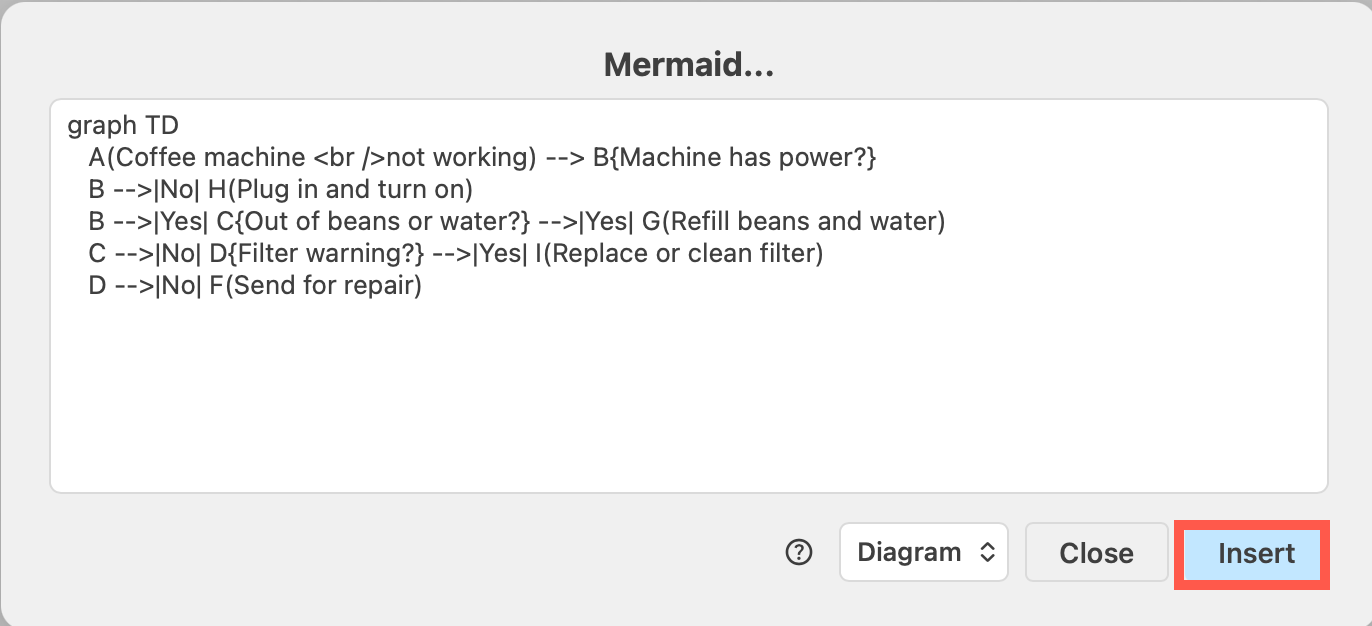
  2. Paste your text into the text box, then click Insert.
    Paste the text in Mermaid syntax, then click Insert

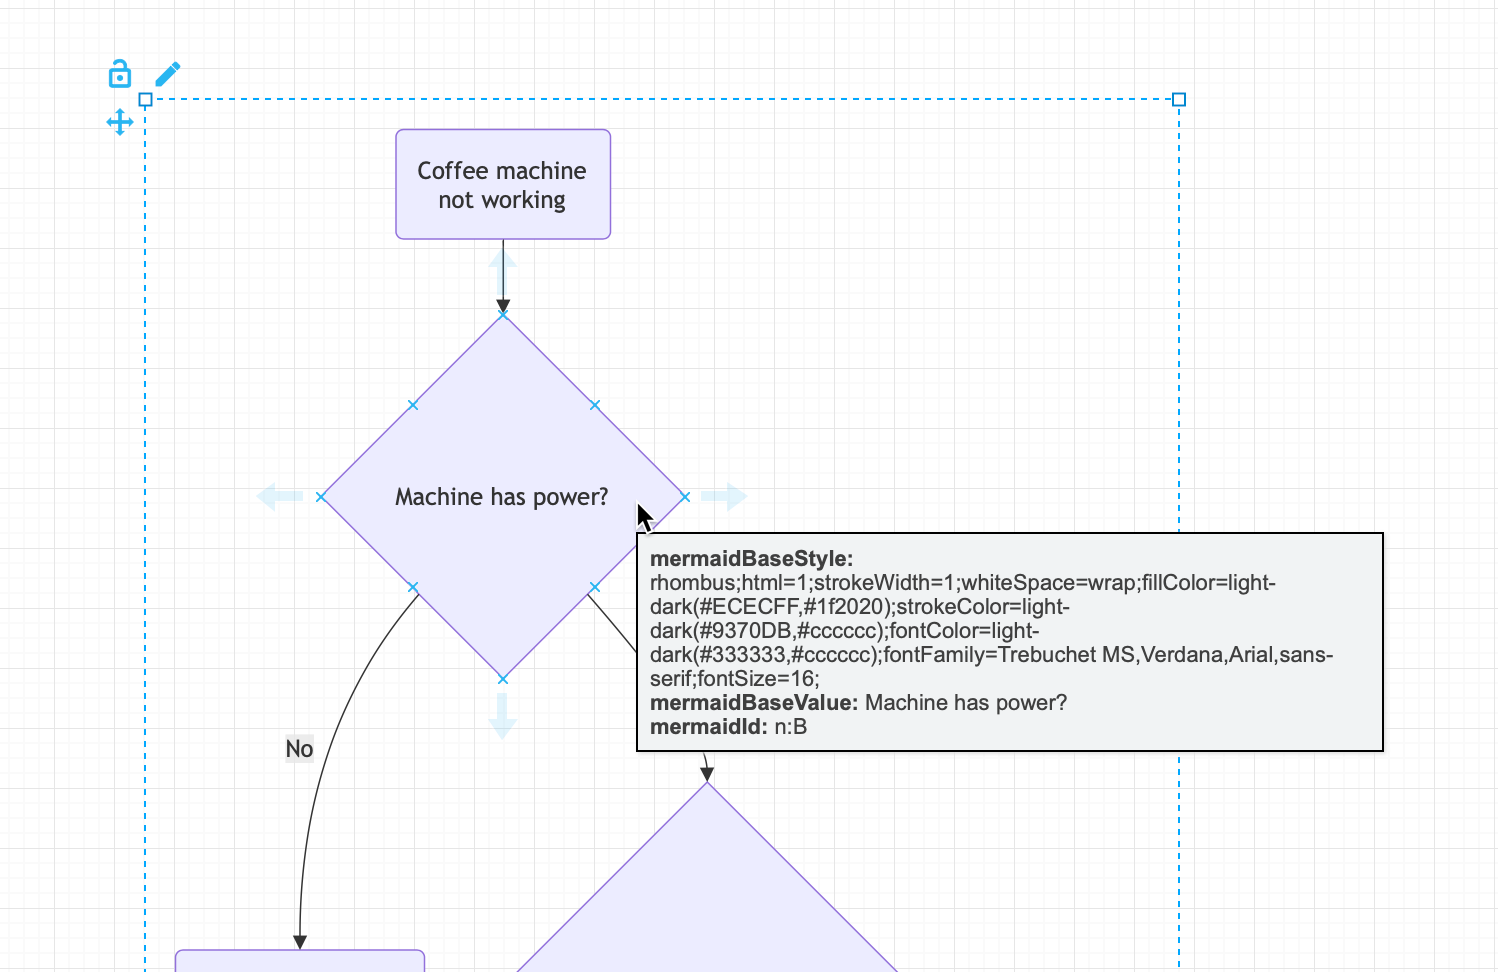
By default using the Diagram option, Mermaid shapes are converted to native draw.io shapes, then automatically laid out in a Mermaid container group. Hover over a shape or connector to see the Mermaid source.
Hover over a shape in the Mermaid container group to see the source

Use the Style tools in the format panel to change fill and line colours and styles, text colours and fonts, and change the labels of the shapes. These edited styles and labels override any Mermaid style information, and will persist over edits to the Mermaid source.
You can restyle the Mermaid diagram and change its shapes - styles will be kept if you regenerate, but geometry changes will not

You can also resize and reposition shapes and repath connectors within the Mermaid container group. These changes will be overridden if you edit the source and regenerate the Mermaid diagram.

Edit the Mermaid diagram​

Because the Mermaid source is still available, you can edit it and regenerate the diagram.

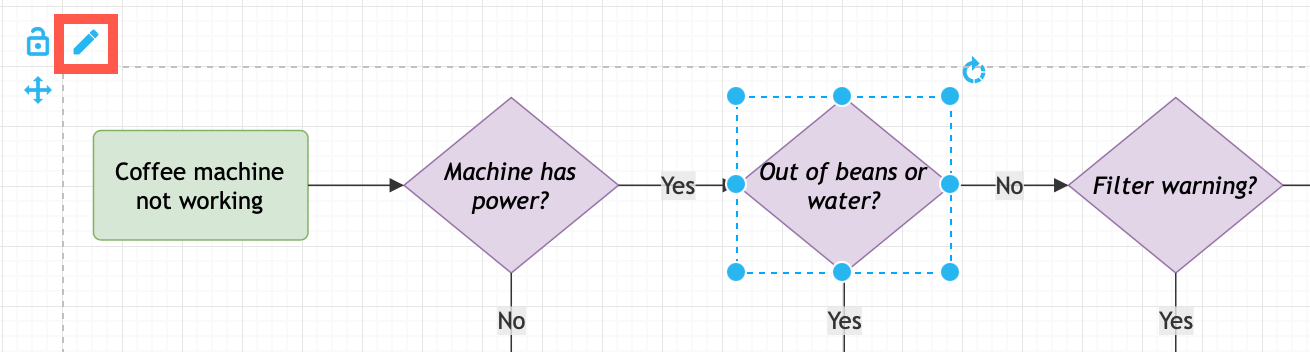
  1. Select one of the shapes in the Mermaid container group to see the edit (pen) icon in the top left.
    Select a shape inside the Mermaid container group, then click the pen icon in the top left to re-edit and regenerate the diagram
  2. Click on the edit icon to re-open the Mermaid dialog, make your changes, and click Apply.

Prevent edits: Click on the padlock icon in the top left of the Mermaid container group to lock the Mermaid diagram to prevent style or geometry changes, or alternatively insert the Mermaid diagram as a single uneditable SVG image.

See the Mermaid section in the user manual for more example diagrams using the Mermaid syntax, configuring the layout engine, and for more a detailed example of drawing a mindmap from Mermaid text.

Better automatic layouts with ELK

· 3 min read

The new version of the automatic layout dialogs in draw.io now use the Eclipse Layout Kernel (ELK) and its layering algorithms to automatically rearrange the shapes in your diagram.

Use these automatic layout presets to build neat flow charts, trees, org charts and other common diagram layouts quickly.

Rearrange your diagram quickly by applying a layout - select Arrange > Layout from the menu

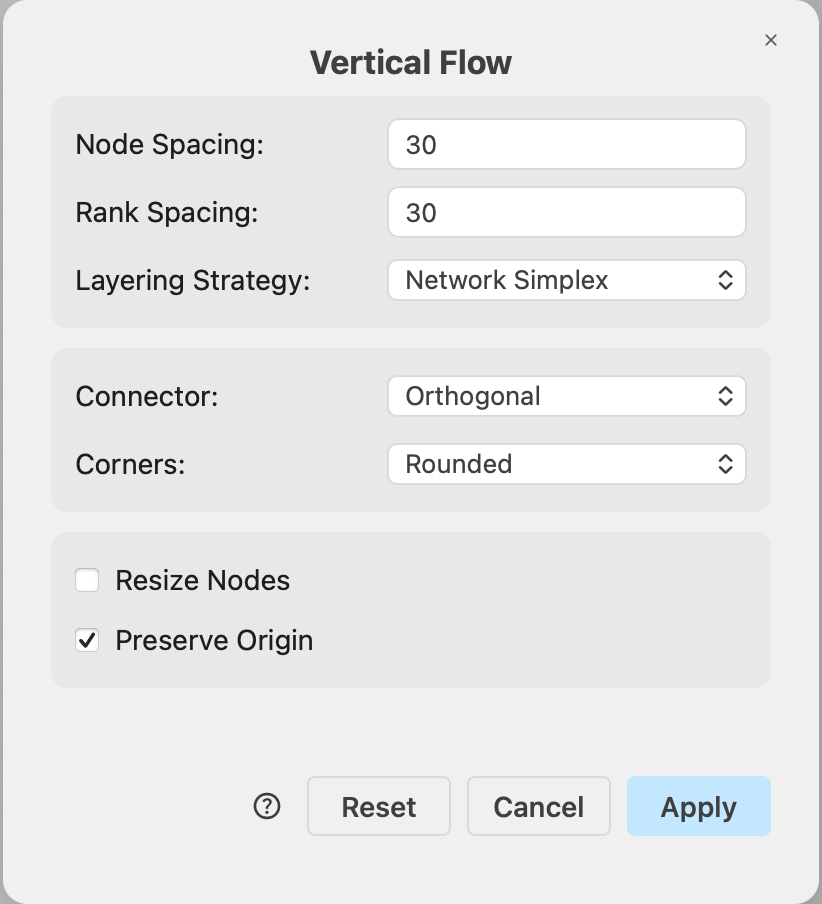
Change layout options​

In most of the preset layouts via the Arrange > Layout menu you can customise the spacing, direction and connector behaviour.

  1. Select Arrange > Layout from the menu, or click + > Layout in the toolbar, then choose the layout preset that suits your diagram best.
  2. Change the layout options if you need to, then click Apply.
    Rearrange your diagram quickly by applying a layout - select Arrange > Layout from the menu

The diagram will be automatically rearranged.

Rearrange your diagram quickly by applying a layout - select Arrange > Layout from the menu

Undo the automatic layout: If you don't like this auto-layout, click Undo in the toolbar or press Ctrl+Z/Cmd+Z to revert to the diagram before it was auto-arranged.

The Flow, Tree, Radial Tree, and Organic layout dialogs store their last-used values in your browser, separately for each layout that you have applied.

Reset defaults: Click Reset in the layout dialog to discard the stored values and reopen the dialog with that preset's defaults.

Use a custom layout​

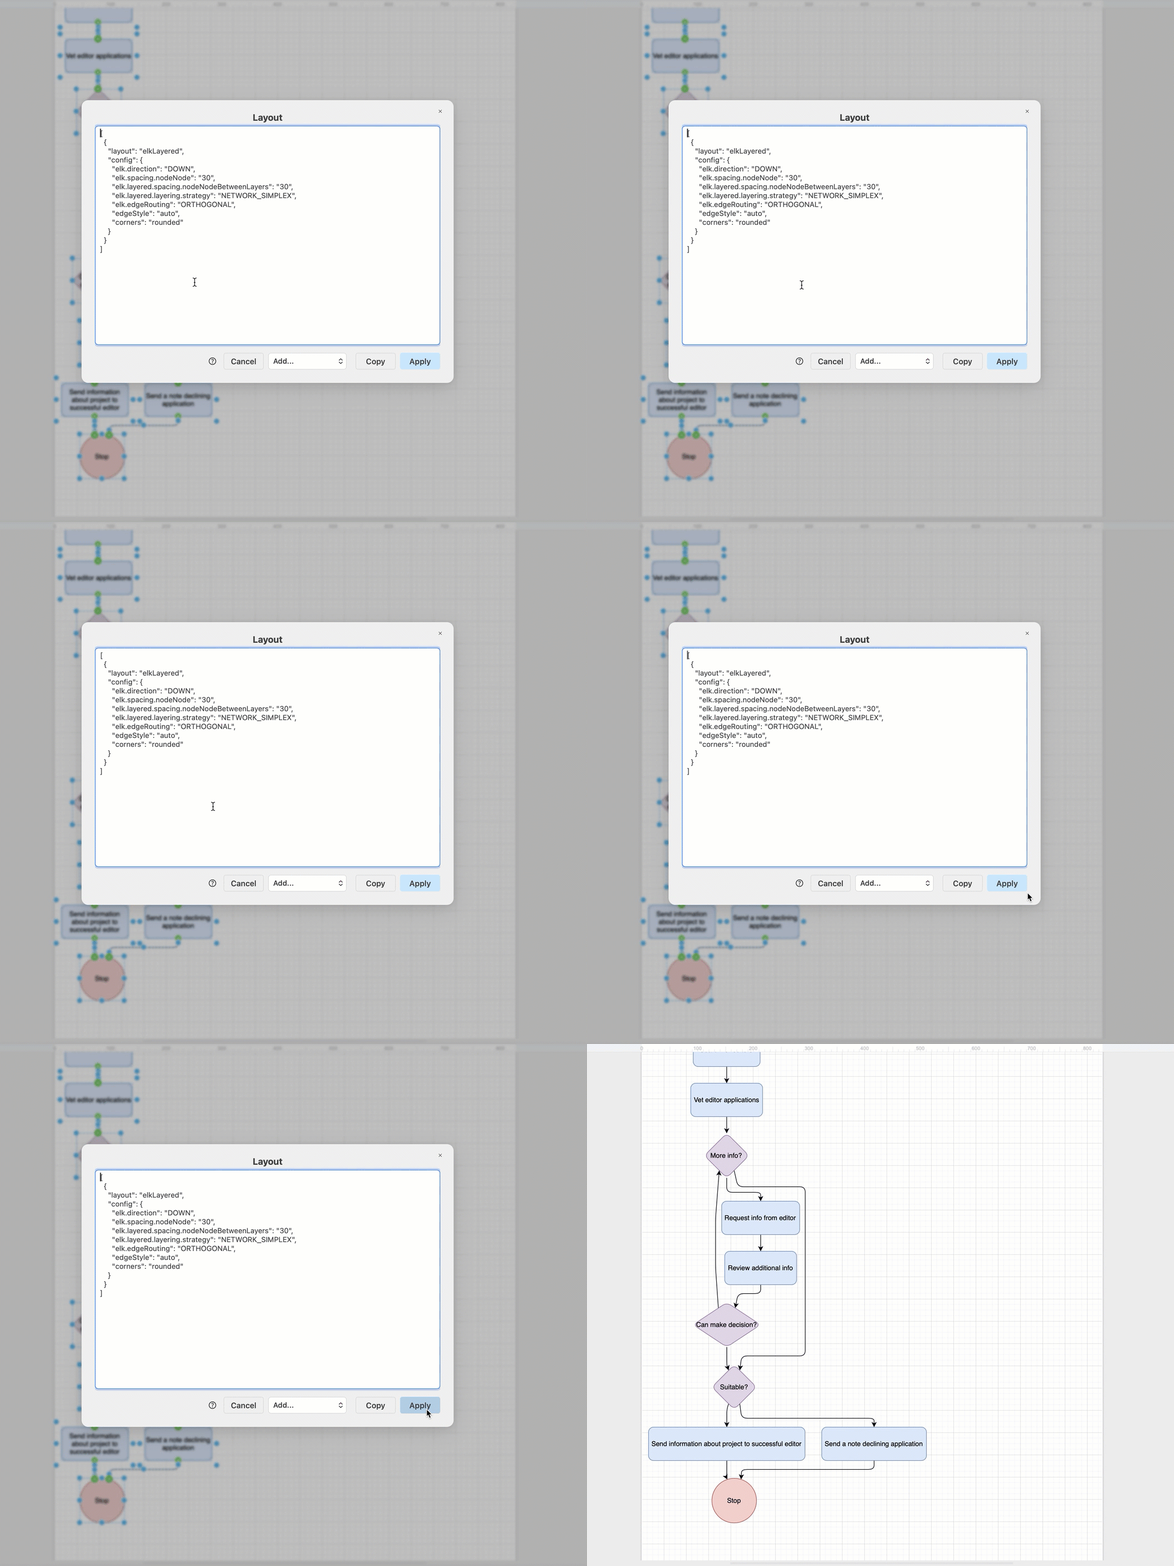
You can further customise the layout algorithm with JSON configuration options via Arrange > Layout > Custom in the draw.io menu, or + > Layout > Custom in the toolbar. Your custom configuration is appended to the JSON definition for that layout preset instead of running the preset immediately on your diagram.
Change the layout algorithm with custom JSON configuration code

Refer to the JSON layout specification for the full documentation of each layout preset.

Tip: This JSON layout specification can also be used to automatically layout imported diagram data from a CSV file.

Legacy layouts​

The legacy layouts are still available via the menu Arrange > Layouts > Legacy Layouts.

You can customise the ELK layout settings by entering a JSON configuration string.

These layout algorithms are also used in arranging the shapes inside the layout shapes from the Advanced shape library and layout containers. When you apply one of the diagram-wide layouts to one of these Advanced layout shapes or layout containers though, their internal elements will not be rearranged.
The Advanced shape library contains a number of automatic layout shapes surrounded by a swimlane shape

The draw.io app for Confluence Cloud transitions to Forge-only

· 4 min read

Atlassian has encouraged all Connect apps to transition to Forge where their modernised Forge architecture can provide increased data security, updated integrated tools and UIs and other useful features. Our hybrid Connect/Forge draw.io app is currently migrating to be fully Forge-only, allowing for enough time to troubleshoot before the first migration deadline in January 2026, should any problems arise.

You should see no difference in functionality - the diagram editor is not changing, and your existing diagrams and draw.io macros will not be changed through this transition.

No full-screen custom macro UI on Forge

We, like many other app developers, delayed moving draw.io to Forge as Atlassian has not yet implemented the full-screen custom UI dialog that is widely used by many Marketplace apps.

A reduced diagram editor size may impact productivity or cause distractions as it does not fully cover the page behind. Some have also reported related display issues with dialogs not appearing correctly on mobile devices in the Forge-only apps.

While we reported this issue back in November 2021, it is currently scheduled by Atlassian to be implemented in FY26Q2 (although, it is not yet included in the Connect-Forge capability equivalence roadmap).

The Forge-only draw.io app cannot run in full screen as Atlassian does not currently support full screen apps in their Forge UI suite - if this is an issue, please add a comment to Atlassian's FRGE-557 or ECO-195 bug reports

If full-screen diagramming or mobile diagramming is a priority for your teams, or if you are an app developer that is affected by this bug, please do comment on the original FRGE-557 issue and the more recent ECO-195 issue.

As soon as this issue has been implemented by Atlassian, the draw.io macros in your Confluence Cloud instance will once again work in full screen.

Updating your draw.io app​

Atlassian may choose to rollout these updated Forge-only apps automatically, or your administrator may need to manually update the draw.io app.

If your teams require the full-screen app functionality as described above, we recommend not updating the draw.io app until Atlassian has resolved this issue.

Note: No diagrams or macros will be removed from any pages in which they are used or edited in any way. There is no danger of losing data on this update.

Migrating from DC to Cloud?​

Atlassian has also recently announced the end of life for Data Center, with a three-year staged transition period starting in March 2026.

If you are migrating from Confluence DC to Cloud because of this, or to take advantage of the enhanced security features of Atlassian's modernised Forge architecture, migrate your draw.io diagrams in Confluence using the PageID method that preserves in-diagram links and embedded diagrams.

Which draw.io app for Confluence Cloud?​

The draw.io for Confluence Cloud app that is transitioning to Forge is available in two editions - Standard and Advanced. The diagramming features of these two editions are the same.

The Advanced edition of the draw.io app includes premium support, custom security reviews, and additional data security options.

The draw.io Zero Egress app is already Forge-only, and provides strict data security, ensuring no diagram data leaves your Confluence instance (zero egress). For customers with such strict data security requirements, Atlassian plans to offer a single tenant Isolated Cloud and their Atlassian Government Cloud. The draw.io Zero Egress app is designed to work with Atlassian's new secure Cloud offerings.

Read more about the differences between the draw.io apps for Confluence Cloud

Configure draw.io online to disable AI diagrams

· 4 min read

Like many software apps, diagramming tools now have AI-powered features that 'help' you diagram. These can be premium features and may not be easily disabled. With the free online draw.io editor, you have access to the diagram generation features by default. It's easy to disable this in draw.io - configure the editor or use the fully offline draw.io Desktop app.

All version of draw.io are highly configurable, with options for custom colours and fonts, and to enable or disable specific features

Note: Diagram generation features are disabled by default in the draw.io apps for Confluence - ask your instance administrator to configure the draw.io editor if you want to (and are allowed to) use this feature.

While draw.io only shares the text you enter as the query to generate a diagram, and only at the time of generation.

draw.io does not share your diagram data with these LLM tools unless you specifically request that the generator modify your diagram or a selection of your diagram (this behaviour can be customised or disabled in the draw.io configuration).

Note, other diagramming applications typically share your diagram data in full and by default with these generation tools, and do not allow you to customise or limit this behaviour.

If you need to include sensitive data or draw confidential diagrams, your diagramming application must not share your diagram data.

Use an offline tool like draw.io Desktop​

Since version 10.7.5, draw.io Desktop has been a fully offline application. You do not need a connection to the internet to use all the built-in shape libraries and templates, or use your own custom shape libraries, fonts or templates stored on your device.

Diagram generation features are not available in draw.io Desktop.

The draw.io desktop app works on MacOS, Windows and Linux

Choose your platform (Windows, macOS or Linux), and download draw.io Desktop to start diagramming securely and privately.

Tip: Many extra template and example diagrams are available in the JGraph/drawio-diagrams repository on GitHub. Download these in advance to use them in draw.io Desktop.

Configure the draw.io web application​

Alternatively, you can run the web app while offline as a progressive web app, or configure the editor in your browser to disable the diagram generation features.

All versions of the draw.io application are highly configurable, including but not limited to:

  • default palette colours and styles
  • default and custom fonts
  • custom templates and a customised template library
  • default and custom shape libraries to automatically open by default
  • default page and grid size

Here's a full list of the draw.io editor configuration options for the web application, draw.io Desktop, and the draw.io apps for Confluence Cloud and DC.

Only the online draw.io web application has the diagram generation enabled by default. To disable the diagram generation features, add a line to the editor configuration and refresh the tab to reload the draw.io editor.

Disable diagram generation in the draw.io configuration​

This removes the Generate tool from template library and menu, the Generate option from the search field, and the sparkle tool from the toolbar.

Note: Be careful about capitalisation - draw.io configuration options are written using lower camel case (Java).

  1. Select Extras > Configuration from the menu, or ... > Settings > Configuration from the toolbar.
    Access the draw.io configuration via Extras /> Configuration
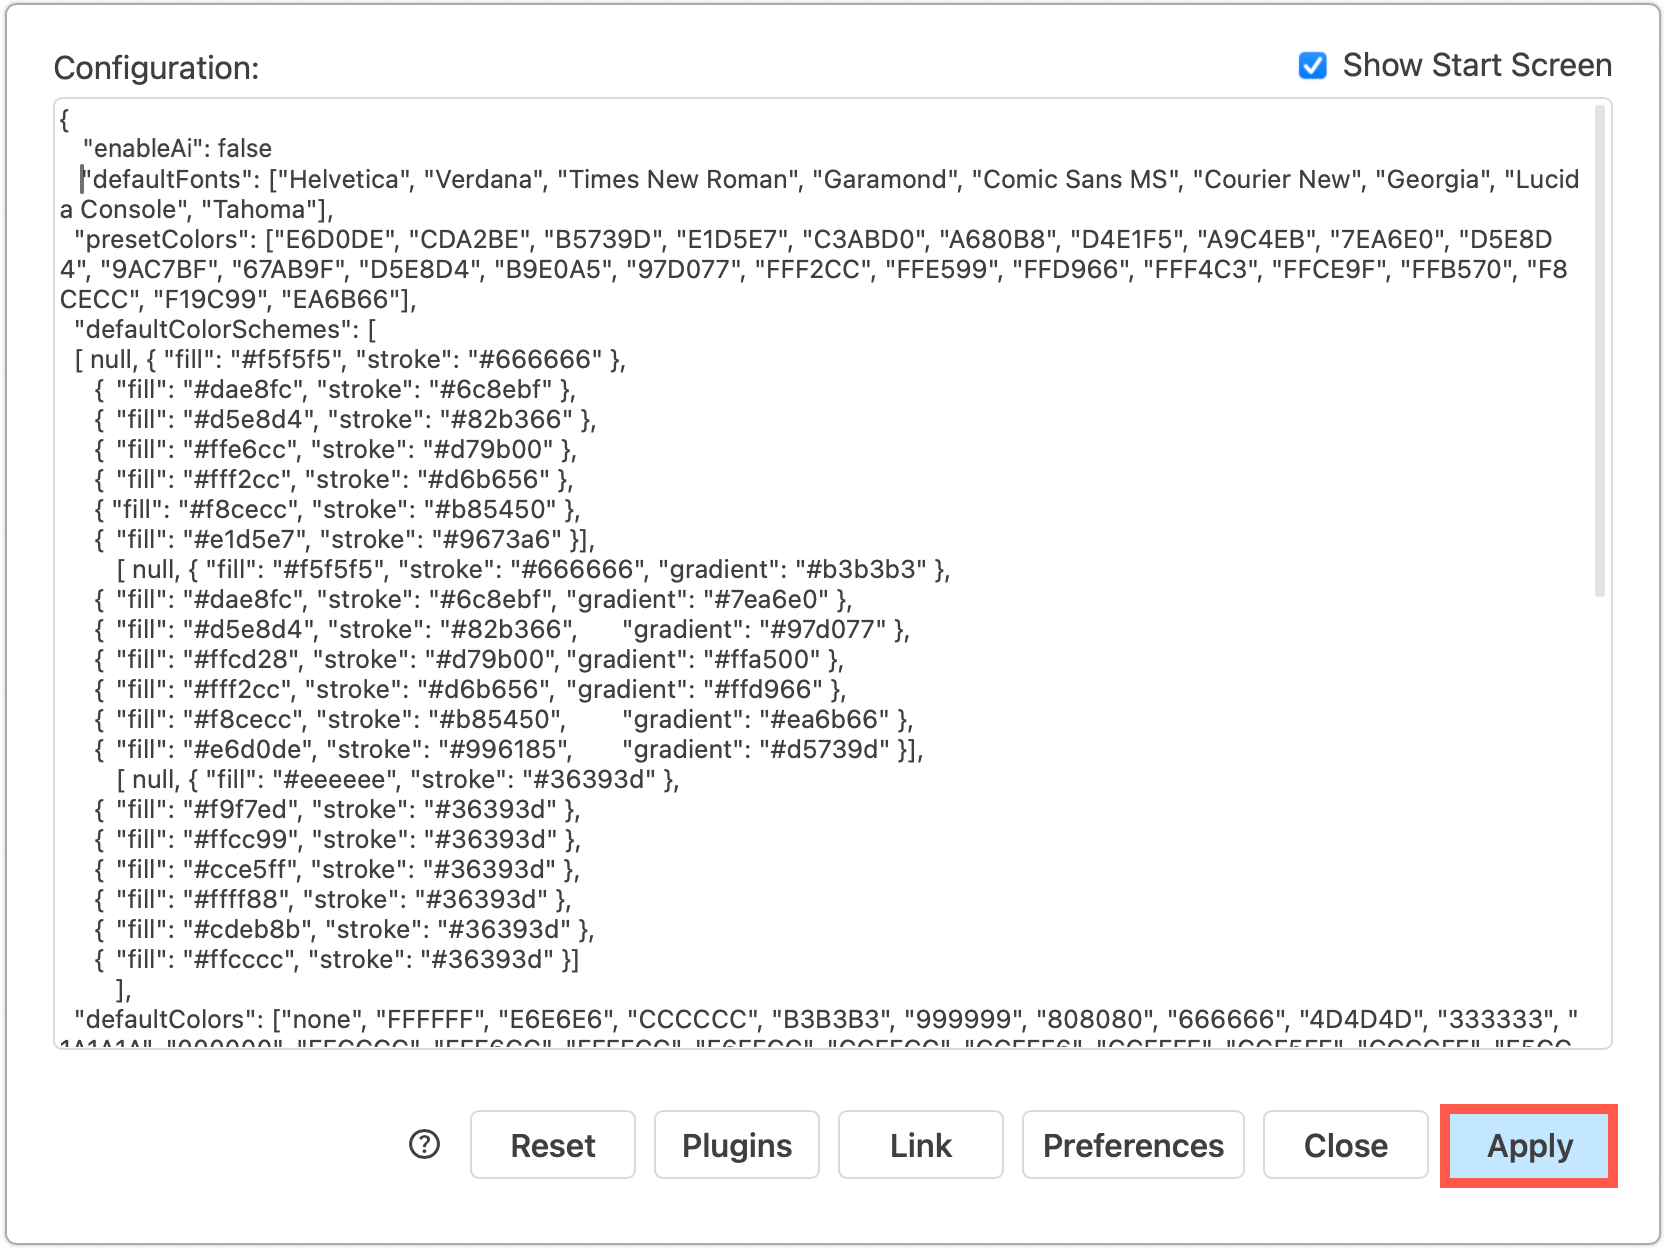
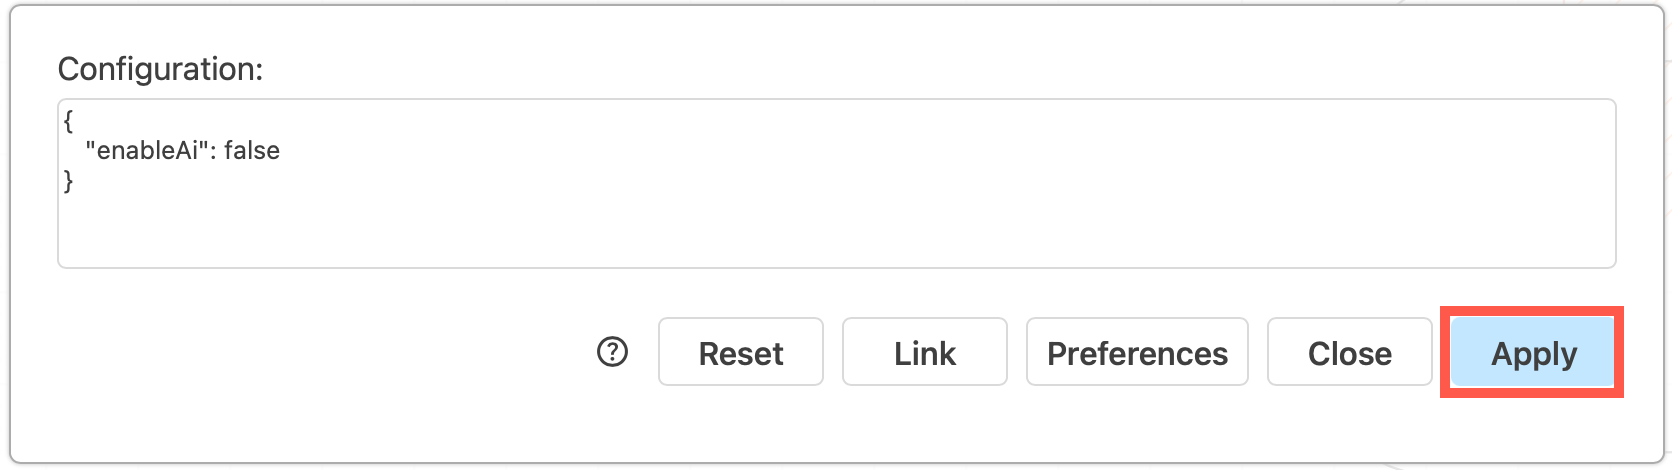
  2. Add the following JSON string to the configuration: "enableAi": false
    Set the enableAI option to false in the draw.io configuration to disable the Generate in the template library, the Generate menu and search options, and the sparkle tool
  3. Click Apply to save your changes. Reload the browser tab to load the new draw.io configuration and disable the diagram generation features.

Note: If you set the lockdown option to true in the draw.io configuration, this will also disable the diagram generation features.

A modern and streamlined interface for draw.io

· 4 min read

The draw.io editor is being freshened up to match the new Google Drive user interface with a modernised and streamlined user interface. All the drawing editor tools are in the same locations around the drawing canvas, so your workflow will not be disrupted.
The draw.io user interface has been modernised and streamlined, but all the editor tools are in their normal places - your workflow will not be disrupted

Edges and buttons have been rounded, fonts updated, colours softened, related menu items grouped together, and every aspect styled uniformly to match the current UI standards for modern web applications.

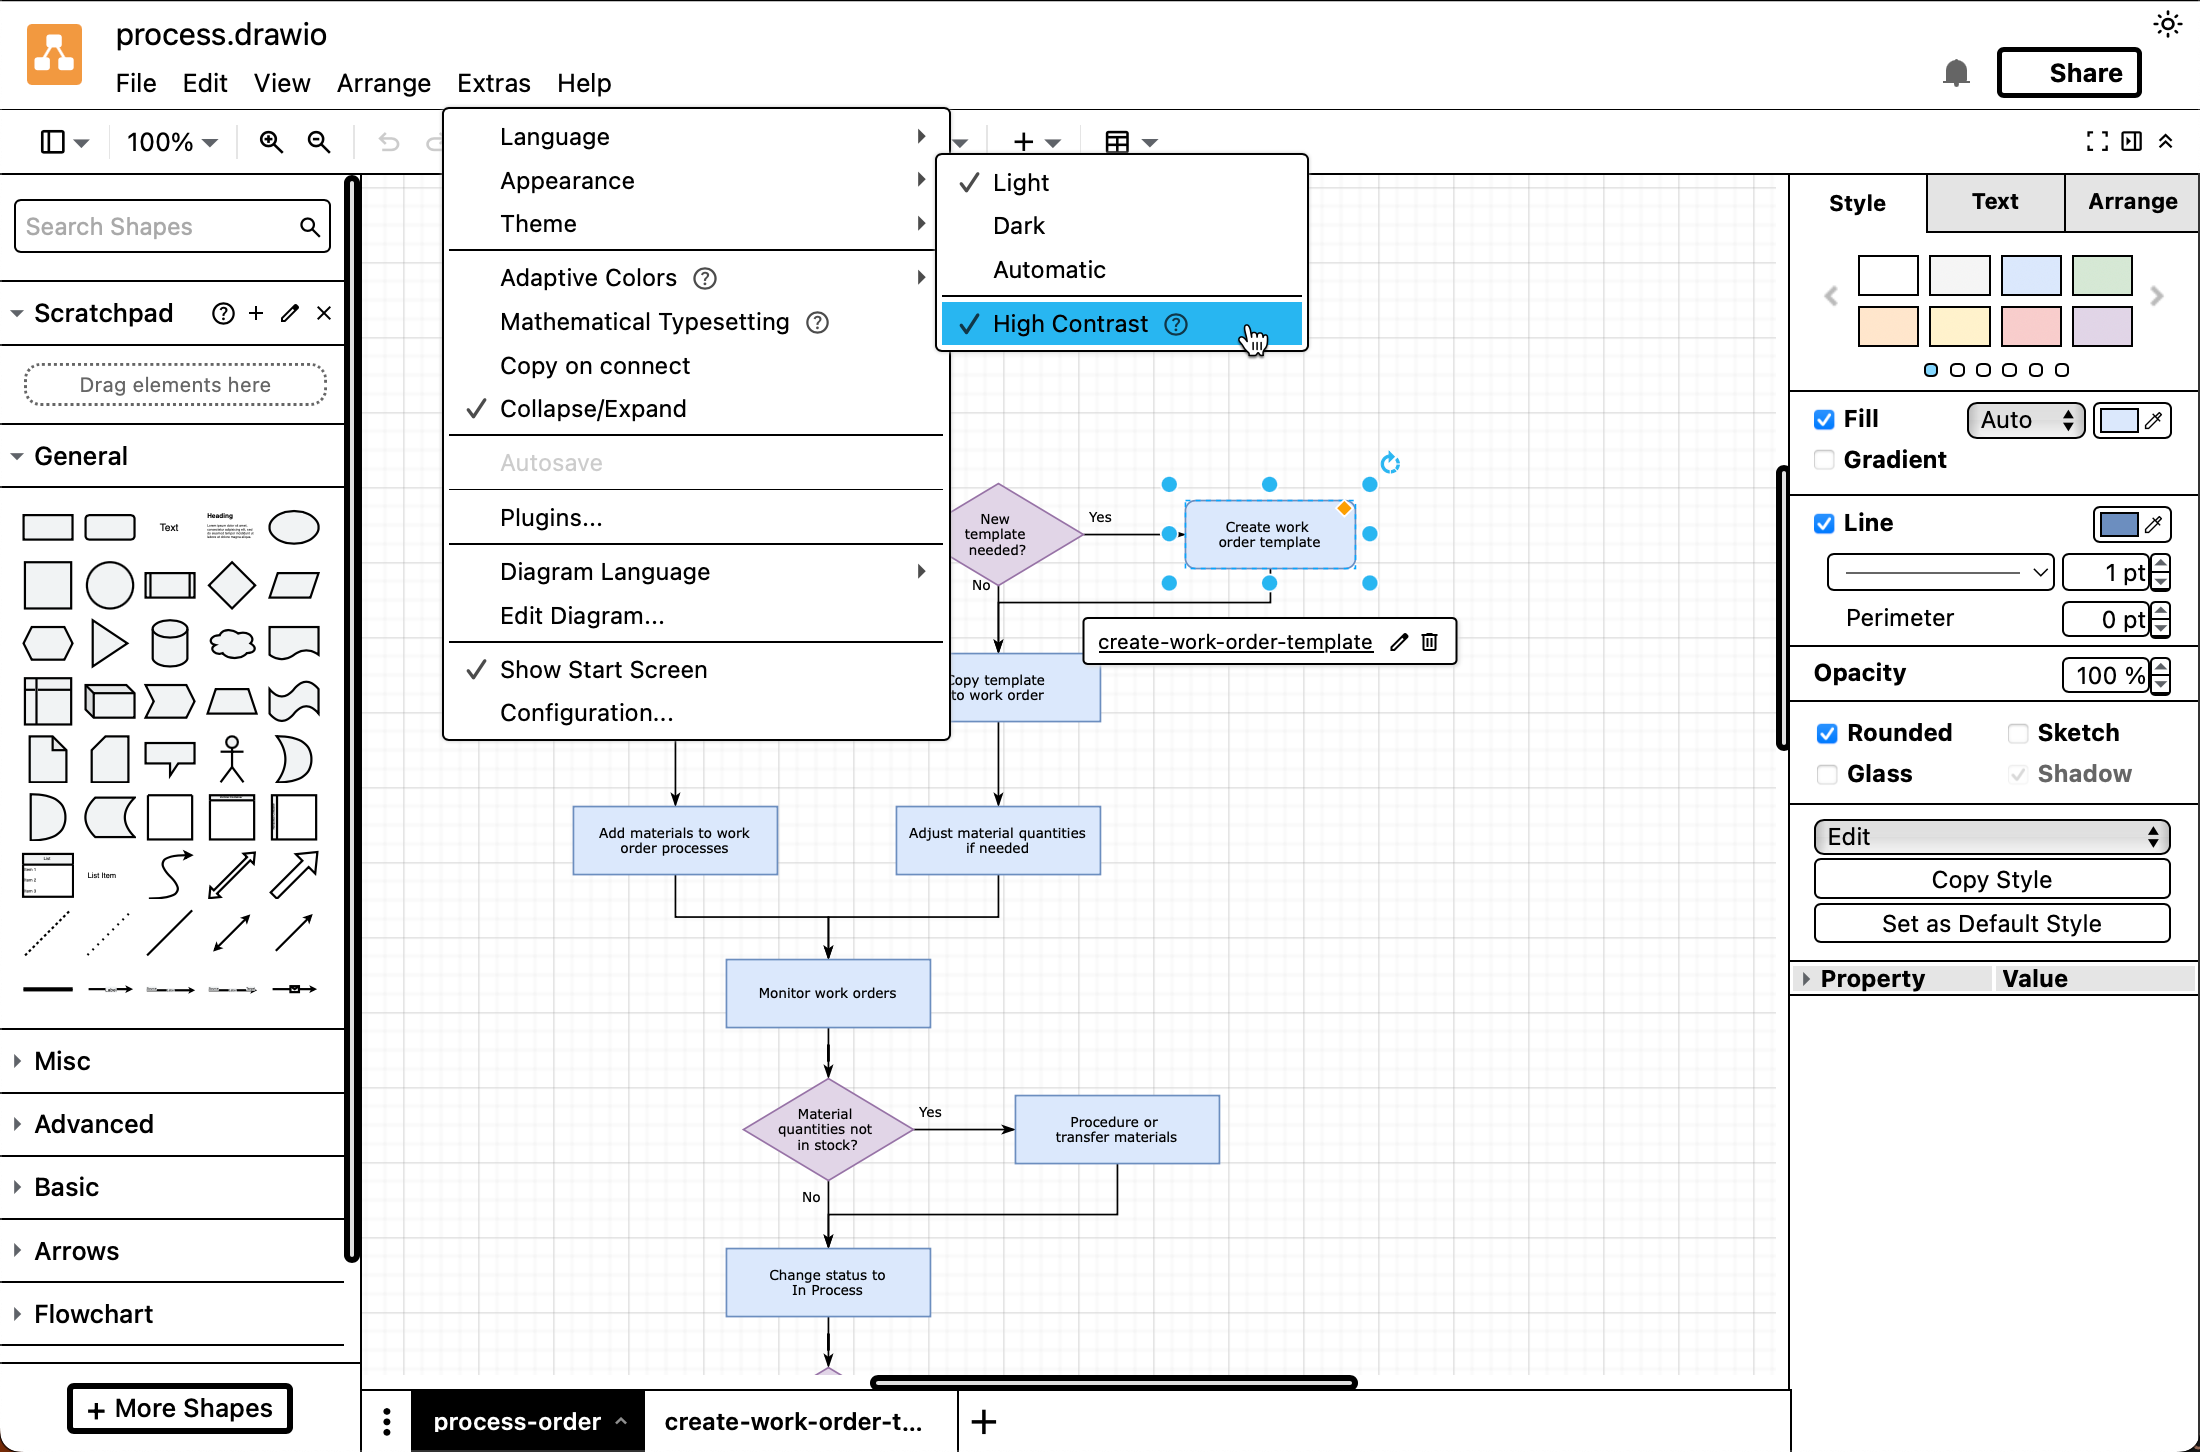
This new streamlined design with fewer obvious separators in the header, panels and tabs, and improved text and shape library contrast ensures the draw.io editor is easier to use in high-contrast mode, whether you prefer to work in dark or light mode.

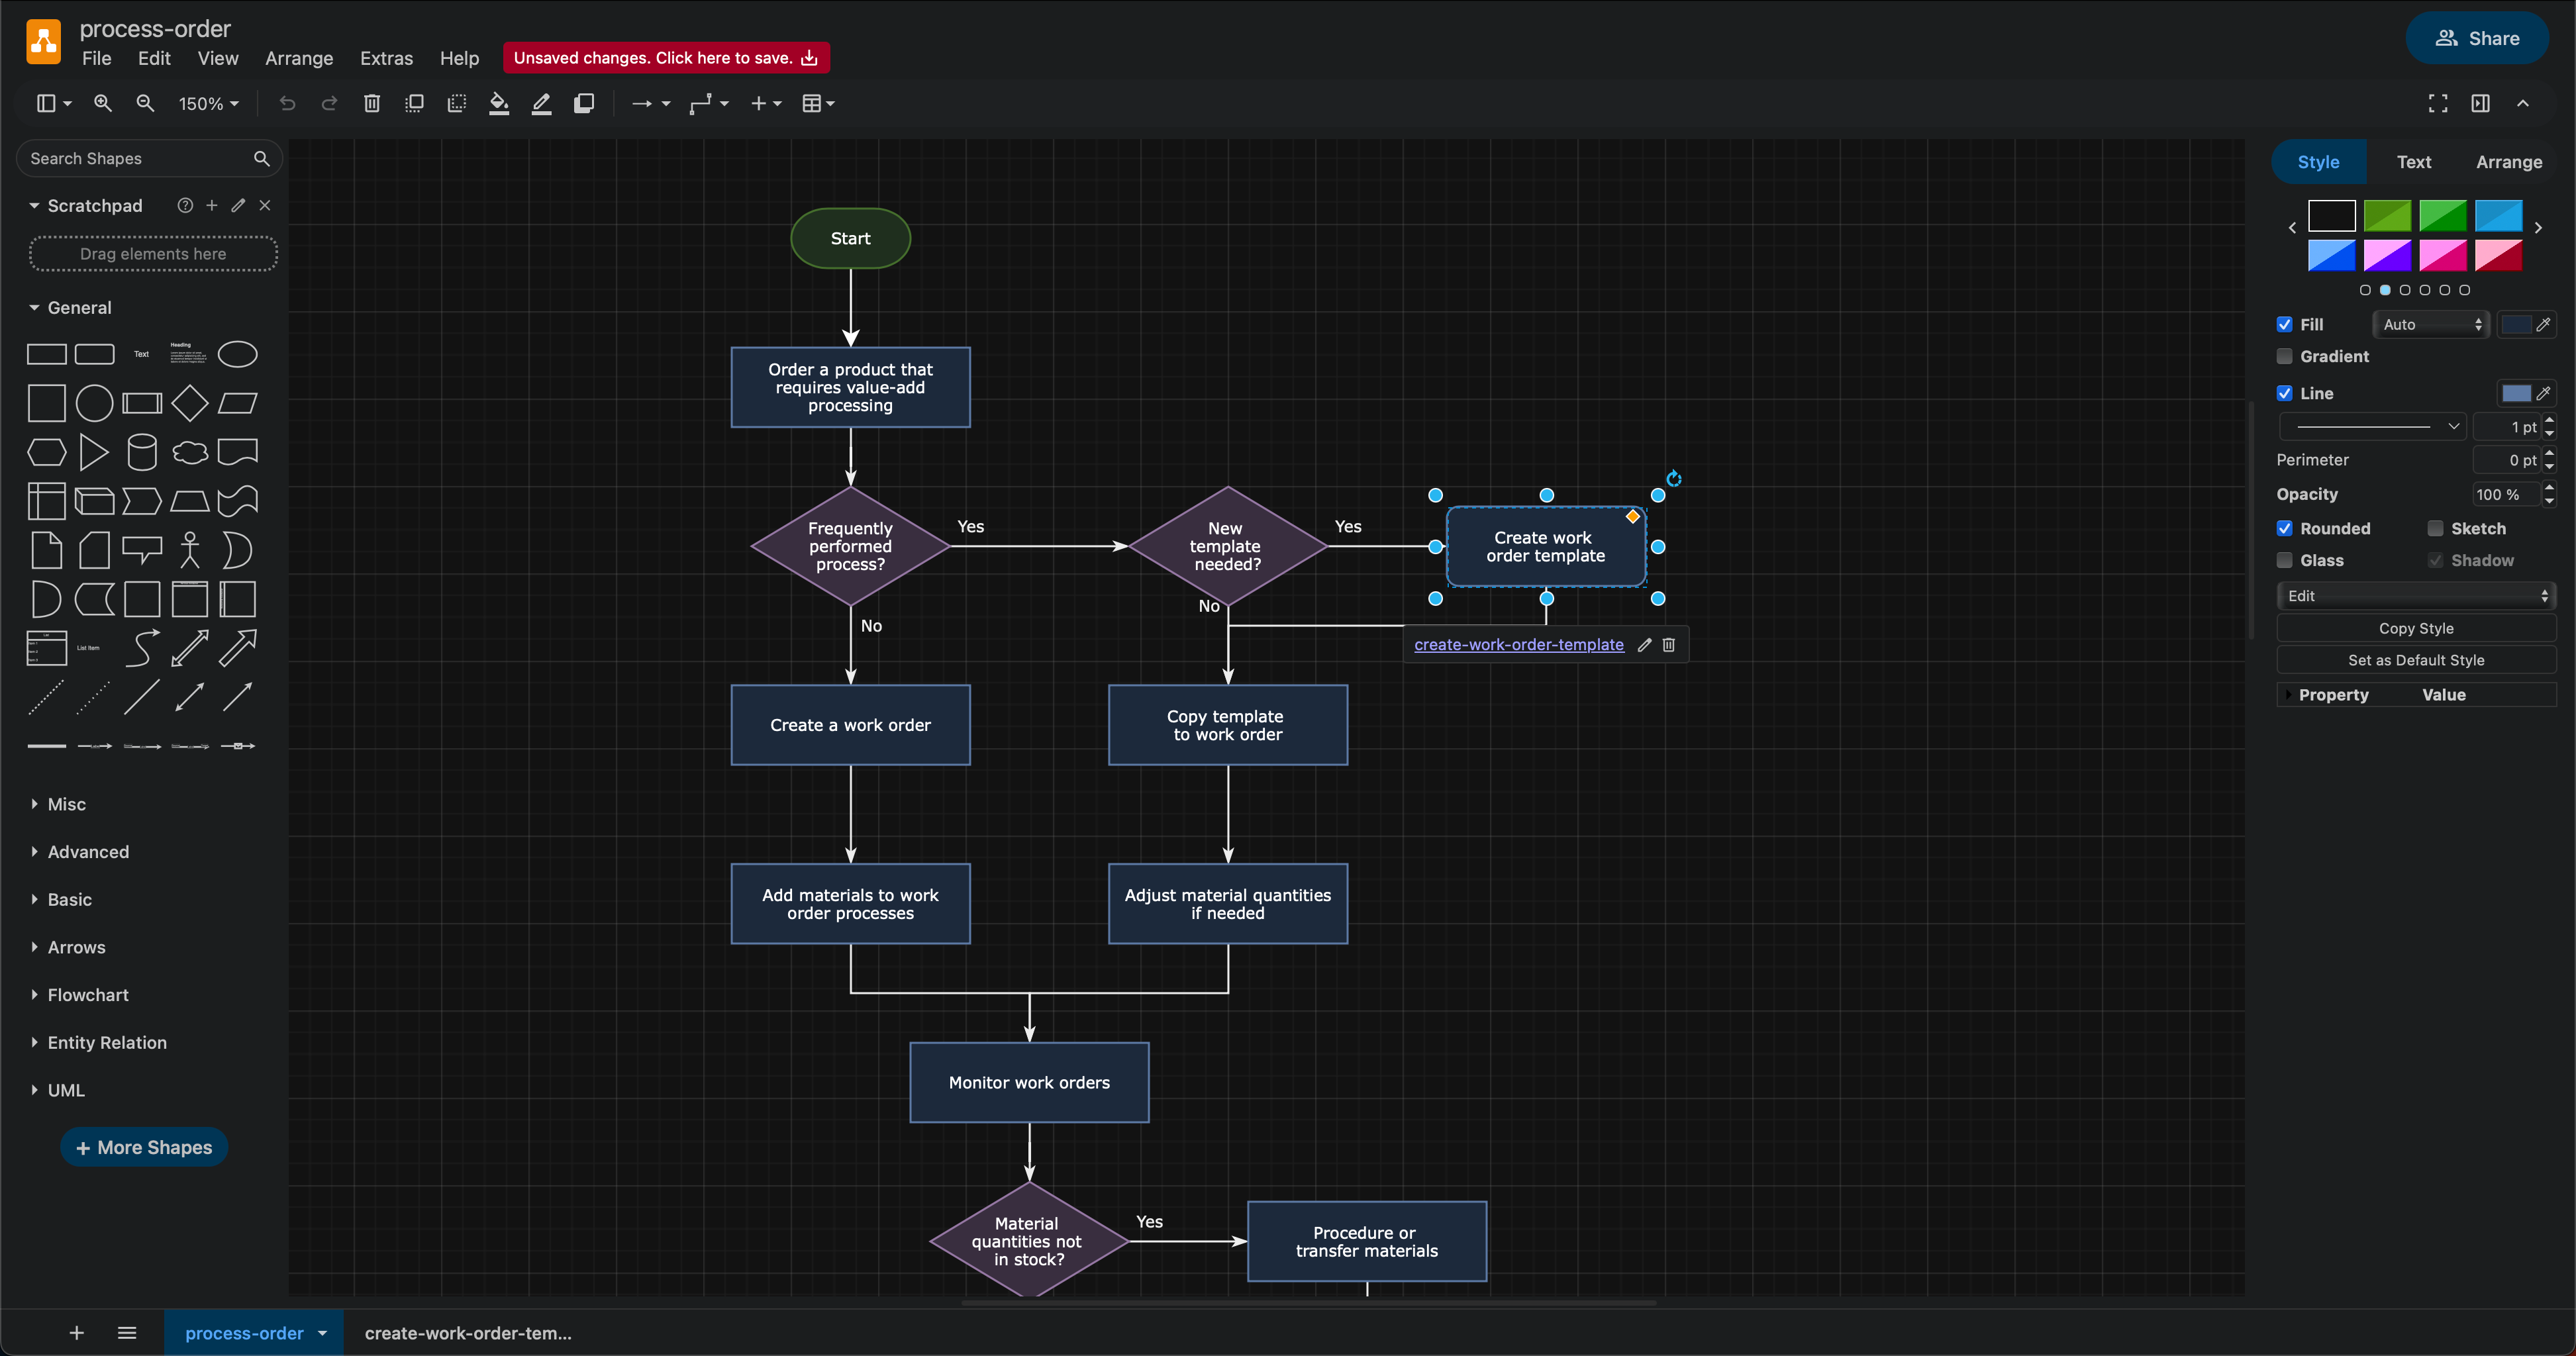
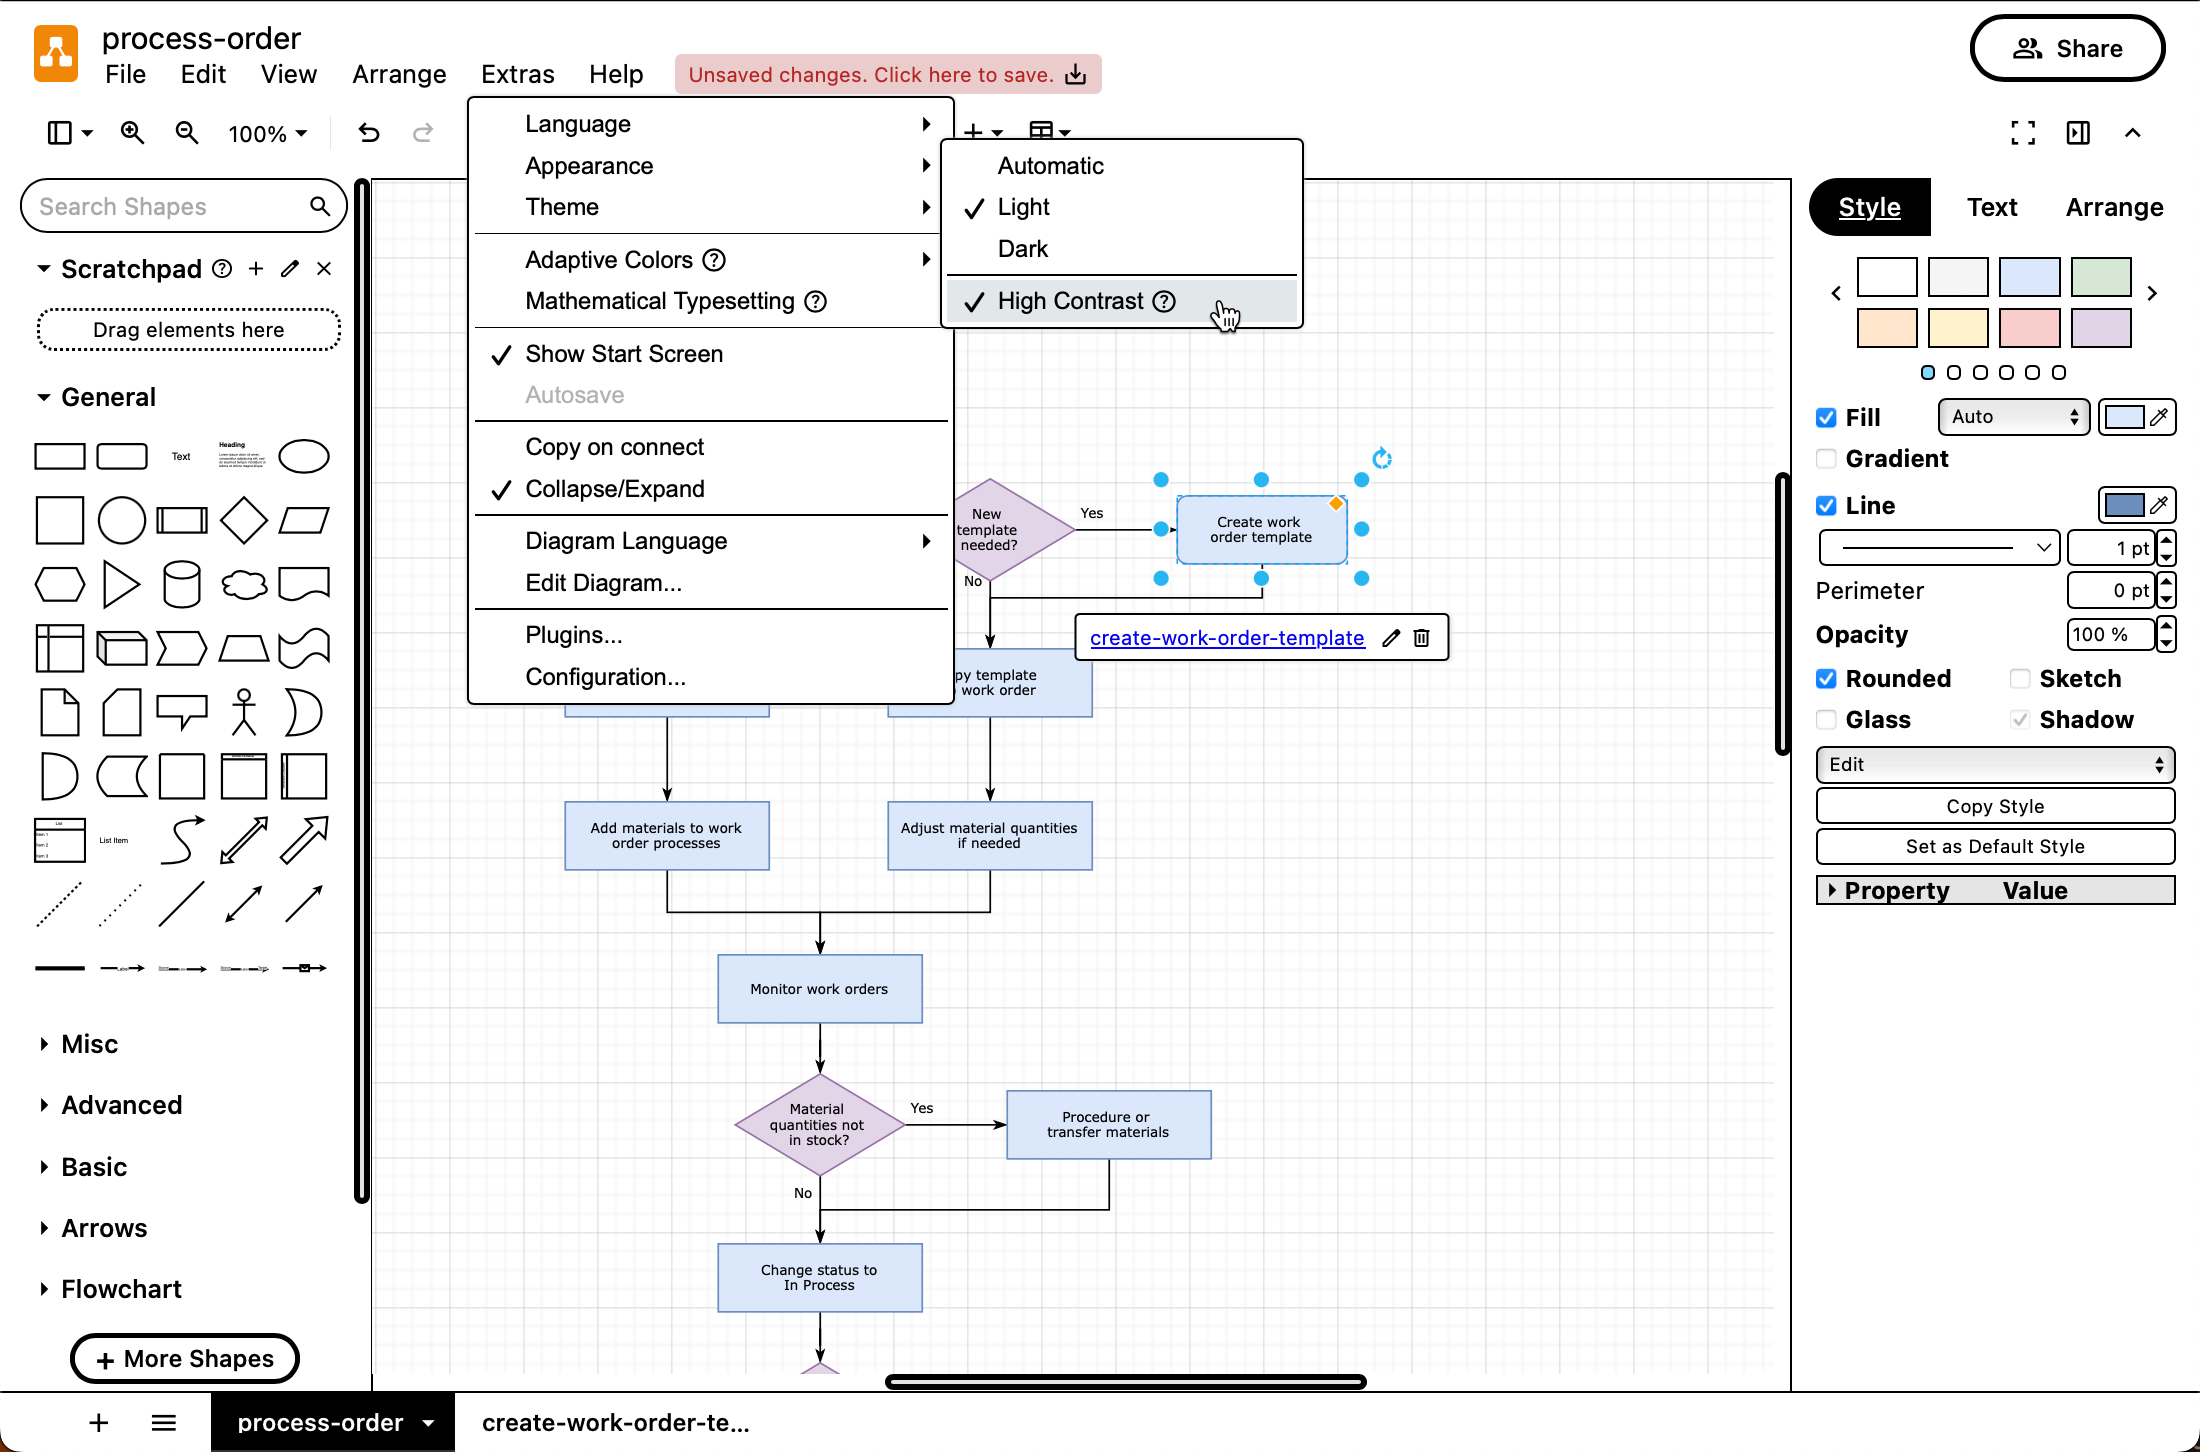
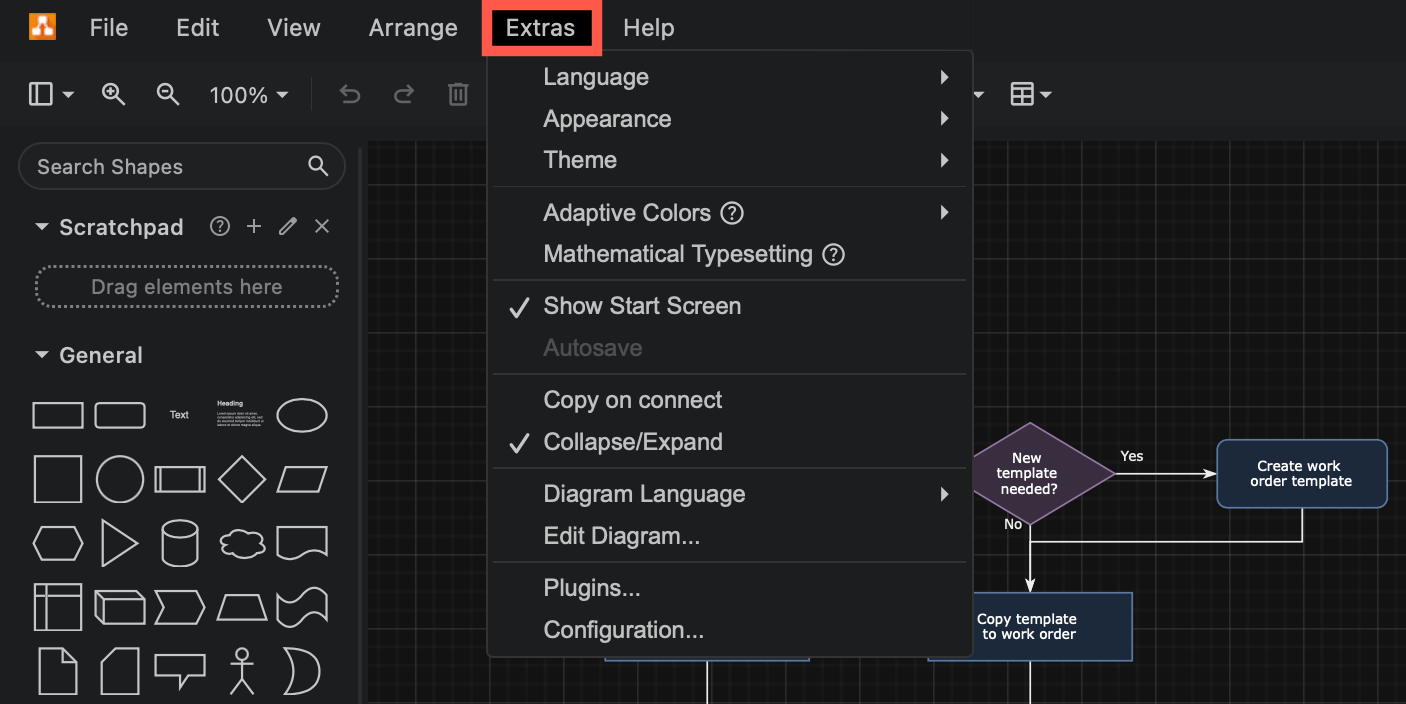
The draw.io user interface has been modernised and streamlined, but all the editor tools are in their normal places - your workflow will not be disrupted The draw.io user interface has been modernised and streamlined, but all the editor tools are in their normal places - your workflow will not be disrupted
The new user interface in the first image above has fewer distracting separating lines in high contrast mode. The older interface in the second image is more cluttered with superfluous separators.

It's not just a visual refresh - the buttons and controls in the draw.io user interface have been optimised to be more responsive, and the codebase has been reworked to improve the editor's efficiency, especially on mobile devices, and allow for future improvements and feature updates.

Switch between modes and editor themes​

Although the refreshed UI is easiest to see in Classic and Simple, the three other draw.io editor themes - Minimal, Sketch and Atlas - have also been updated with contrast improvements and modernised dialog elements.

The mode switch icon (sun/moon) for dark/light modes and the classic/simple editor layout that was previously in the top right of the editor has been moved into the menu for all themes.

  • Appearance submenu: automatic, dark, light and high contrast modes
  • Themes submenu: automatic, Classic, Simple, Minimal, Sketch, and Atlas themes

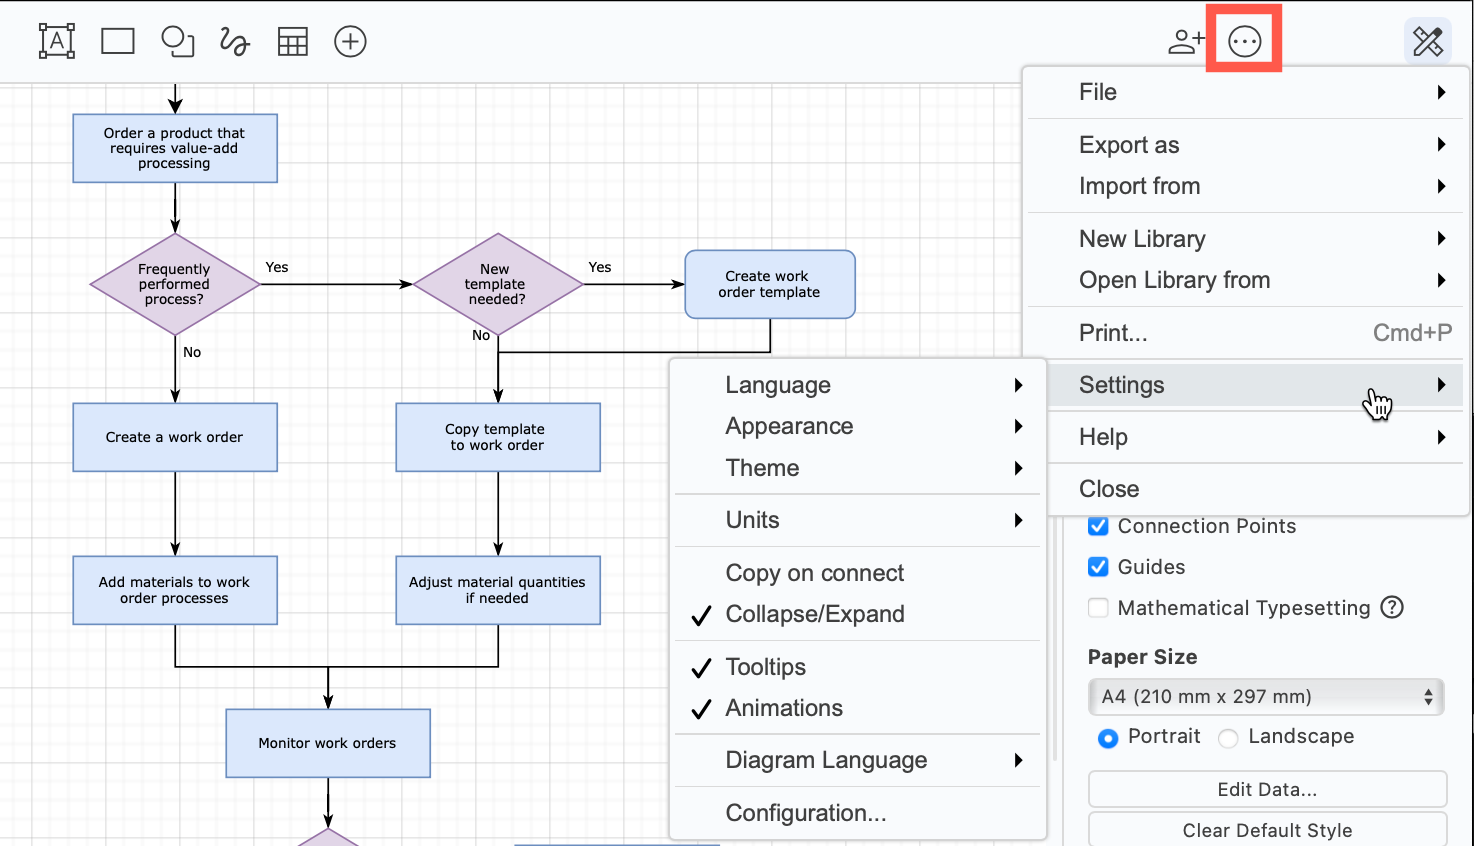
These submenus are accessed slightly differently in each editor theme.

Simple: Click ... in the toolbar and select Settings.
Click ... and select Settings to access the appearance and themes menu when using the Simple draw.io editor theme

Classic and Atlas: Select the Extras menu.
Click ... and select Settings to access the appearance and themes menu when using the Atlas or Classic draw.io editor themes

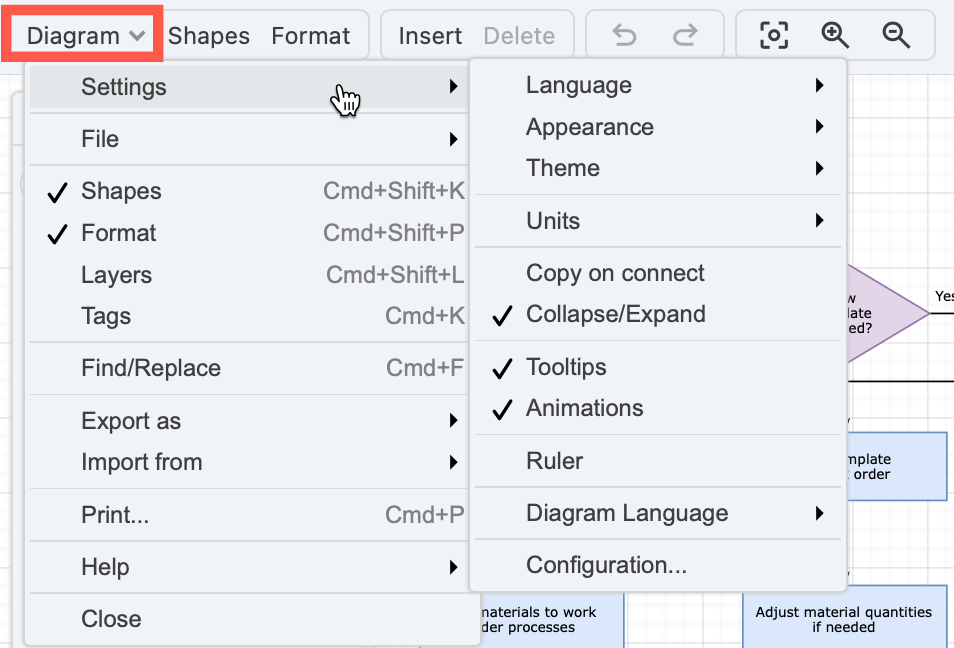
Minimal: Select Diagram > Settings from the toolbar.
Click ... and select Settings to access the appearance and themes menu when using the Minimal draw.io editor theme

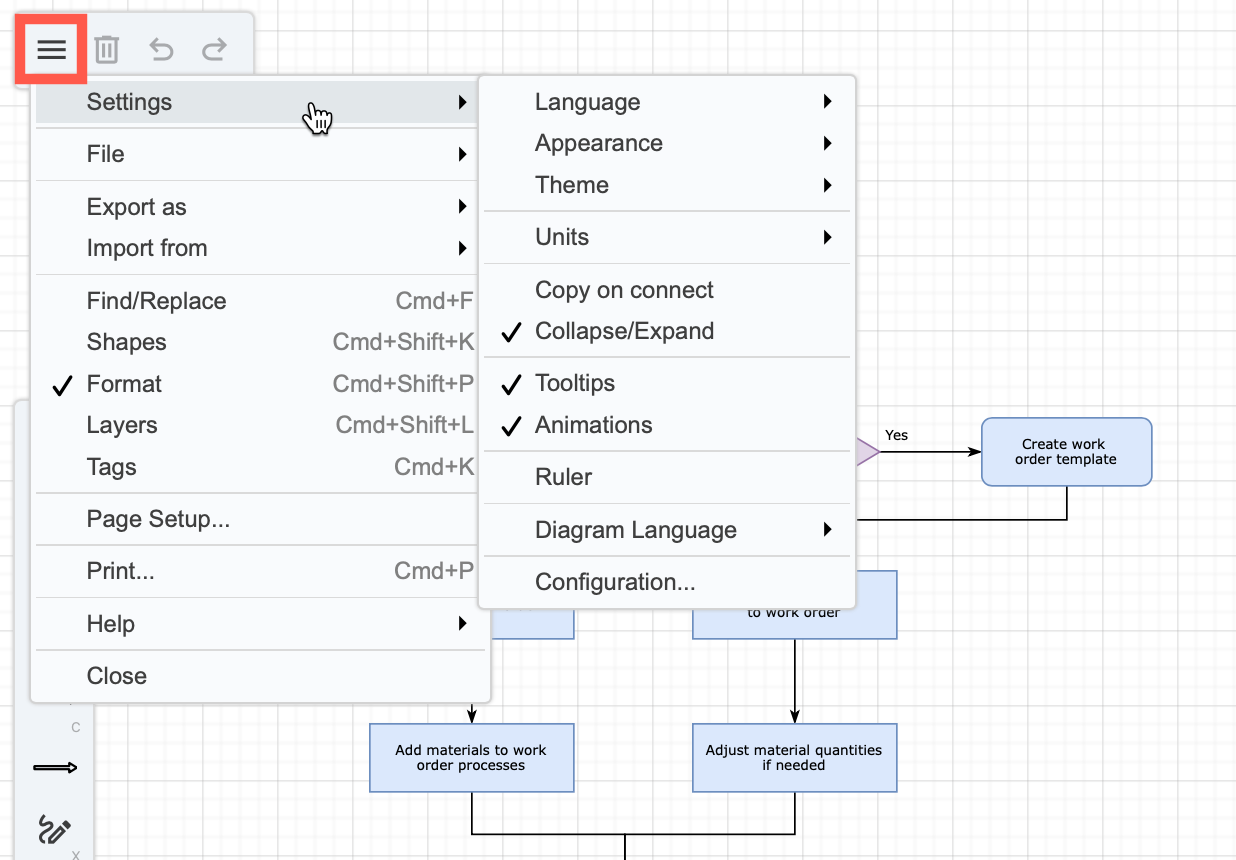
Sketch: Select the triple horizontal bar in the top left, then select Settings.
Click ... and select Settings to access the appearance and themes menu when using the Sketch draw.io editor theme

Work with multi-page diagrams​

In Atlas, Classic and Simple themes with the refreshed user interface, the + to add a new diagram page has moved to the bottom left of the editor.
The diagram page tools in the Minimal and Sketch editor themes are unaltered.

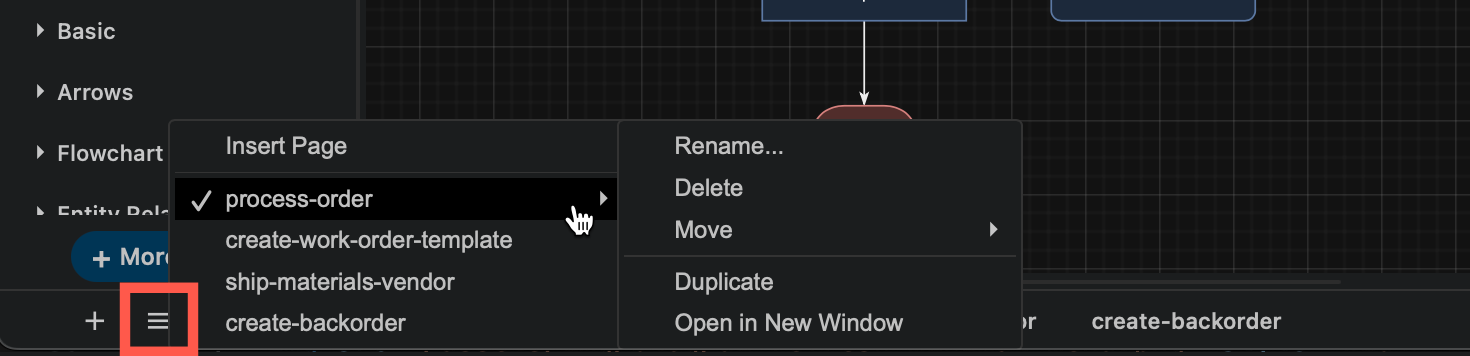
Click on the horizontal lines to see a list of all pages in the diagram (if there are too many to fit) and work with the current page directly, or right click on any page tab at the bottom of the editor to rename, duplicate, move and delete it.
Click on the + in the bottom left to add a new page, and the horizontal lines to see a list of all pages in your diagram

Learn more about working with multi-page diagrams in draw.io